

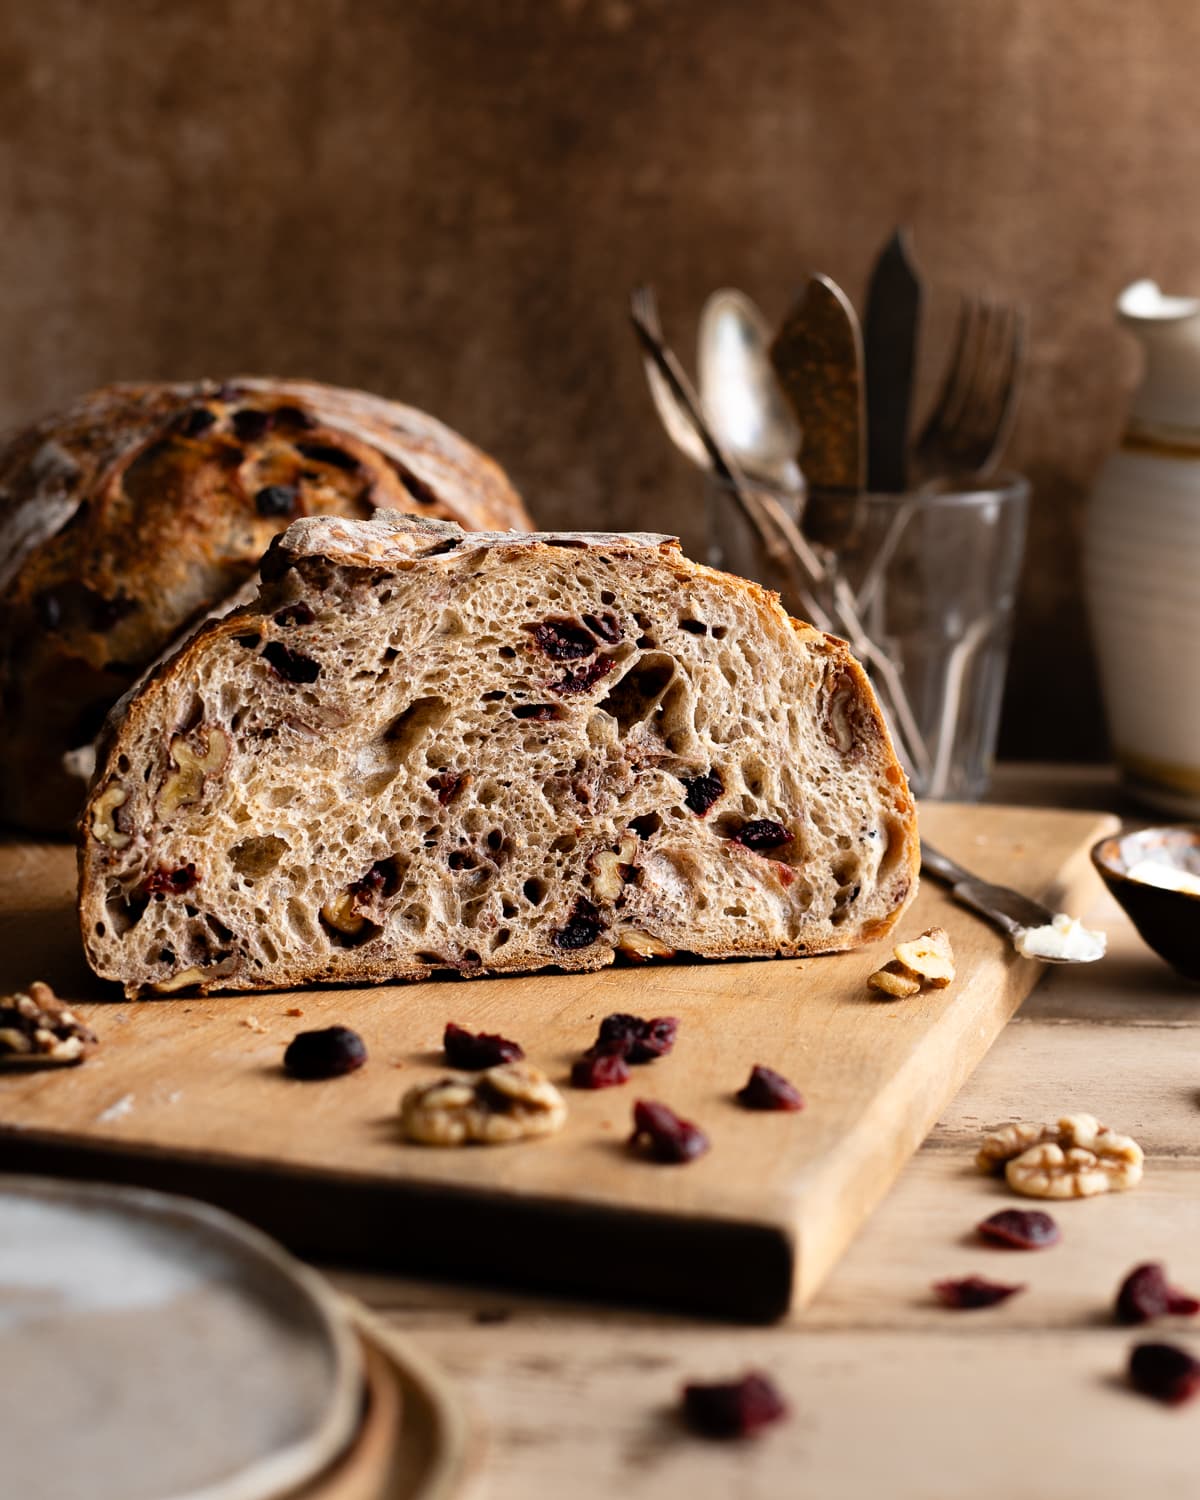
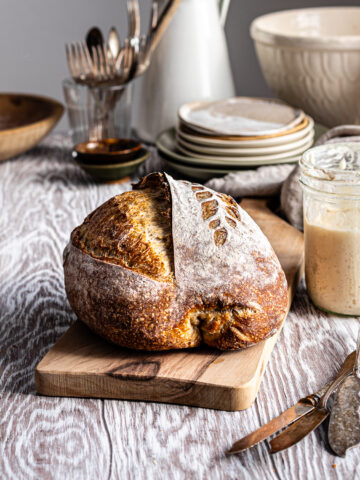
With a soft and airy crumb studded with cranberries and walnuts, you'll fall in love with this subtly sweet Cranberry Walnut Sourdough Bread. Whether toasted and slathered with homemade cultured butter or paired with chicken salad, this bread will elevate your sourdough baking routine to delicious new heights.
Jump to:
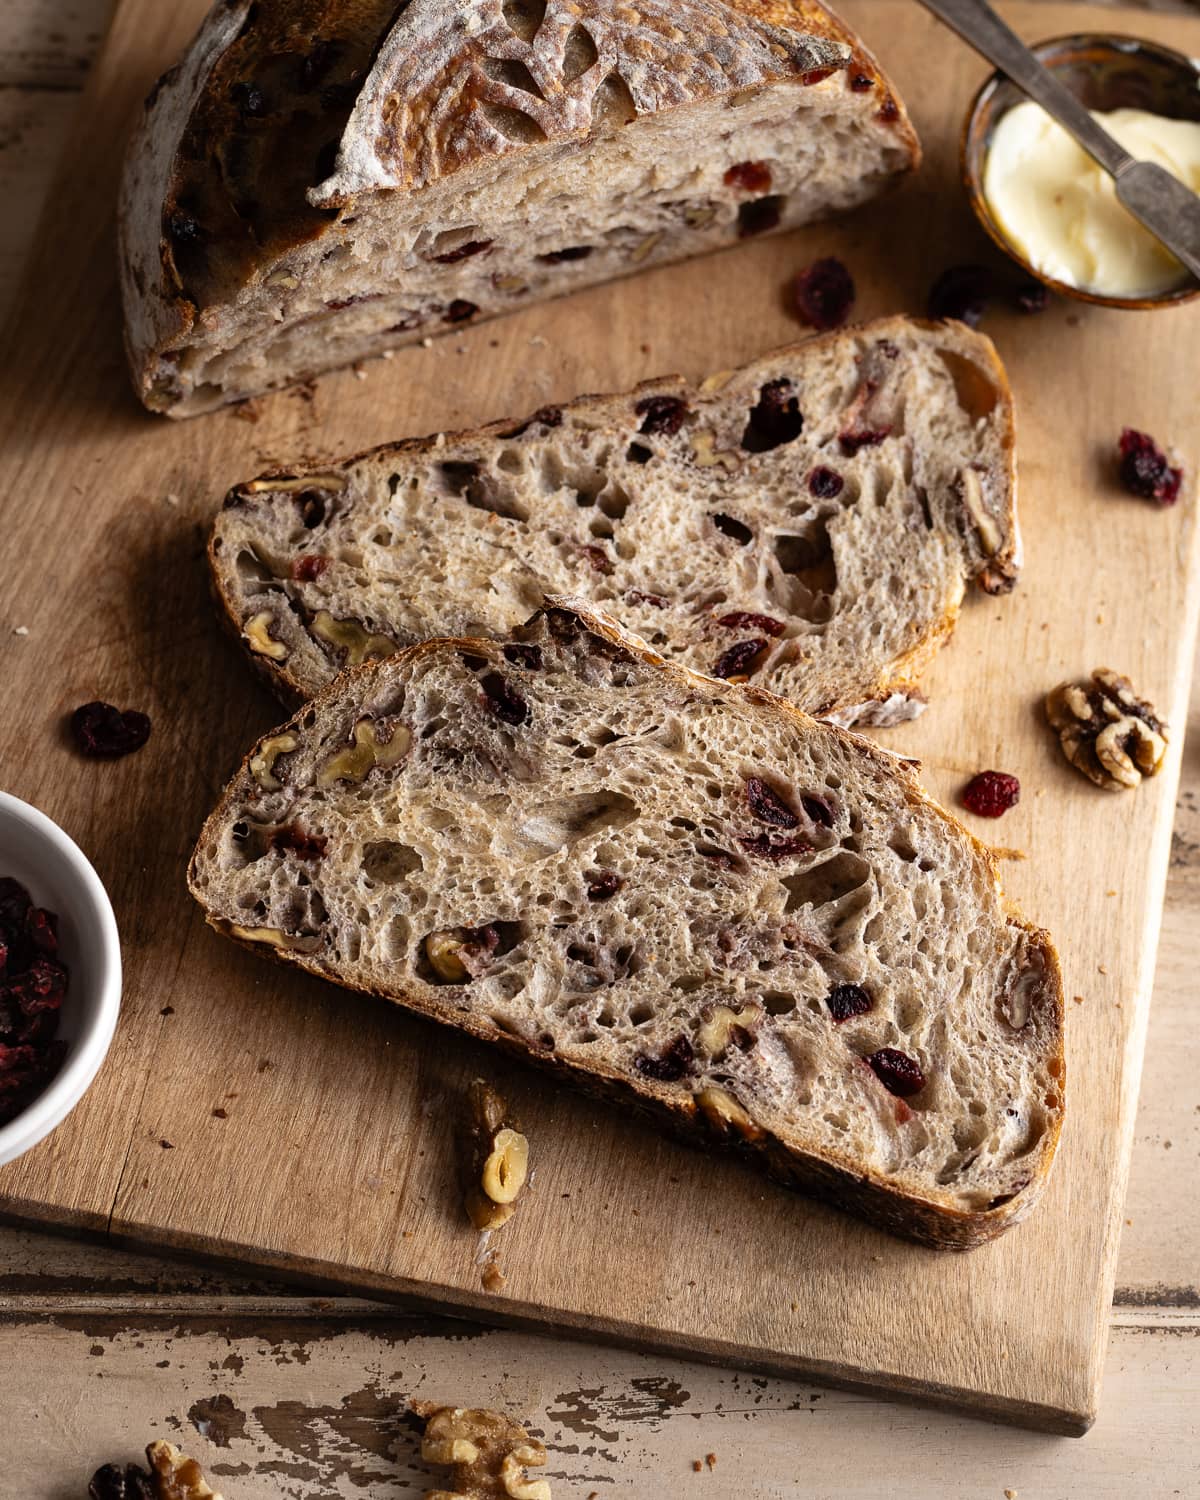
With the earthy walnuts and tart cranberries, the slightly sweet crumb, and the delicate, golden-brown crust, this loaf is a winter staple in our house. We love eating thick slices on their own or toasting them slathered with butter. Luckily, with dried cranberries and walnuts accessible throughout the year, you can whip up this loaf anytime the craving strikes.
5 Star Review ★
I absolutely love this recipe. I soak my cranberries overnight in red wine. So good. I added just a touch of walnut oil to my dough while doing stretch and folds. I have friends asking me for this recipe all the time.
Cheryl Licata
If you love cranberry recipes as much as I do, try my cranberry sourdough discard bagels and cranberry swirl scones.
Adding inclusions to bread
Although this loaf has been a household favorite for years, the main reason I'm only sharing the recipe now is I've had trouble with getting the cranberries and walnuts evenly distributed throughout the crumb in the past.
In my previous tests, I would add the mix-ins during lamination or I would mix it up all together with the flour. Both methods fell short, leading to an uneven distribution of the mix-ins, leaving several spots devoid of nuts or cranberries. In some instances, the crumb would be too dense or the mix-ins would break through the surface of the dough.
I realized I was overcomplicating the process! To keep the crumb light and airy, I incorporated autolyse which kickstarts gluten formation and helps prevent the cranberries and nuts from breaking through the dough. I also fold the fillings in early, followed by subsequent coil folds that evenly and gently distribute them throughout the dough.
What you need
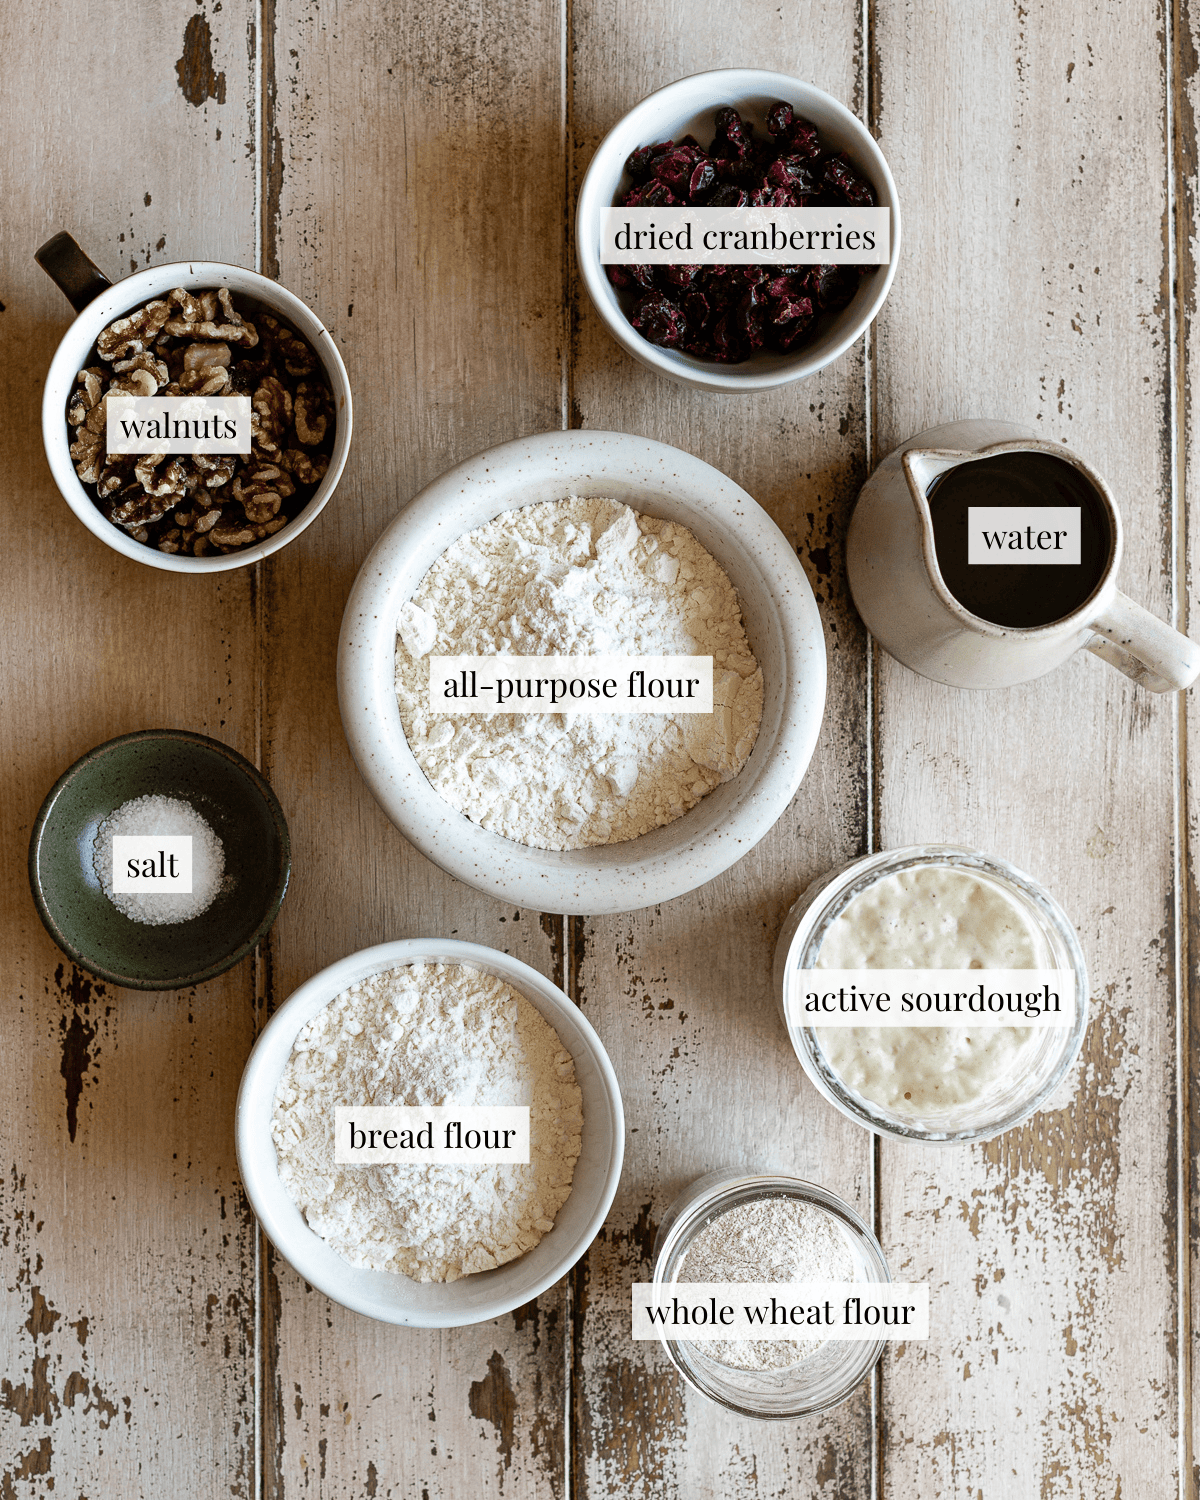
Flour: This recipe blends all-purpose flour, bread flour, and whole wheat to create the perfect balance of structure, texture, and flavor. Avoid using 100 percent whole wheat flour as it can result in a dense loaf. While 100 percent bread flour is an option, it may compromise the desired tender and creamy texture leading to excessively chewy bread.
Active sourdough starter: You'll need a mature, active bubbly starter for this recipe. Feed your starter the night before or at least 4 hours before you make your dough. Test your sourdough starter for readiness before attempting to bake this bread.
Dried cranberries: Both sweetened or unsweetened cranberries will work for this recipe. Don't skip soaking as dried fruit has a tendency to absorb water from the dough potentially resulting in a tough, dry loaf.
Walnuts: Toasting your walnuts will intensify their nutty flavor. Feel free to substitute pecans.
Variations
- Pecans are a great alternative for walnuts in this recipe.
- Substitute Raisins, dried cherries or blueberries for the cranberries.
- Add orange or lemon zest to the dough.
- Soak the cranberries in Port Wine or Bourbon to add more flavor.
- Add some chocolate chips for a sweeter variation.
Step-by-step instructions (with photos)
Baking this sourdough cranberry bread is a two-day process, with most of the steps being passive. Make sure you read the instructions from start to finish before starting the recipe.
Prep Ingredients and Autolyse
Activate sourdough starter, toast walnuts and soak cranberries (image 1). Mix flours and water, autolyse for 30 minutes (image 2).
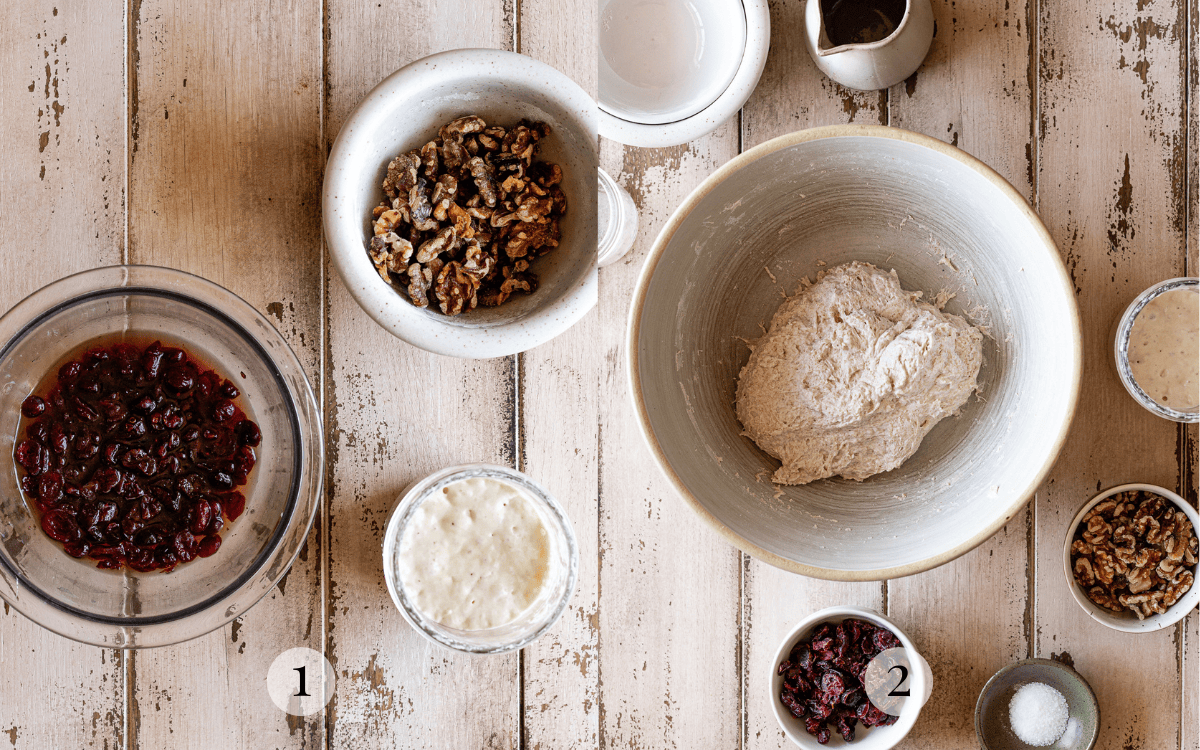
Autolyse kickstarts gluten development, making dough stronger with minimal effort, so it won't tear when the mix-ins are added. Check out my post on how to autolyse sourdough to find out more.
Make the dough
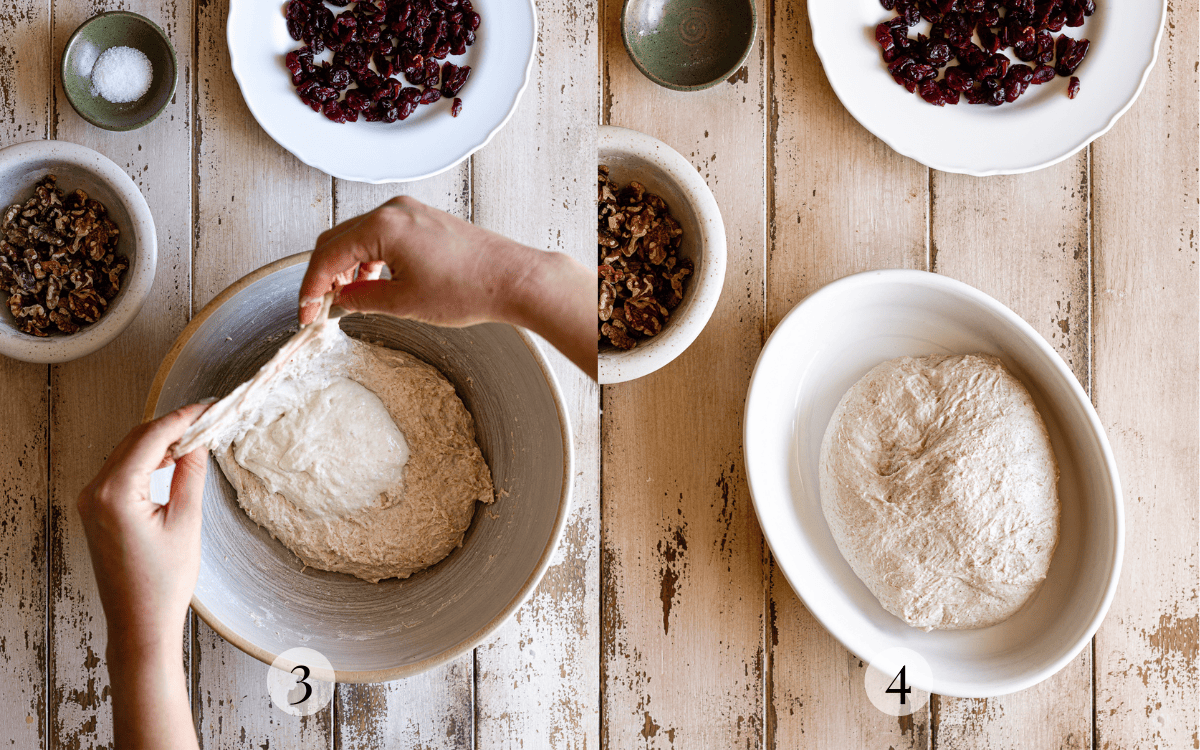
Fold the sourdough starter and salt into the autolysed dough (image 3). Continue mixing until the starter and salt are completely incorporated, transfer the dough to a clean, lightly oiled container (image 4). Cover and let the dough rest for 30 minutes.
Add mix-ins
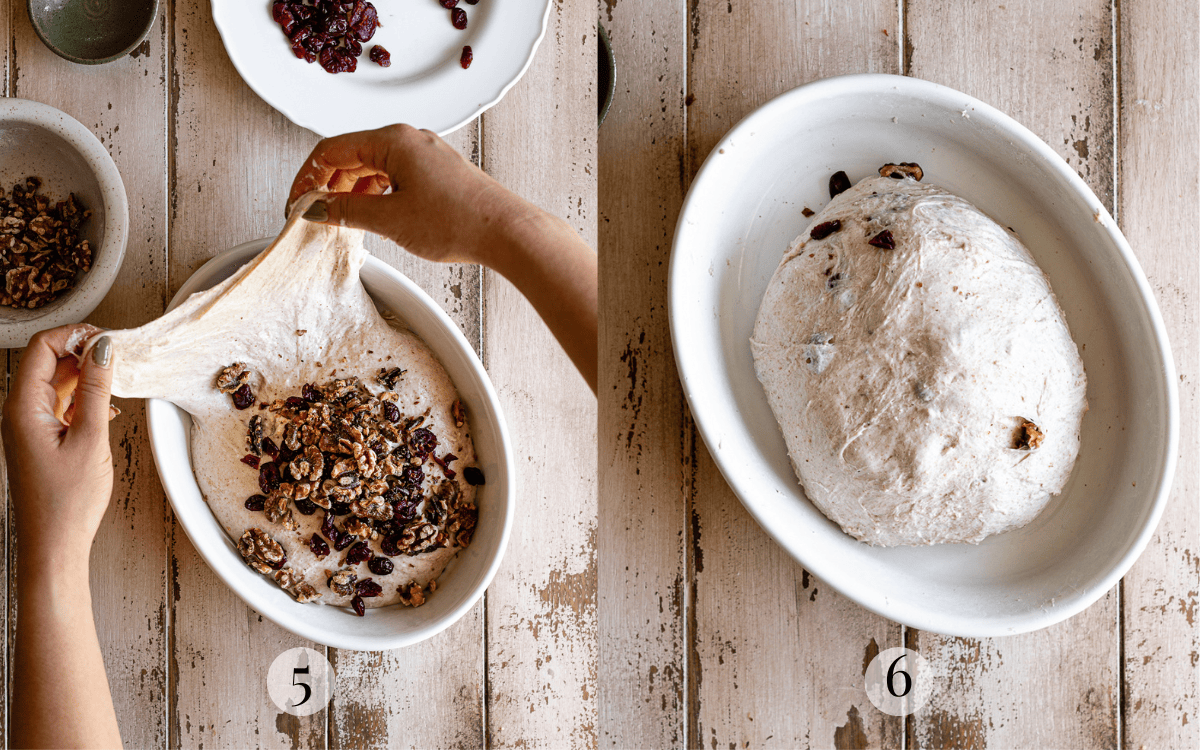
Add half of the mix-ins to the top of the dough. Pick up the edge farthest away from you and fold it over the mix-ins (image 5). Turn the container 90 degrees, add in the remaining mix-ins and fold the dough over once more. Gather the dough into a ball and let the dough rest for another 30 minutes (image 6).
Perform the coil folds
Lift the dough using your fingertips until the ends release from the container (image 7). Lightly set the dough back down into the bowl and tuck the ends under (image 8). Cover and let the dough rest for 30 mins.
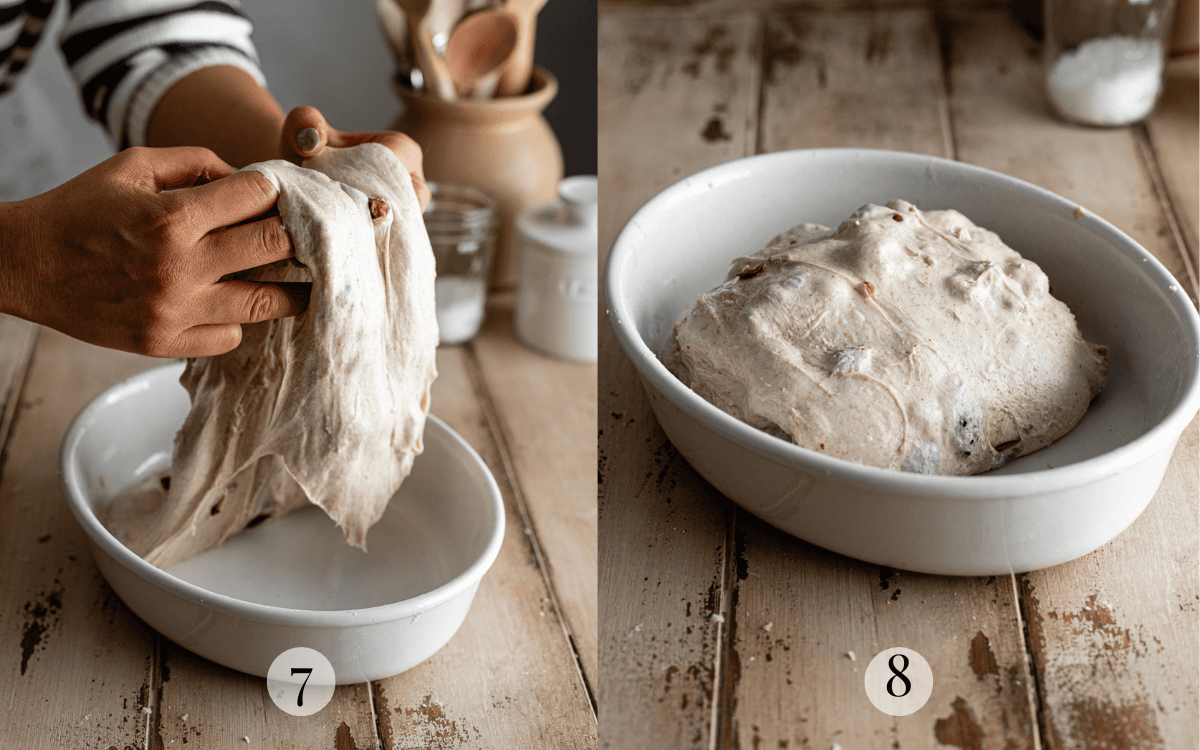
Coil folds are a gentler way to enhance gluten development and prevent the dough from tearing while evenly distributing the filling throughout the dough.
You'll perform these folds during bulk fermentation.To strengthen the dough, you'll perform 3 sets of folds in 30-minute intervals.
Here's an example of how you might complete your folds:
(9:00 a.m.) Coil fold 1
30-minute rest
(9:30 a.m.) Coil fold 2
30-minute rest
(10:00 a.m.) Coil fold 3
Shape your loaf
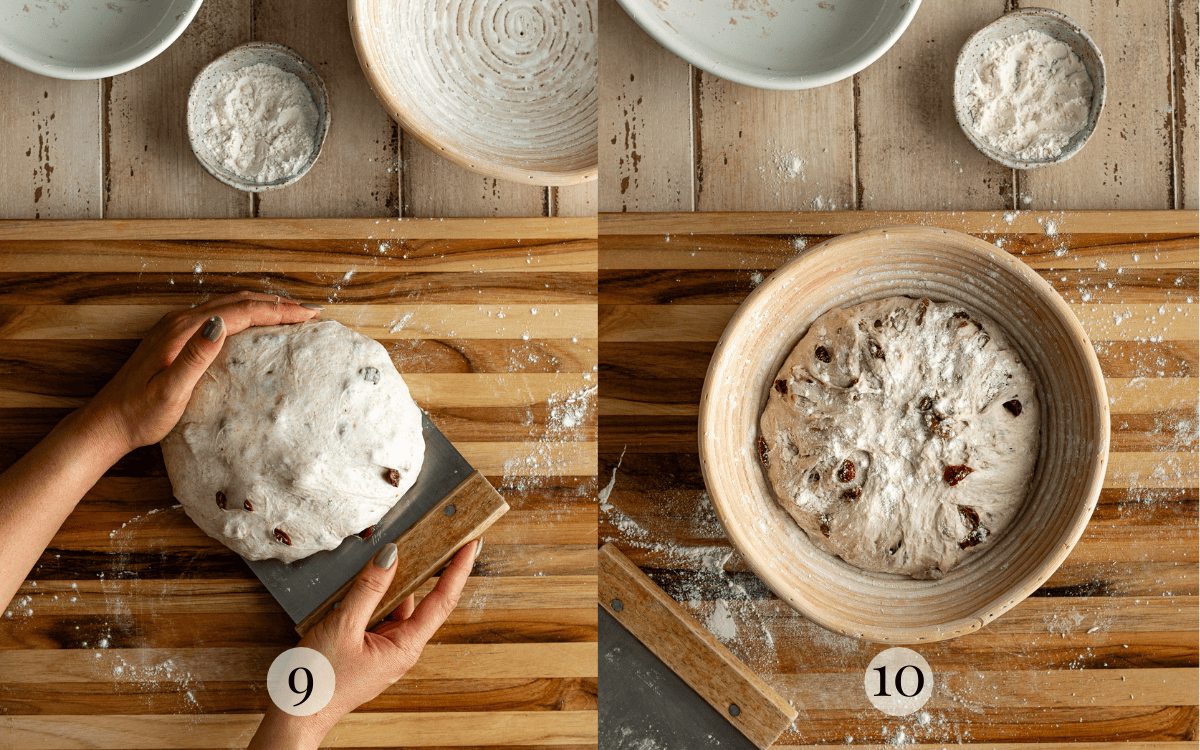
Preshape your dough by rounding it into a ball and let the dough rest covered with a clean tea towel for 30 minutes (image 9). Shape the dough into a round boule (image 10). Transfer the shaped dough to proof in the refrigerator overnight (8 to 24 hours).
Bake your loaf
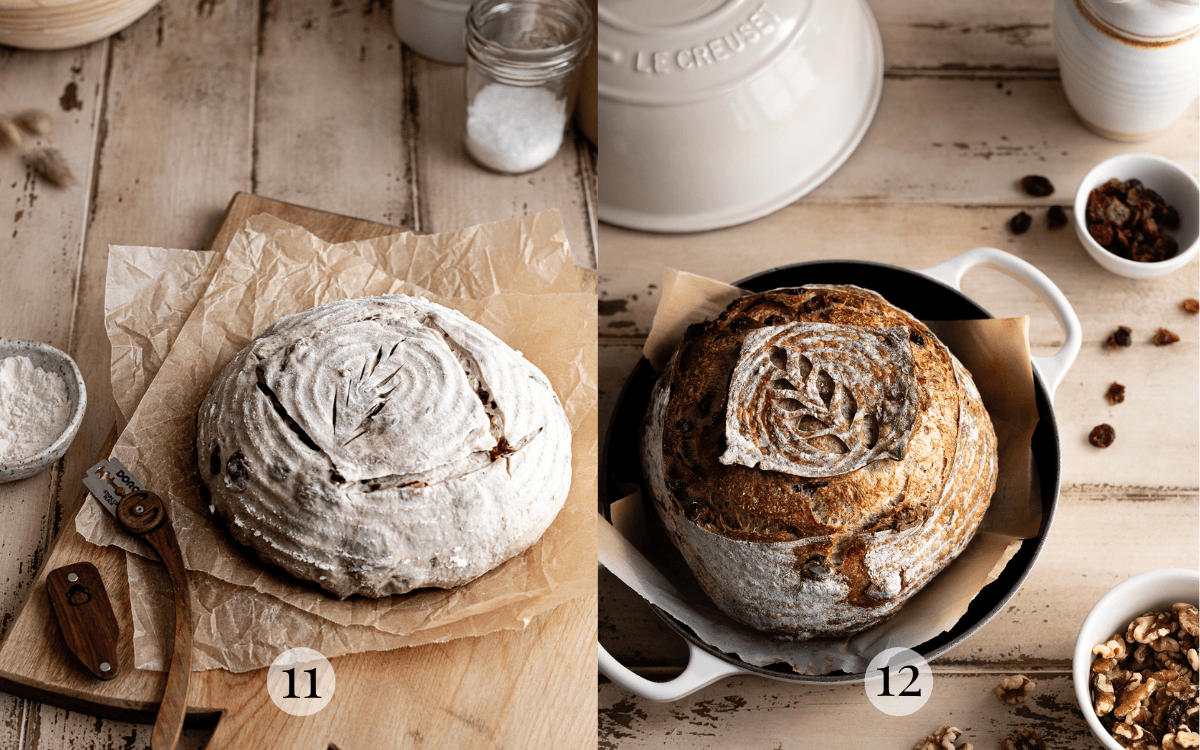
Score the dough (image 11). Bake the dough at 450 F in a Dutch oven covered for 25 to 30 minutes and uncovered for 5 to 10 minutes (image 12).
Baker's Tips
- Although I'll be giving time cues, fermentation time may differ based on your starter's health and the unique conditions in your kitchen. Wait until your dough is visibly bubbly and well-risen before shaping your dough.
- Pat the cranberries dry using a paper towel or clean tea towel. Moisture from the soaker will add too much water to your dough which may make it too wet and difficult to handle.
- If your dough feels too sticky, work with lightly damp hands.
- Pre shaping your dough allows it to build more tension and prepares the dough to take its final form, which is especially important for wetter dough like this one. It's an optional step, but highly recommended.
- Don't forget to score your loaf. Inadequate scoring can prevent steam from escaping, causing your bread to burst. To learn more, check out my post on sourdough scoring.
- If you don't have a banneton or a Dutch oven, you can bake this sourdough bread in a loaf pan.
- Let the bread cool for at least 2 hours before slicing! Cutting it too soon can cause moisture to escape, hindering the crumb from setting properly and resulting in a gummy loaf that goes stale faster.
Did this recipe rise to the occasion?
★★★★★
Leave a star rating and a comment. Your feedback inspires future recipes and helps others feel confident choosing what to bake next. I read and respond to every message.
If you're looking for additional ways to support my work, share this recipe or buy me a Ko-fi. Every little bit helps me keep creating the recipes and guides you enjoy.
Thank you for your support!

Cranberry Walnut Sourdough Recipe
This section may contain affiliate links
Ingredients
Soaker
- 75 grams water
- 70 grams dried cranberries
Dough
- 180 grams all-purpose flour
- 120 grams bread flour
- 60 grams whole wheat flour
- 282 grams water
- 113 grams active sourdough starter
- 7 grams salt
Mix-ins
- 75 grams walnuts toasted, see note
Click US Customary to view volume measurements
Instructions
The night before
- Soak the cranberries: Combine cranberries with water in a small container. Cover and leave the cranberries to soak overnight (see note).75 grams water, 70 grams dried cranberries
Day 1
- Make the dough: Mix the flours and water together in a large mixing bowl using a stiff spatula or wooden spoon until a shaggy dough forms and no traces of dry flour remain. Cover the bowl with plastic wrap and let the dough rest for 30 minutes to 1 hour.180 grams all-purpose flour, 120 grams bread flour, 60 grams whole wheat flour, 282 grams water
- Fold the active sourdough starter and salt into the dough. Knead the ingredients in until you no longer feel any grains of salt. Transfer the dough to a clean, lightly greased container and cover with plastic wrap. Let the dough rest in a warm spot for 30 minutes.113 grams active sourdough starter, 7 grams salt
- Drain the cranberries and transfer them to a clean tea towel or paper towel to suck up any excess moisture.
- Add the mix-ins: Add half of the cranberries and nuts on top of the dough. Pick up one side of the dough and fold it over the mix-ins. Repeat with the remaining filling, cover the dough with plastic wrap, and let the dough rest for 30 minutes.75 grams walnuts
- Coil Fold: Perform 3 sets of coil foils in 30 minute intervals. Cover the bowl with plastic wrap and set in a warm place in between sets.To perform a coil fold, working with the dough inside the bowl, lift the center of the dough up with your fingertips until the ends release from the container. Lightly set the dough back down into the bowl and tuck the ends under.
- Bench rest: After the last coil fold, let the dough rise untouched until the dough looks well risen and bubbly, about 1 ½ to 2 hours.
- Pre shape the dough: Place the proofed dough onto a lightly-floured clean counter. Using a bench scraper, turn the dough over and lightly round it into a tight ball. Cover with a clean tea towel and let the dough rest for 30 minutes.
- Shape the dough: Turn the dough over once more, flatten it out into a rectangle. Fold the side closest to you towards the center and the top of the dough over the bottom flap. Fold the sides over each other. Flip the dough and round it into a boule. Place the dough into a prepared banneton with the seam side up.
- Cold proof: Cover the banneton with plastic wrap. Transfer the dough to the refrigerator to proof overnight (about 8 to 16 hours).
Day 2
- Prep: Preheat the oven to 500 F with a Dutch oven inside.
- Score the dough: Turn the proofed dough out on a piece of parchment paper. Score the top of the loaf with the pattern or design of your choice, and make sure the cut is at least a ¼-inch deep.
- Bake: Transfer the dough into the Dutch oven with the parchment paper.
- Turn the oven temperature down to 450 F, bake for 25-30 minutes covered and 10-15 minutes uncovered.
- The loaf is baked when it registers at least 190 F when probed with an instant-read thermometer and reaches your desired level of browning.
- Enjoy: Transfer the baked loaf to a cooling rack. Let the bread cool for at least 2 hours before slicing.
- Store: Store any leftover bread for up to 3 days in an airtight container at room temperature.
Tips
These recipes were developed and tested using grams for precise measurements. To increase your chances of success, I recommend investing in a kitchen scale. I've included rough volume estimates (in tablespoons and cups), but they might not be totally accurate.
Remember all ovens are unique, these recipes were tested in my oven which runs cooler than others. You might need to lower the temperature if your bake appears to be browning too quickly. Monitor your bake closely and make adjustments if needed.
Notes
- If you forget to soak your cranberries overnight, use boiling water and let them rehydrate for 20 minutes. Make sure your cranberries have cooled before adding them to your dough or it may harm the yeast.
- Toast walnuts on a baking sheet at 350 F for 5 to 8 minutes, or until the nuts are fragrant.
- Use a mixing bowl lined with a tea towel dusted with flour if you don't have a banneton. Or bake your bread in a loaf pan.
- If you have trouble with burning the bottom of your bread, transfer it to a baking sheet for the second part of baking.
Nutrition
I am not a nutritionist or dietitian, any nutrition information provided is an estimate.
KarenB says
This is the 3rd time I am baking this bread and it is delicious. I soak dried cherries in wine, toast the pecans, and then toss the pecans with 1 Tblsp cinnamon.
My question is can I cold proof longer than the 16 hours?
Hannah Dela Cruz says
Hi Karen! Thank you for trying out this recipe. I wouldn't push this past 16 hours because your dough could become acidified which would cause the gluten structure to break down, resulting in a gummy loaf.
Lisa says
What a delicious loaf! I used pecans because my husband isn't a fan of walnuts.
I do have a question - I like to bake in loaf pans because it's so much easier to slice the bread.
Do you have recommendations for changes in temp and timing for this in a loaf pan? Thank you!
Hannah Dela Cruz says
Hi Lisa! Thank you for trying this loaf, I’m so glad you loved it. It’s a favorite at my house too.
You don’t need to change the timing or temperature, but adding steam to your oven is essential for this recipe. Place a second metal loaf pan or baking pan filled with water in the oven to create steam.
Bake with steam for 25 minutes, then carefully remove the water pan and continue baking for another 20 to 25 minutes, or until the loaf reaches your desired level of browning.
Cheryl Licata says
I absolutely love this recipe. I soak my cranberries overnight in red wine. So good . I added just a touch of walnut oil to my dough while doing stretch and folds. I have friends asking me for this recipe all the time. I also bake mine in a 13 inch turkey roaster. So good
Hannah Dela Cruz says
Oooh! Soaking the cranberries in red wine sounds so good. Glad you loved this recipe!
Mary Reed says
Absolutely delicious! I’m still getting used to the upfront prep and cold ferment process, but your detailed posts really make it easy to follow and understand. I really appreciate the formate you use with the written recipe.
It’s helpful to see the ingredients listed in the step they will be used. Thank you for the lovely recipe. It came out so beautifully. Looking forward to baking more of your recipes!
Hannah Dela Cruz says
Hi Mary! Thank you so much for checking out my blog and I am so glad you loved the recipe. I think you'll learn to love the cold ferment, it breaks up the long baking process so nicely. So glad you appreciated the little touches I added to make following the recipes easier for you as well. Welcome to the blog and I hope you find more baked goods you'll love to make here.
Cindy Elliott says
I made this recipe. My 1st inclusion loaf. It turned out wonderful! I did'nt cold proof. Baked the same day after a few hours proofing on the counter. Everyone who tried it thought it was so good. Also used some for a smoked turkey panini...so good!
Hannah Dela Cruz says
I'm so glad you enjoyed this cranberry sourdough. Cranberry and turkey is such a classic combination! I'm going to have to try this as well.
Sharon Brinker says
Hannah, I tried the cranberry walnut bread with fresh cranberries. Delicious! I cooked cranberries "till they pop", the let them cool. Before adding them to dough, I let them sit on a paper towel to absorb more moisture. A couple notes...the fresh cranberries can turn the dough pink in spots, and I think dried cranberries are sweeter than fresh. I love fresh cranberries & we loved your bread recipe! thank you!
Hannah Dela Cruz says
Hi Sharon! Thanks for sharing your experience with using fresh cranberries. I am so glad it worked out and that your family loved it.
Anna says
Made this one yesterday. I didn't have walnuts, so substitute with pecans.
My favorite bread! SOOO delicious!
Hannah Dela Cruz says
So happy you loved it!
Peggy says
What size and brand of Dutch oven is used in this recipe? Thanks so much.
Hannah Dela Cruz says
A 5 Qt. Dutch Oven works for all of my recipes. I usually bake my bread in the Challenger Breadpan. Added links below (affiliate).
Dutch oven: https://amzn.to/3XDVlHT
Challenger breadpan: https://challengerbreadware.com/?ref=Makeitdough
Rebecca says
Loved this recipe! I don't really like dried fruit and was planning to just give the entire loaf away, but after sampling, I decided to keep some for myself.
Hannah Dela Cruz says
Glad your bake tempted you to try a little bit! I hope you enjoyed it.
Tami Augustine says
in step 4, it says to add half the cranberries and nuts. when does the other half get added?
Hannah Dela Cruz says
Hi! Sorry for the confusion. The remaining mix-ins are added in the same step. I just ask that they are added half at a time so that they are evenly distributed throughout the dough.
Martiey says
What do you do with string? I can't find it in the recipe, but it says at the end to cut the strings off.
Hannah Dela Cruz says
Thank you for pointing this out and so sorry for the confusion. This probably got left over from a template of a recipe that I used. No strings needed and I will change the recipe immediately to clarify.
Erin says
This recipe is delicious! I've made it many times and still cannot get enough. Thank you!
Hannah Dela Cruz says
Thank you, Erin! I am so glad you love this bread.
Sharon Brinker says
hi Hannah!
can you use fresh cranberries (it's the season!) by cooking them to soften & draining?
Hannah Dela Cruz says
Hi Sharon! I think that should work, although I've never tried adding cooked cranberries to this bread so I can't make any guarantees. The only thing I would watch out for is that your dough may turn out a little bit wet. You can try to lessen the water in the recipe. Start with 226 grams (1 cup). Good luck and let me know how it turns out.
Deborah J Hanson says
I love this Sourdough Bread recipe! One of my favorite recipes and I make it weekly.
Hannah Dela Cruz says
So excited to hear this! It's one of my favorites.
Michelle says
Hana
Do you add the water that the cranberries soaked in or do you discard it?
Thanks
Hannah Dela Cruz says
Thanks for the comment, Michelle! You're meant to drain the cranberries but I overlooked that step in the instructions. I added it in. I appreciate you asking!