

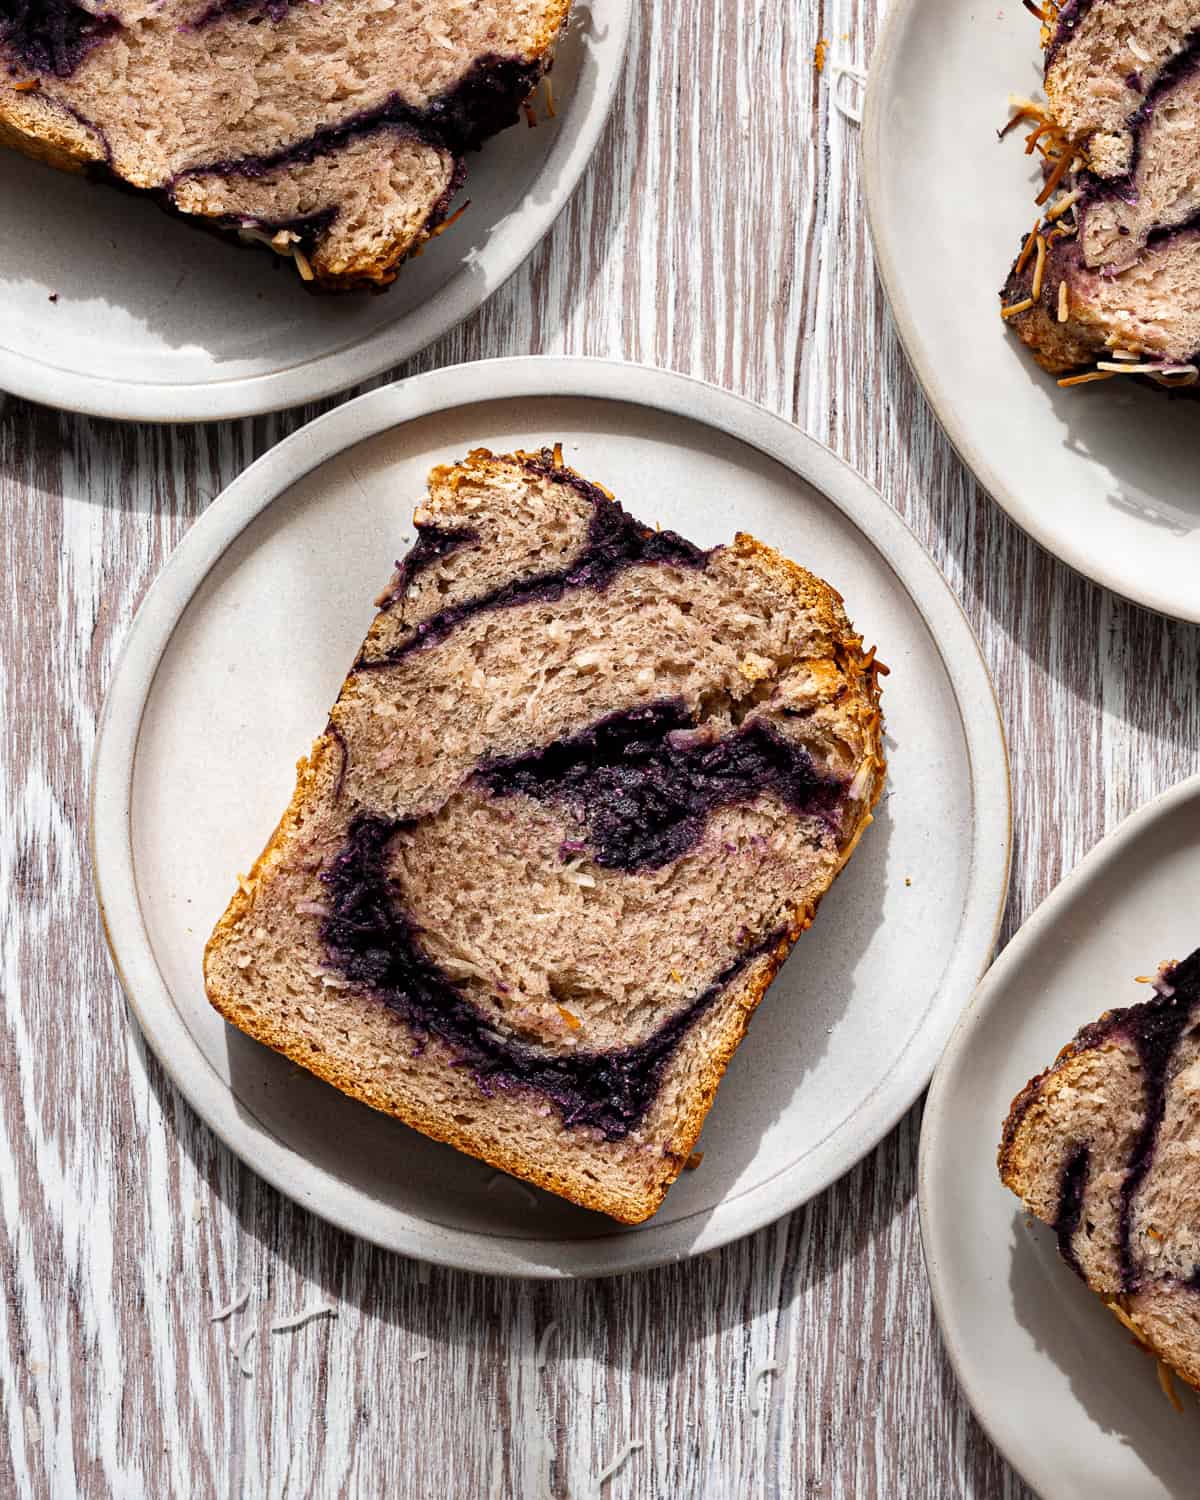
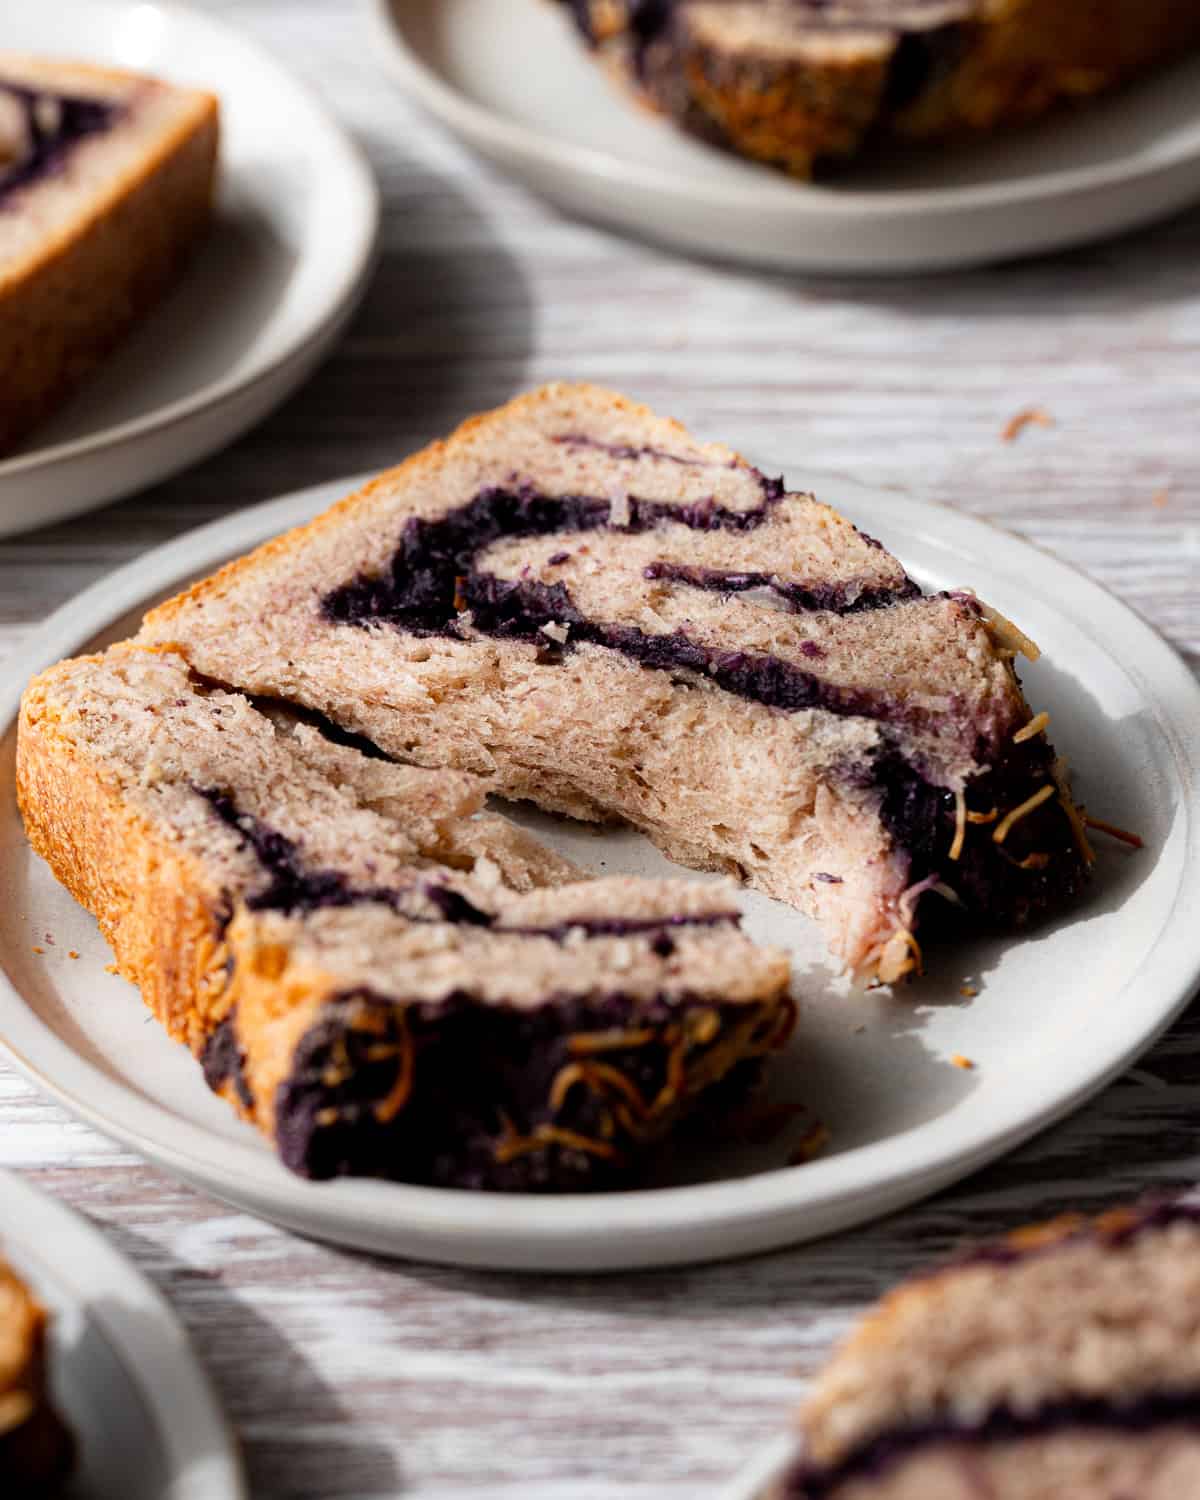
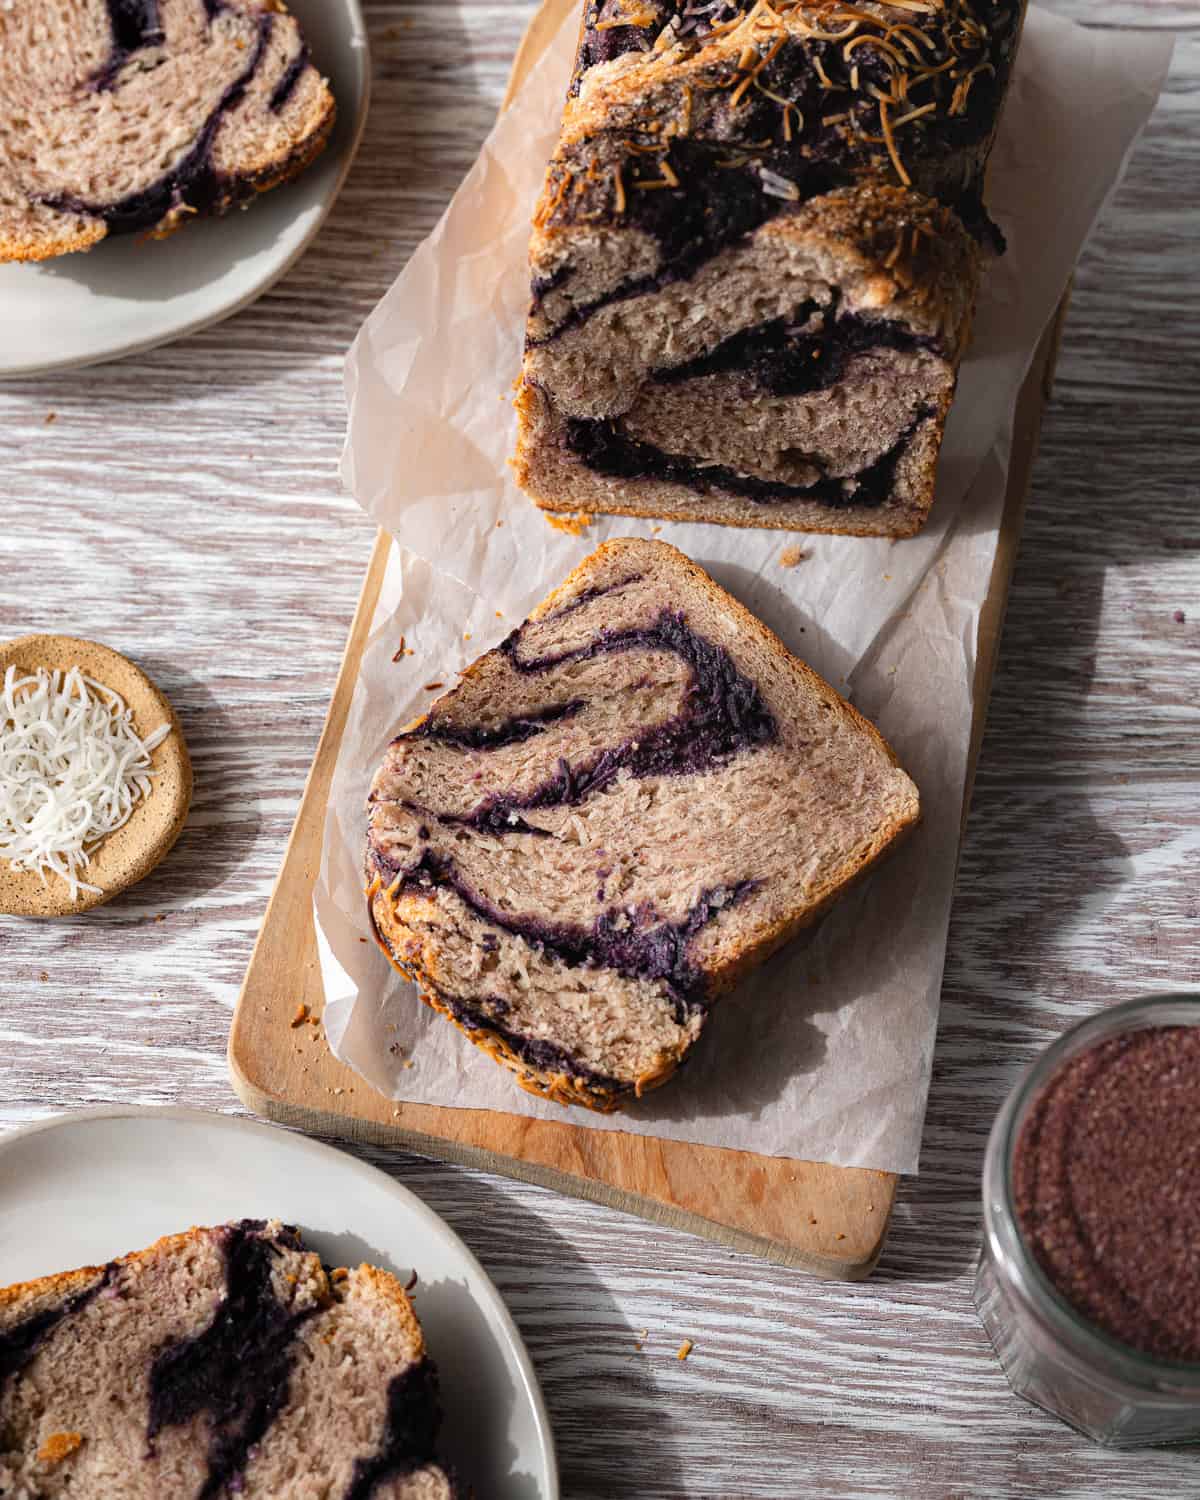
If you love soft, pillowy bread, you'll love this Sourdough Ube Pan de Coco! This recipe combines three of my favorite ingredients-coconut, ube, and sourdough-into one delicious eye-catching loaf. The tender, purple-hued crumb is flecked with coconut and filled with a vibrant ube filling.
This recipe was first published in Jan. 2020 and has been updated with new photos, step-by-step instructions and additional tips for success.
Jump to:
This Sourdough Ube Pan de Coco recipe is a collaboration between me and Bryan Ford. We first met at the 2019 Saveur Blog Awards, where we each won in our respective categories for our sourdough blogs. This recipe holds a lot of nostalgia, and I still remember all the bakers who recreated this loaf and shared their bakes on Instagram.
I made this yesterday and so far have gotten rave reviews from everyone who tried it!
- Meghan
What is pan de coco?
Pan de coco is a type of bread popular in both Honduras and the Philippines, though the two versions differ slightly. Originally from Honduras, the bread was introduced to the Philippines by the Spaniards during colonial times. Since coconuts are also abundant in the Philippines, the bread quickly became popular and evolved to suit local tastes.
In Honduras, it's typically a loaf made with coconut milk and coconut meat throughout the crumb. The version I grew up with in the Philippines is a sweet, brioche roll filled with a sticky coconut filling. In the Philippines, pan de coco is often enjoyed as a snack or dessert, while in Honduras, it can also be served with savory dishes.
Curious about Filipino Breads? Check out my recipes for Sourdough Pan de Coco and Sourdough Pandesal.
What is ube?
Ube is a traditional Filipino ingredient widely used in many of our beloved desserts. This vibrant purple yam (not to be confused with purple sweet potatoes) boasts a unique vanilla flavor with a subtle hint of pistachio. Although it's challenging to describe its taste fully, ube's delicious flavor and scroll-stopping purple hue have made it a favorite on social media in recent years. When Bryan and I were brainstorming ways to give pan de coco a creative twist, adding ube was a no-brainer.
If you like ube desserts, you'll love my recipe for Sourdough Ube White Chocolate Cookies.
Ingredients and Substitutions
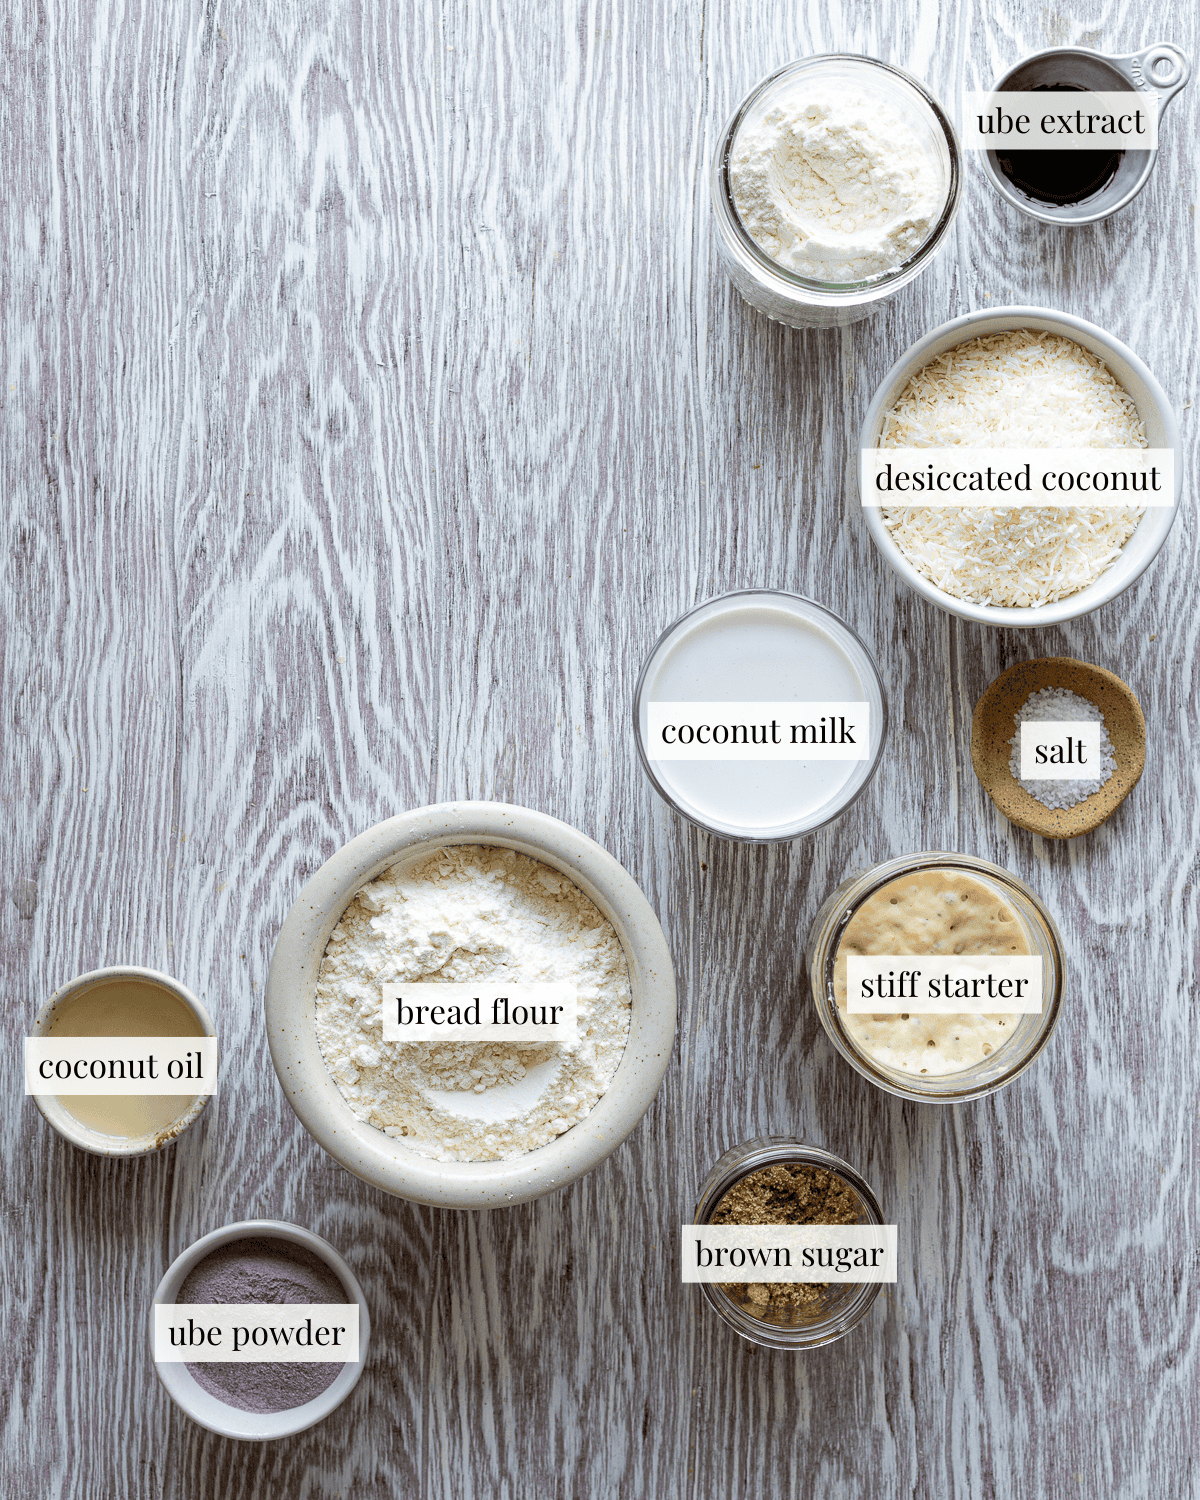
Desiccated coconut: This recipe was developed using unsweetened desiccated coconut, but you can use sweetened coconut flakes, your bread will taste slightly sweeter.
Ube powder: Ube powder is available at most Asian supermarkets and online. It imparts a pinkish hue to the loaf and gives the filling a delicious, creamy texture.
Ube extract: This ingredient adds a deep purple color and enhanced ube flavor to the filling. You can omit this ingredient if you use store-bought Ube Jam instead.
Coconut milk: This recipe was developed using full-fat canned coconut milk, but unsweetened coconut milk from the carton can also be used if that's all you have.
See recipe card for detailed ingredient information.
Baking with a Sweet Stiff Starter
A mature, active, and healthy sourdough starter is essential for making any naturally leavened bread. For soft, sweet breads like this sourdough ube pan de coco, a sweet stiff starter works particularly well. This type of starter is made with a lower hydration level (about 50 percent) and a small amount of sugar. The lower hydration helps control the additional liquid added to the dough while allowing for a higher proportion of sourdough starter. Additionally, incorporating sugar into the starter limits bacterial activity and acid build-up, which reduces sourness in the final bake.
How to Make Sourdough Ube Pan de Coco
STEP 1: Make the dough
Activate your stiff sourdough starter. Make the dough. Tear the starter into pieces and knead it into the dough. Continue kneading until no traces of the starter remain and the dough looks smooth.
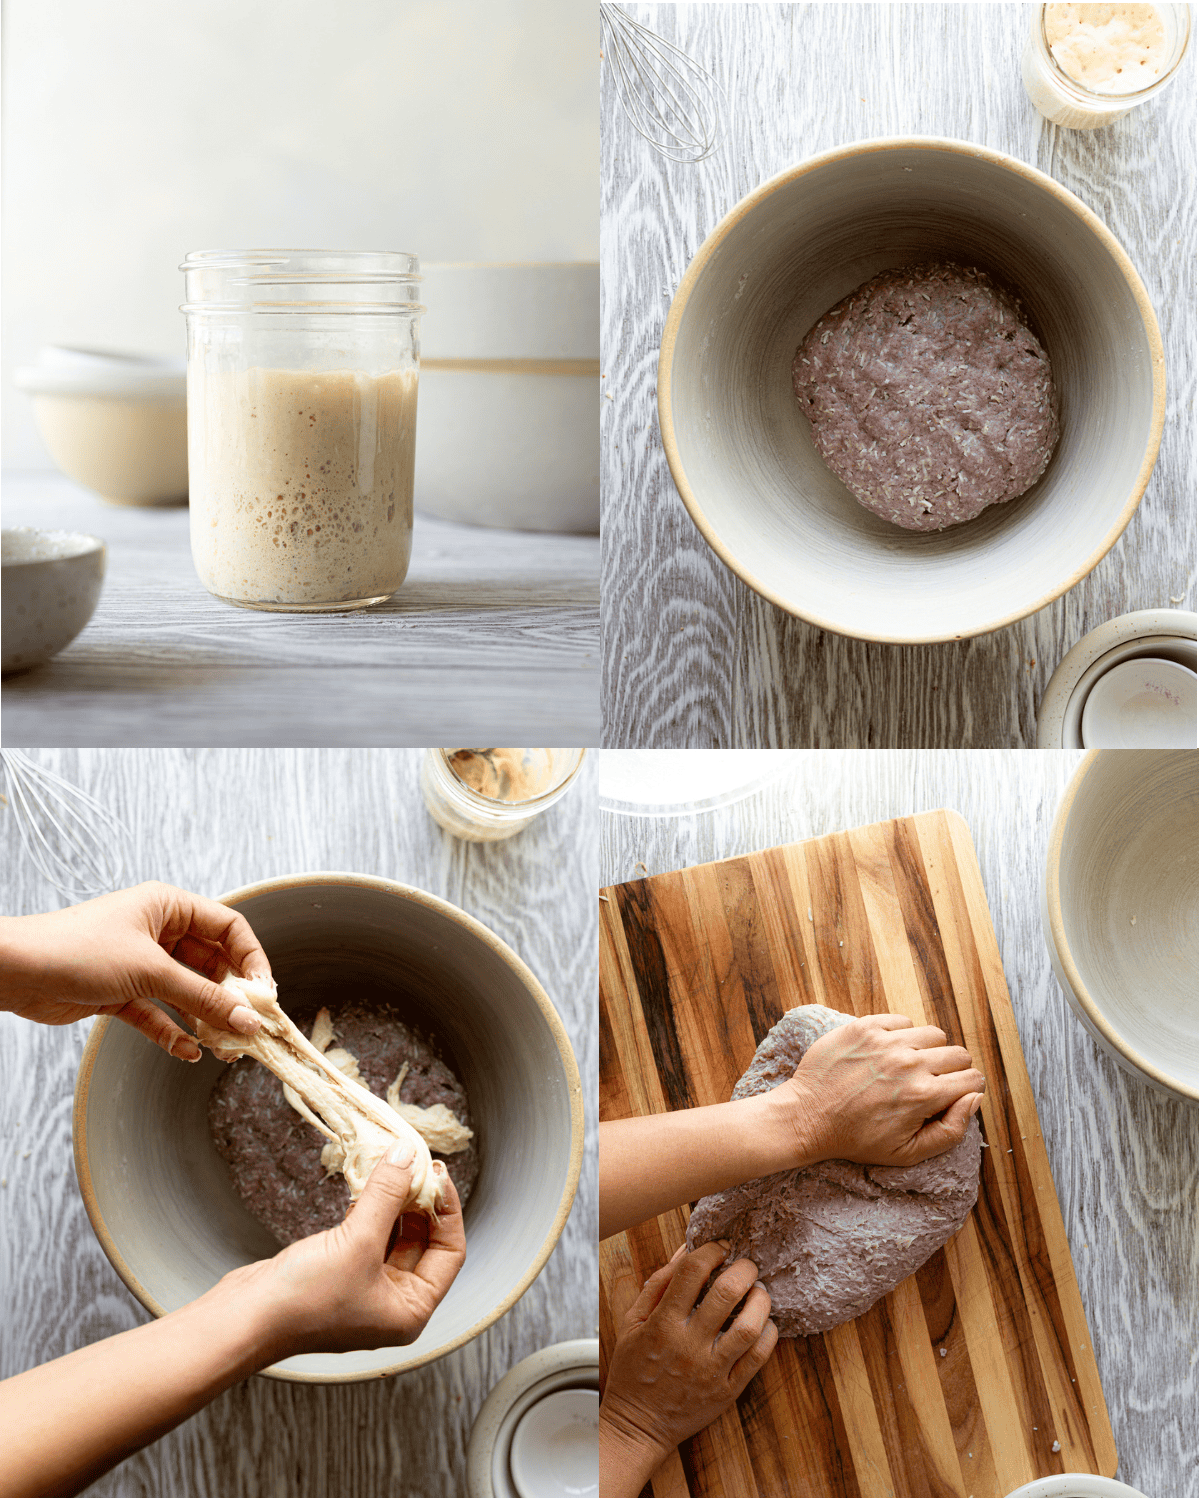
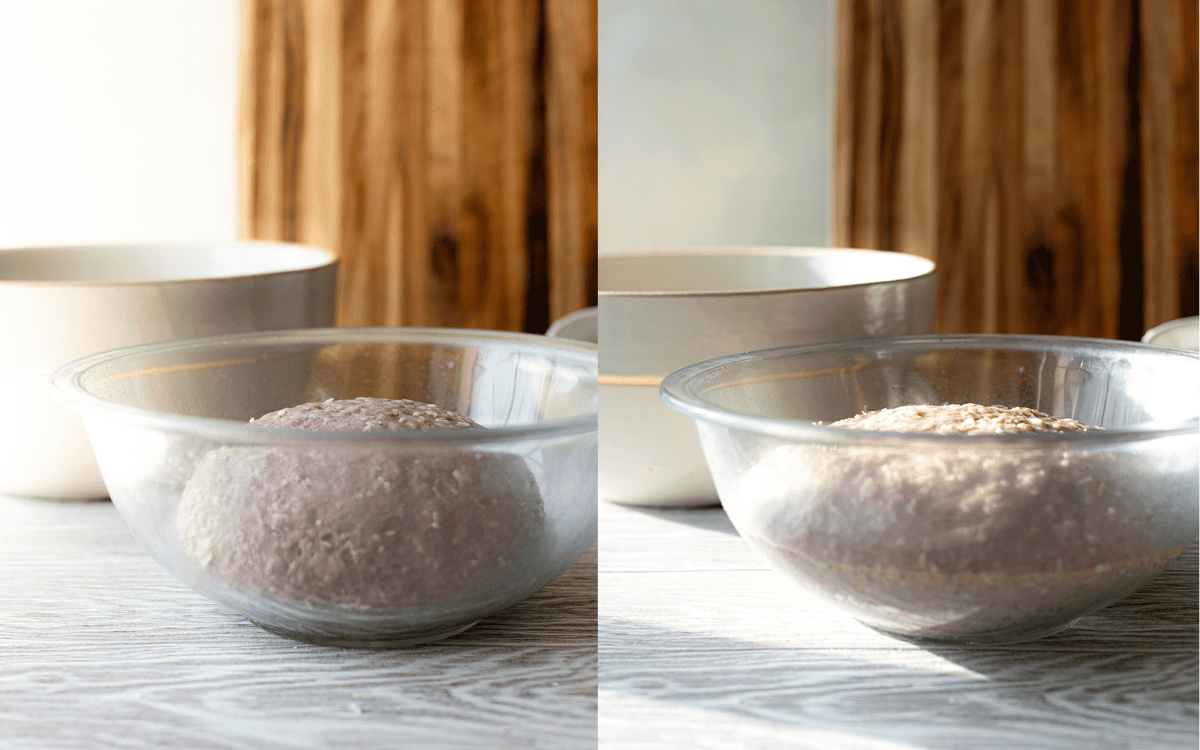
STEP 2: Bulk fermentation
Round the dough into a tight ball and transfer it to a lightly-greased bowl. Let the dough rise in a warm place until doubled in volume, about 3 to 4 hours. Transfer the risen dough into the refrigerator and cold bulk overnight.
Can I bake this loaf on the same day?
Absolutely! Simply skip the cold proof and go straight to shaping and baking.
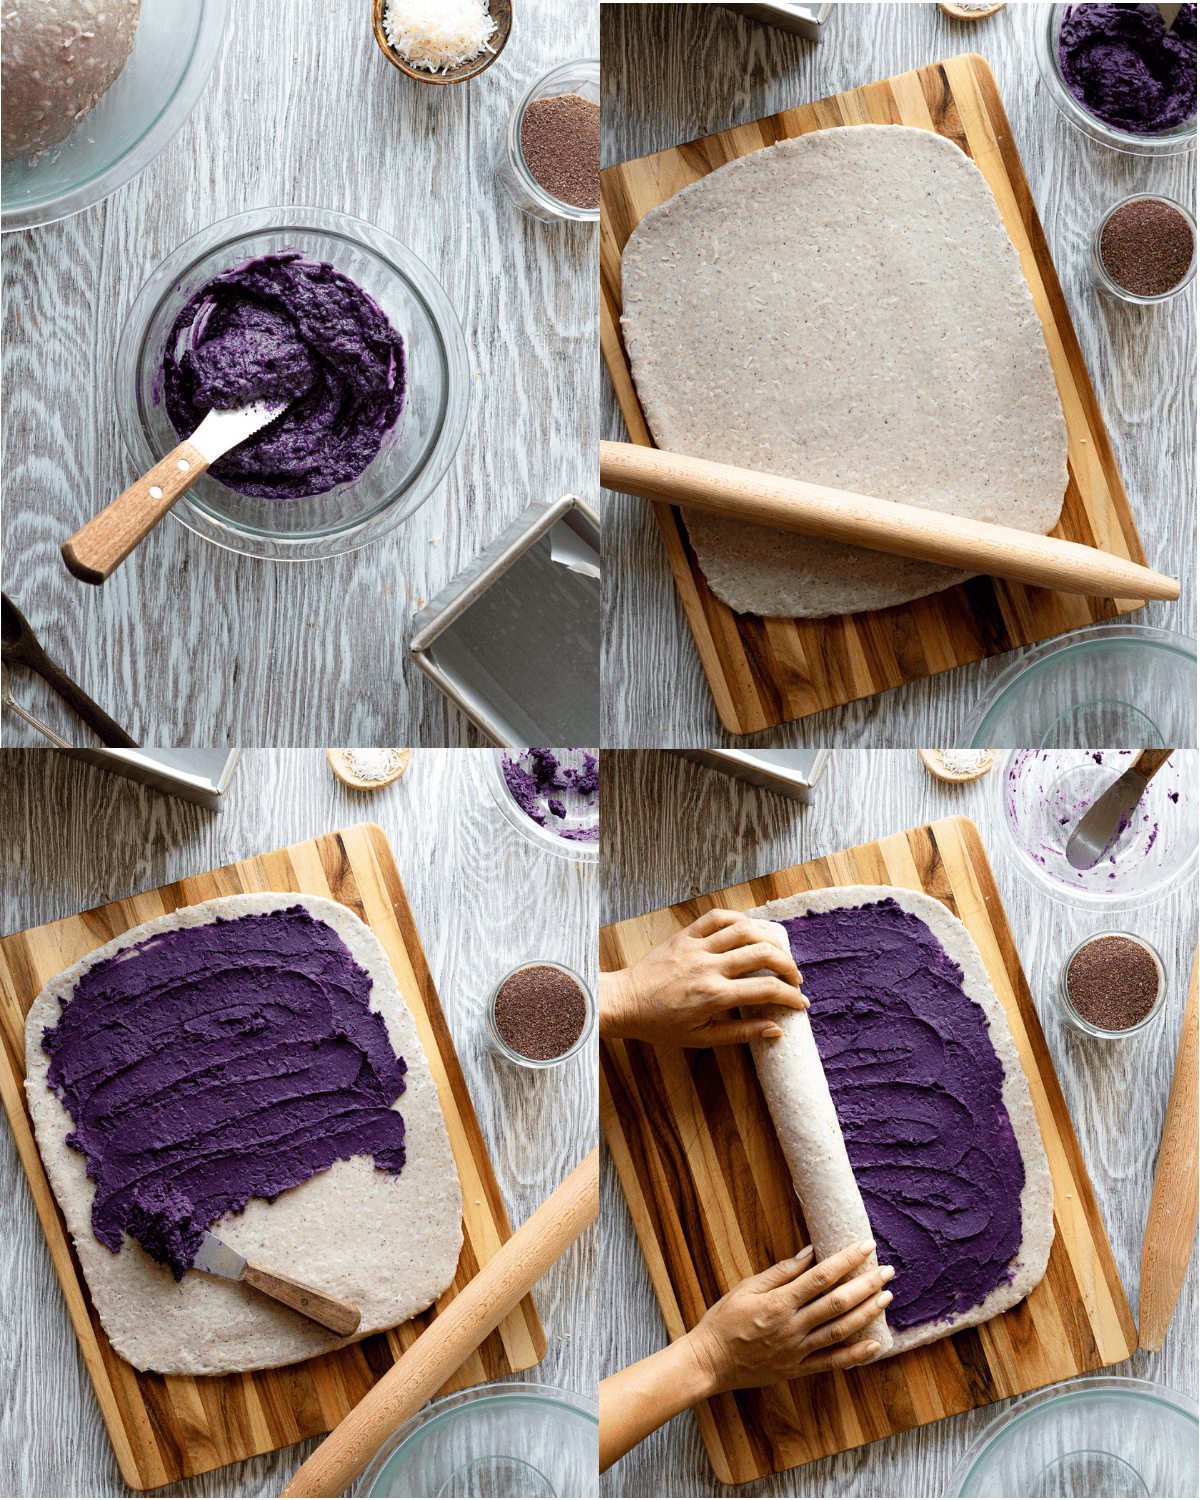
STEP 3: Assemble the pan de coco
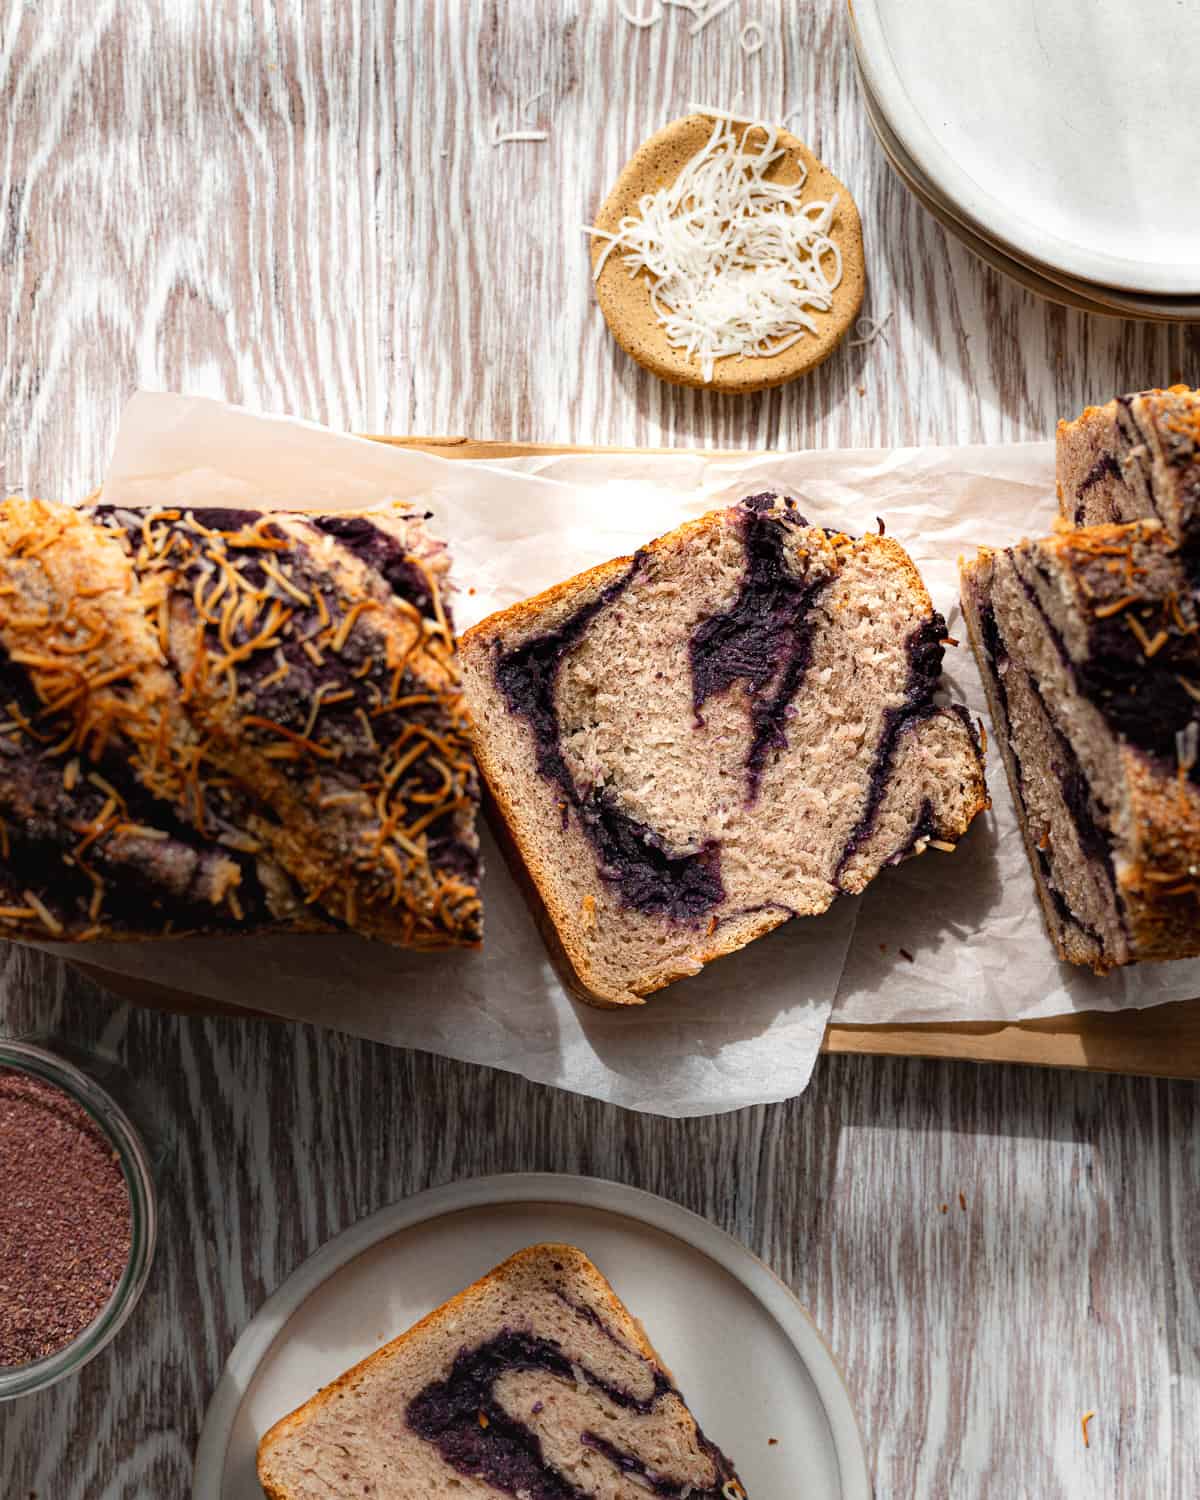
Make the filling. Roll the dough into a 12 by 14-inch rectangle. Spread an even layer of ube filling on top of the dough. Roll the dough into a log.
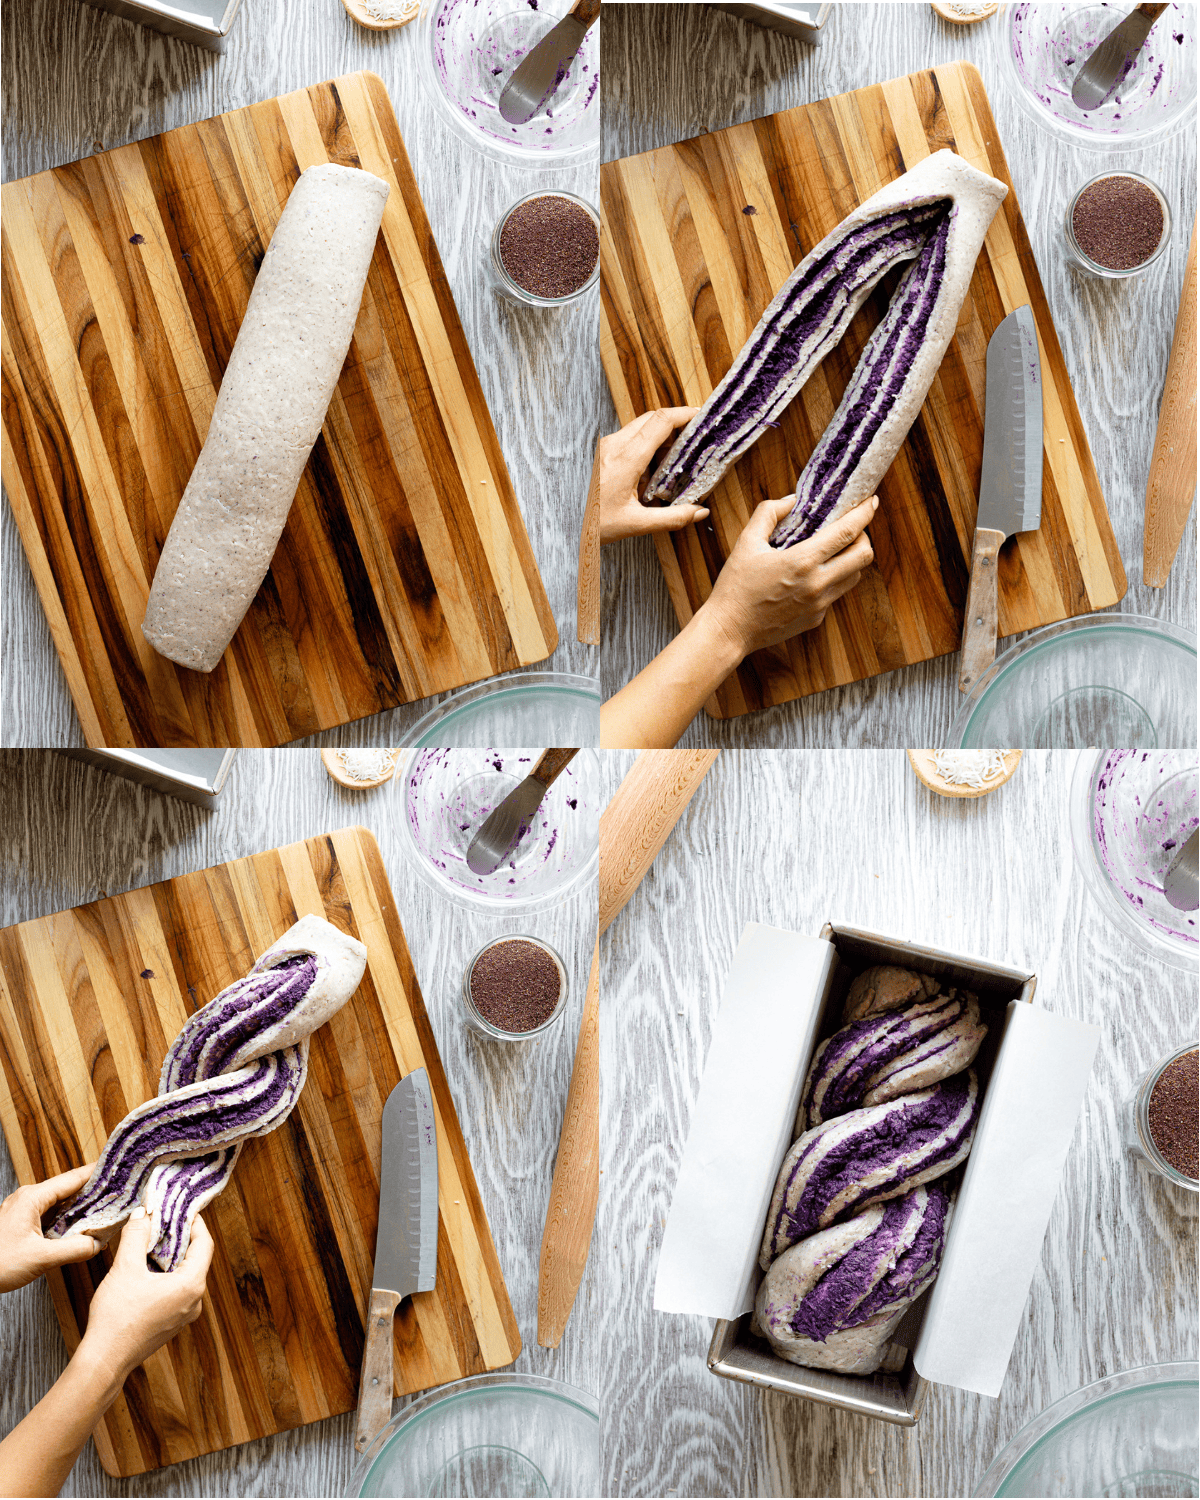
STEP 4: Shape the loaf
Split the dough in half lengthwise leaving the top inch attached. Flip the dough upwards to expose the filling. Twist the halves together until the dough is fully coiled. Transfer the dough to a parchment-lined Pullman pan (9 by 4 inches).
STEP 5: Bake
Cover with plastic wrap and let the dough rise until puffy and doubled in volume, about 2 to 3 hours. Brush the dough with egg wash. Top the dough with sugar and additional coconut flakes. Bake at 375 F for 55 to 60 minutes.

Baker's Tips
- Weigh your ingredients! Measuring using a kitchen scale is much more accurate than by volume (with tablespoons and cups).
- Make sure your starter is mature and active before starting this recipe. An inactive or immature starter can hinder your dough from rising, resulting in a dense and gummy loaf.
- Both unsweetened coconut and sweetened coconut will work for this recipe. Your loaf will be much sweeter flavor if you opt for sweetened.
- Fold your flour into the wet ingredients a third at a time. This will ensure the flour is properly hydrated, otherwise your dough may feel too dry and stiff.
- If your dough feels too sticky and difficult to handle, return it to the bowl, cover with plastic wrap and let it rest for 30 minutes before continuing to knead.
- Be patient, baking with wild yeast takes time. Wait until your dough is visibly bubbly and well-risen, which typically 4 hours or more. I'll be giving time cues, but this may differ based on your starter's health and the unique conditions in your kitchen.
- Temp your loaf! The best way to know if your loaf is fully baked is by measuring the temperature of the loaf with an instant-read thermometer, it should register at least 190 F when its done baking.
Recipe FAQs
If your dough is too sticky, let it rest before kneading. This allows the dough to hydrate fully, kickstarts gluten development and makes the dough much easier to handle.
Absolutely. Simply combine the ingredients in the bowl of your stand mixer and knead with a dough hook until smooth, about 3 to 5 minutes.
This was most likely because your dough was underproofed due to an inactive starter or not letting it ferment for an adequate amount of time. Make sure your starter is healthy, mature and active before attempting this recipe. Give your dough enough time to rise, remember that fermentation may occur at a slower pace if your kitchen is cold or if your starter is not as strong. Your dough should be puffy and bubbly before you move on to shaping.
Did this recipe rise to the occasion?
★★★★★
Leave a star rating and a comment. Your feedback inspires future recipes and helps others feel confident choosing what to bake next. I read and respond to every message.
If you're looking for additional ways to support my work, share this recipe or buy me a Ko-fi. Every little bit helps me keep creating the recipes and guides you enjoy.
Thank you for your support!

Sourdough Ube Pan de Coco Recipe
Equipment
This section may contain affiliate links
Ingredients
Sweet Stiff Starter
- 14 grams sourdough starter
- 60 grams all-purpose flour
- 35 grams water
- 14 grams brown sugar
Dough
- 240 grams all-purpose flour
- 180 grams bread flour
- 52 grams ube powder
- 60 grams unsweetened coconut flakes
- 6 grams salt
- 339 grams coconut milk
- 28 grams coconut oil
- 66 grams brown sugar
Ube Filling
- 26 grams ube powder
- 226 grams water
- 113 grams coconut milk
- 50 grams brown sugar
- 26 grams unsweetened coconut flakes
- ½ teaspoon ube extract
- 7 grams coconut oil
Topping
- 1 egg omit if going vegan
- unsweetened coconut flakes optional
- cane sugar optional
Click US Customary to view volume measurements
Instructions
- Make the sweet stiff starter: In a small jar or mixing bowl, dissolve the sugar and starter in water. Fold the flour in and stir until no dry traces remain. Cover and let the starter activate overnight or until bubbly and doubled in volume (about 6 to 8 hours).14 grams sourdough starter, 60 grams all-purpose flour, 35 grams water, 14 grams brown sugar
- Make the dough: Whisk the dry ingredients together, set aside. In a separate, large mixing bowl whisk the wet ingredients together. Fold the dry ingredients into the wet ingredients a third at a time. This will allow the flour to properly hydrate. Continue adding the flour and mixing until no traces of dry flour remain.240 grams all-purpose flour, 180 grams bread flour, 52 grams ube powder, 339 grams coconut milk, 60 grams unsweetened coconut flakes, 28 grams coconut oil, 66 grams brown sugar, 6 grams salt
- Rip the stiff starter into small pieces and knead it into the dough, working inside the bowl. Continue kneading until the dough looks cohesive and no traces of the starter remain. Cover the bowl with plastic wrap and let the dough rest for 30 minutes.
- Knead the dough: Turn the dough out onto a clean work surface. Knead the dough until it feels supple and looks smooth. To knead the dough, lightly hold the dough down with the ends of your fingertips, then using the heel of your hand, gently push the top of the dough down and away from you. Then fold the top of the dough into itself and repeat.
- Bulk ferment: Round the dough into a tight ball and transfer it to a clean, lightly greased bowl. Cover the bowl with plastic wrap and let the dough rise untouched in a warm place until bubbly and doubled in volume, about 4 hours (depending on the temperature of your kitchen).
- Cold proof: Once the dough has risen, deflate it and round it into a tight ball again. Cover the bowl with plastic wrap and let the dough ferment in the refrigerator overnight. Skip this step and continue on to shaping if you'd like to bake on the same day.
- Make the filling: Combine the ube powder and water in a small saucepan. Let the powder rehydrate for 30 minutes.26 grams ube powder, 226 grams water
- Add the coconut milk, sugar and desiccated coconut into the pan and bring the mixture to a boil. Continue cooking the mixture until thickened, it should resemble the consistency of mashed sweet potatoes (about 20 to 30 minutes).113 grams coconut milk, 50 grams brown sugar, 26 grams unsweetened coconut flakes
- Turn the heat off, stir the coconut oil and ube extract into the filling. Transfer to a bowl and let the mixture cool completely.½ teaspoon ube extract, 7 grams coconut oil
- Assemble the pan de coco: Turn the dough onto a clean work surface, your dough may feel a little stiff after cold-proof. If it's too difficult to roll out, let the dough warm up at room temperature for 20 minutes.
- Flatten the dough into a 12 by 14-inch rectangle using a rolling pin. Spread an even layer of ube filling on top of the dough. Working with the long side of the dough, roll the dough into a tight log.
- Shape the dough: Using a chef's knife, split the dough in half lengthwise, leaving about an inch of the dough attached on top. Flip the dough up to expose the filling, twist the dough into itself until its completely coiled. Twist the halves together until the dough is fully coiled. Transfer the dough to a greased or parchment-lined Pullman pan (9 by 4 inches).
- Final proof: Cover the pan with plastic wrap and let the dough rise in a warm place until puffy and it has increased noticeably in volume, about 2 to 4 hours.
- Prep: When the dough is almost ready, preheat the oven to 375 F. Whisk the egg.
- Bake the dough: Brush the proofed dough with egg wash. Top the dough with a light layer of cane sugar and desiccated coconut. Bake the dough for 50 minutes to 1 hour or until the center of the dough registers at 190 F.1 egg, unsweetened coconut flakes, cane sugar
- Transfer the loaf to a wire rack and let it cool for 45 minutes before slicing. Store any leftover slices in an airtight container or a ziplock bag.
Tips
These recipes were developed and tested using grams for precise measurements. To increase your chances of success, I recommend investing in a kitchen scale. I've included rough volume estimates (in tablespoons and cups), but they might not be totally accurate.
Remember all ovens are unique, these recipes were tested in my oven which runs cooler than others. You might need to lower the temperature if your bake appears to be browning too quickly. Monitor your bake closely and make adjustments if needed.
Notes
- Feel free to use store-bought ube jam if you don't want to make your own filling.
- If you want to make this recipe vegan, brush the dough with additional coconut milk.
- Make the filling up to 3 days in advance, store in the refrigerator until ready to use.
- Sweetened coconut flakes will work just fine for this recipe.
Nutrition
I am not a nutritionist or dietitian, any nutrition information provided is an estimate.

Angelica says
Very good recipe! I left out the coconut flakes, used regular cow's milk, and used pre-made ube halaya. Bread turned out so soft, moist, and flavorful! Will definitely make this again.
Hannah Dela Cruz says
Thank you for trying this out Angelica! I am so glad you loved it.
Meghan says
I made this yesterday and so far have gotten rave reviews from everyone who tried it! I did switch it up a bit by making it into a swirl bread instead of individual rolls because that works better for portioning it out and freezing it for me. I made the dough and filling as written but after the fridge proof, rolled all the dough into a rectangle, spread half the filling on, folded it like a book, rolled it back out, spread on the rest of the filling then rolled it up. Final proofing was again done as written but I did have to cook it quite a bit longer to cook through. Very happy with the final product, it was quite delicious!
Hannah Dela Cruz says
I've been meaning revisit this recipe for so long and the idea of making it into a swirl bread is such a great idea! You've inspired me to revisit this sooner than I would have planned to!
Cary Grant says
I just made this. It doesn’t look quite like your photo but it is delicious, and I don’t really like coconut! Thank you.
Make It Dough says
Oh no! Perhaps you would enjoy my potato dinner rolls instead 😀