

If you're craving fresh-baked bread but didn't plan ahead, this no-knead discard bread fits easily into a busy schedule. It's mixed by hand, rises quickly, and bakes into a loaf that's light, soft, and full of tangy flavor. You don't even need to activate your sourdough starter! This is the recipe I rely on when I want a light, flavorful loaf but don't have the time (or energy) to make my classic sourdough bread recipe. Everything comes together in one bowl with a few simple ingredients, making fresh bread feel doable on any day of the week.

This recipe was originally published in Sept. 2023. I have since added more photos and tips for success.
5-STAR REVIEW
This was my first run through with this recipe and it turned out amazing! I love that this loaf yields a similar structure to a true sourdough loaf with a fraction of the time and effort. Will definitely make again.
Allison
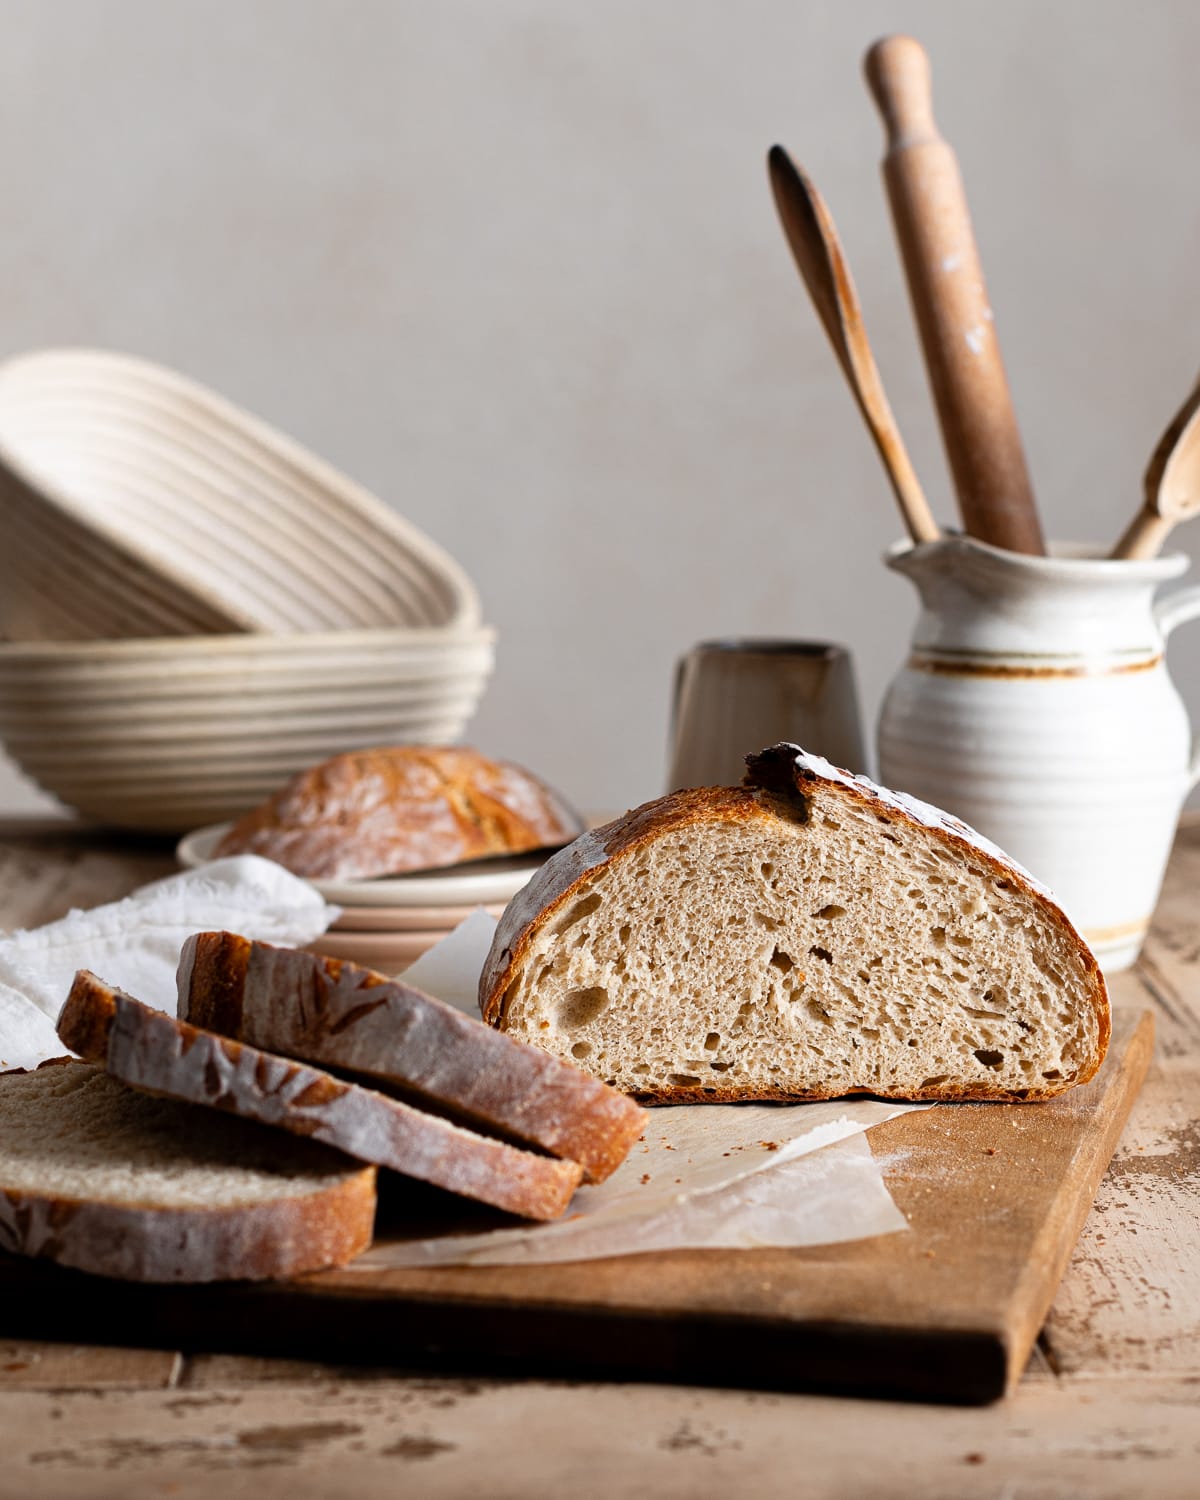
I'll admit, I used to be a bit of a purist and believed good bread could only come from long fermentation. But as life has gotten fuller (we've added a few pets to our family and I've picked up a few new hobbies), I've embraced how reliable and convenient baking with commercial yeast can be. Paired with sourdough discard, it still makes wonderfully flavorful bread, just on a schedule that fits real life.
If you've made my sourdough discard focaccia, sourdough discard pretzels, and sourdough discard sandwich bread, you'll know that sourdough discard and a bit of yeast can work together beautifully.
Ingredients and Substitutions
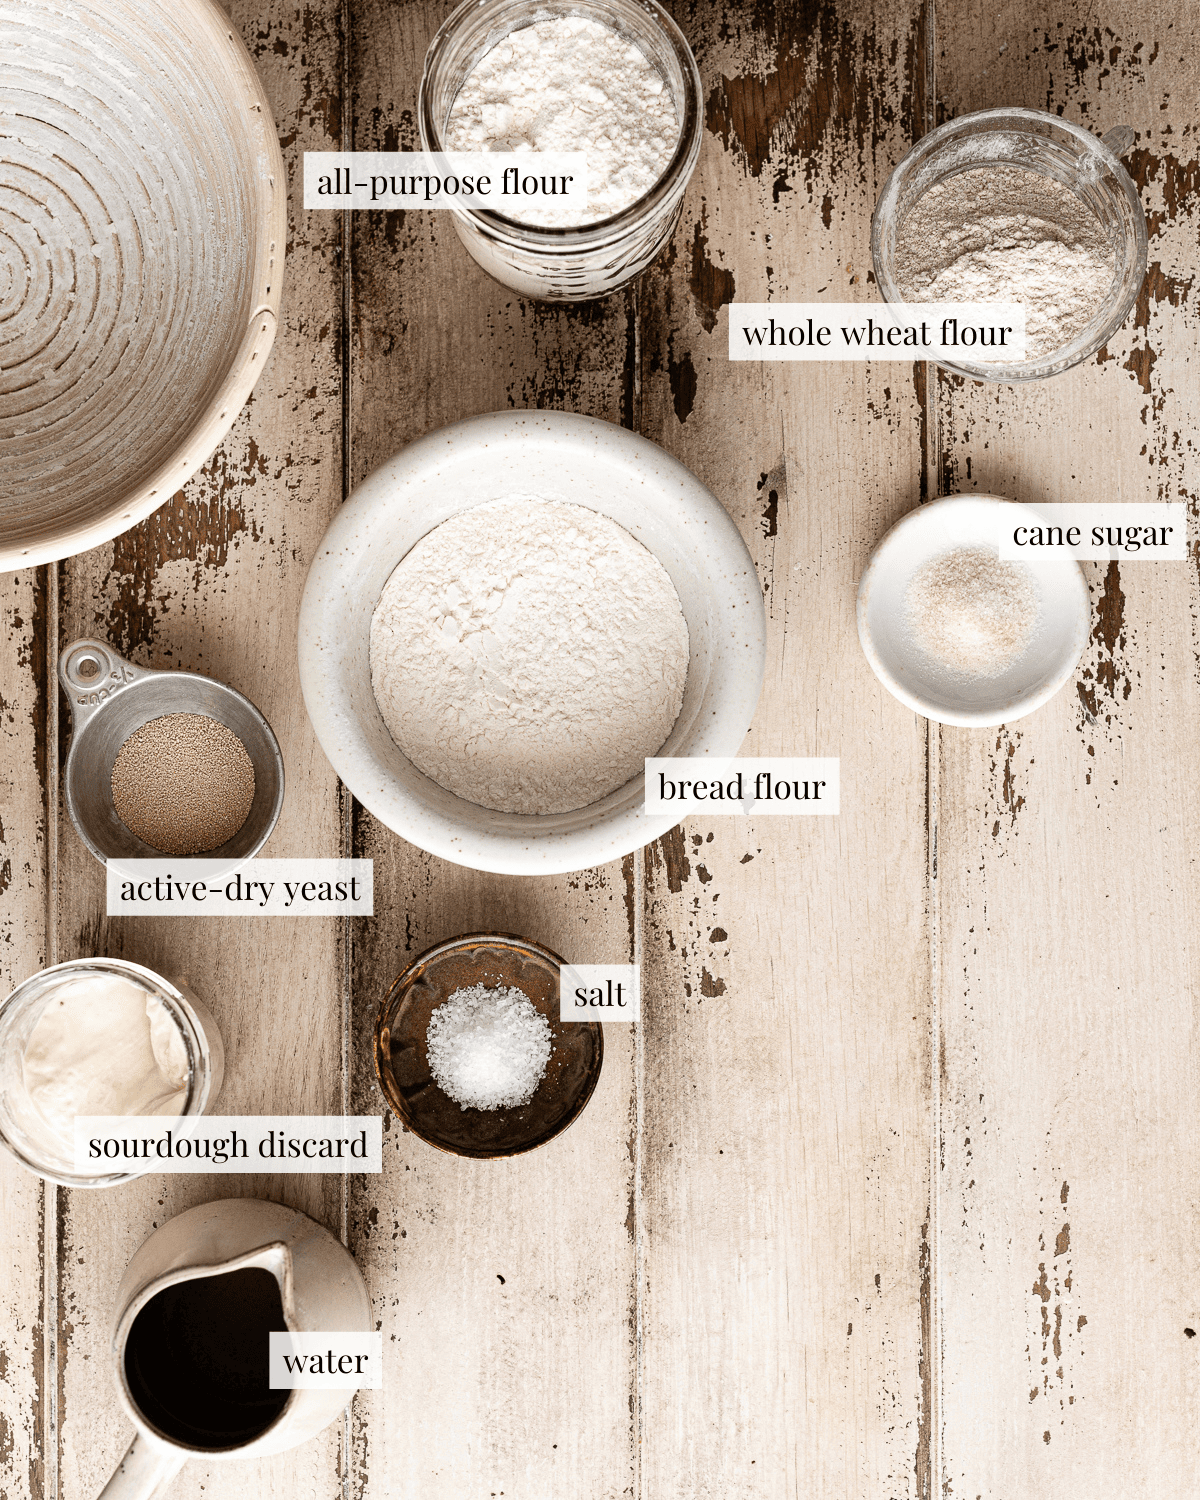
This recipe uses a mix of different types of flours, all-purpose flour, bread flour and whole wheat the ideal mix for flavor and texture. But if you don't have all three on hand, no problem. You can use just all-purpose or bread flour and still get great results.
Since this recipe uses commercial yeast you can use your sourdough starter straight from the fridge, no need to activate it!
Step-by-step Instructions
STEP 1: Make the dough
Combine water, sugar and active-dry yeast, let the yeast bloom for 15 minutes. Add in the sourdough starter and dry ingredients. Mix until no traces of dry flour remain.

STEP 2: Stretch and fold
Perform 3 sets of stretch and folds in 15-minute intervals during bulk rise. To perform 1 set, use your fingertips pick up one side of the dough and stretch it as far as you can without tearing. Then fold the dough over itself, turn the bowl 90 degrees, and repeat 3 more times (this is one set).

Stretch and Fold Sample Schedule
9:00 a.m. - Fold 1
9:15 a.m. - Fold 2
9:30 a.m. - Fold 3
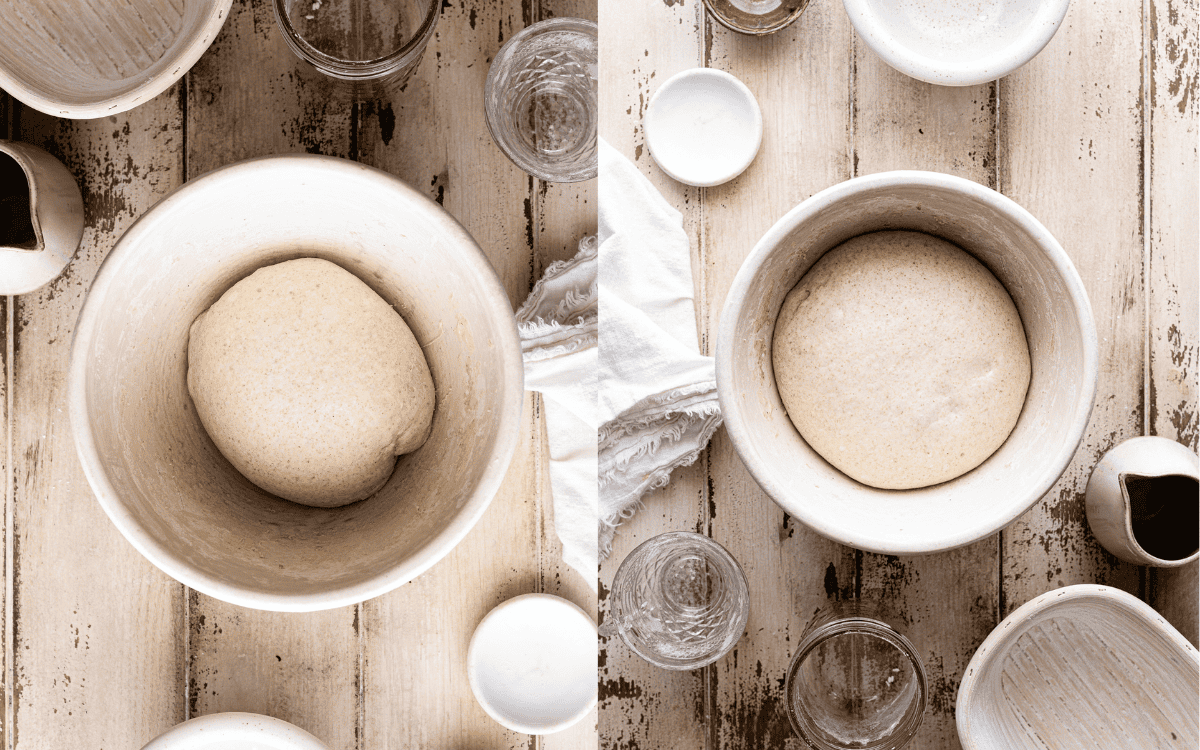
STEP 3: First rise
After the last fold, allow the dough to rise untouched until doubled in volume.
STEP 5: Bake
Score the dough. Bake in a covered Dutch oven at 475 F for 25 minutes. Remove the cover and bake at for an additional 10 to 15 minutes, depending on how dark you'd like your crust.

Tips from Hannah's test kitchen
- This dough contains a lot of water (about 73% hydration). It's completely normal for your dough to feel very sticky and difficult to handle right after it's mixed. Don't panic! Be gentle, use your fingertips during stretch and fold, and keep your hands damp to make it easier to handle.
- Although I love how yeast speeds things up, I had better results using cold water during testing. It slows down fermentation, but it gives the dough more time to develop flavor and the payoff is worth it.
- This bread works really well as a sandwich loaf too check out How to Bake Bread in a Loaf Pan in my post.
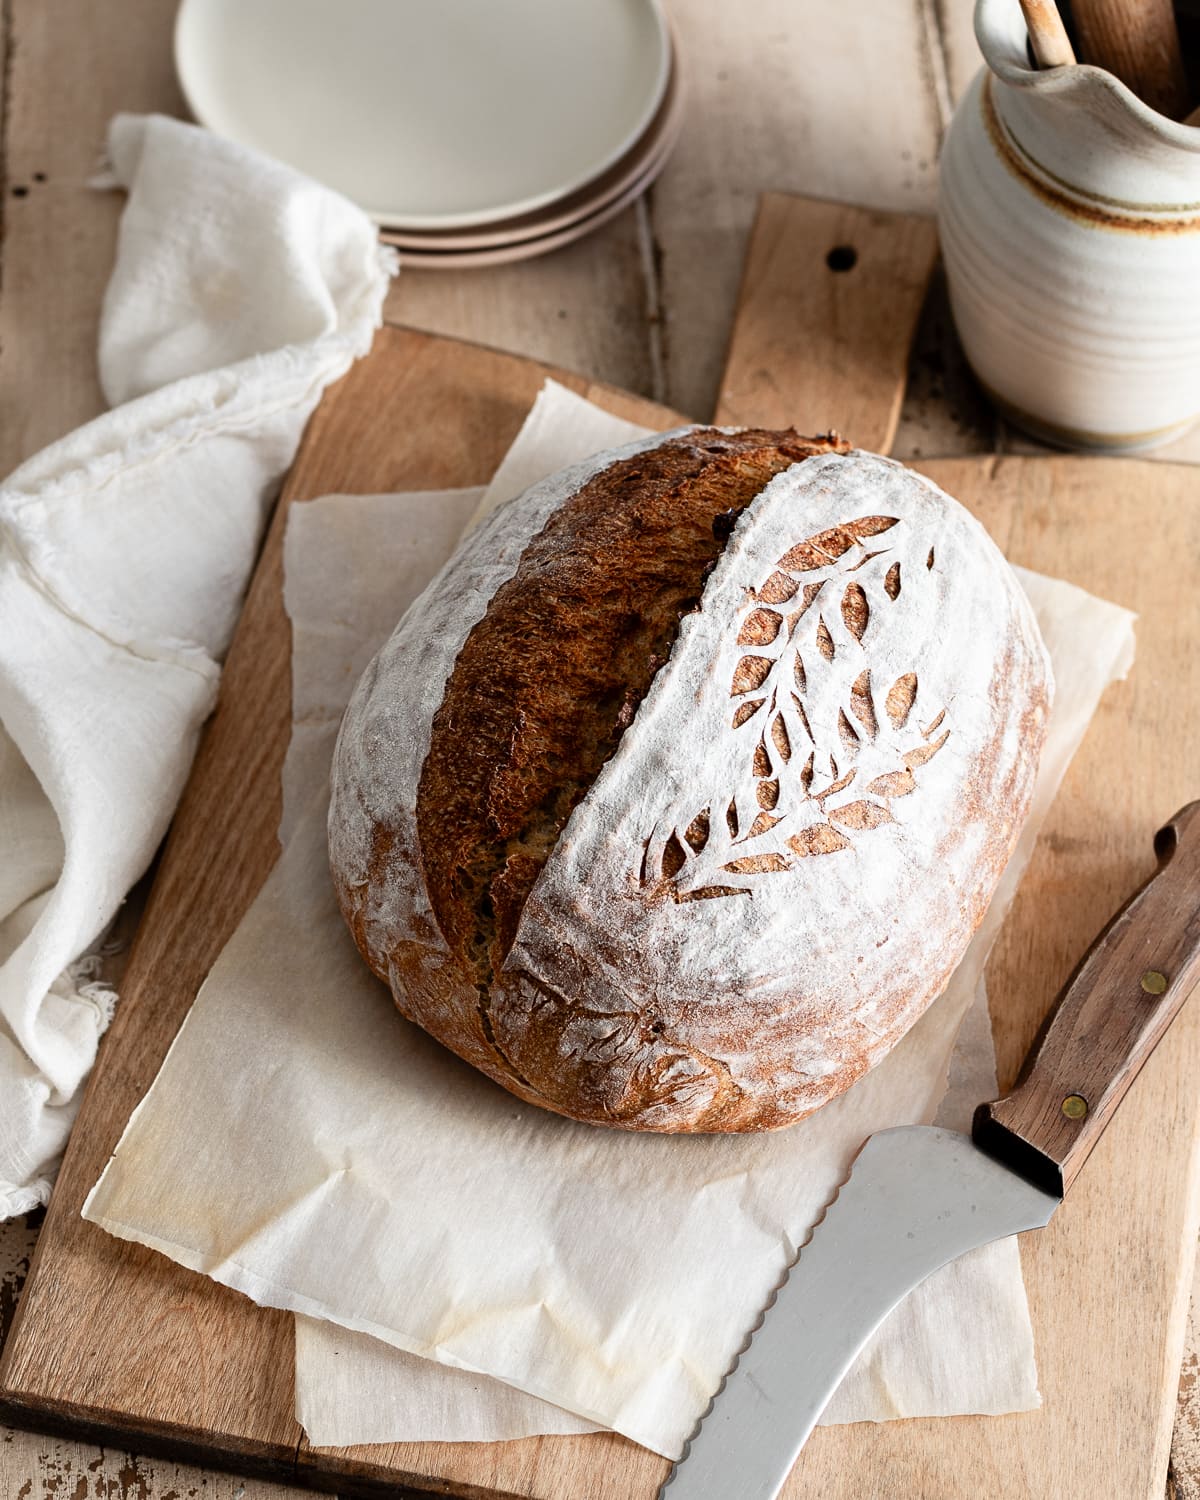
Want to learn how to create beautiful decorative scoring patterns on your bread? My sourdough bread scoring guide is a great place to start.
Did this recipe rise to the occasion?
★★★★★
Leave a star rating and a comment. Your feedback inspires future recipes and helps others feel confident choosing what to bake next. I read and respond to every message.
If you're looking for additional ways to support my work, share this recipe or buy me a Ko-fi. Every little bit helps me keep creating the recipes and guides you enjoy.
Thank you for your support!

Easy Sourdough Discard Bread Recipe
This section may contain affiliate links
Ingredients
- 7 grams active-dry yeast
- 226 grams water
- 14 grams cane sugar
- 113 grams sourdough discard
- 180 grams bread flour
- 90 grams all-purpose flour
- 60 grams whole wheat flour
- 7 grams salt
Click US Customary to view volume measurements
Instructions
- Make the dough: Mix the water, active-dry yeast, and sugar in a mixing bowl. Allow the mixture to bloom until it smells yeasty and looks bubbly.7 grams active-dry yeast, 226 grams water, 14 grams cane sugar
- Fold in the sourdough discard, bread flour, all-purpose flour, whole wheat flour and salt until no traces of dry flour remain. Cover the bowl with plastic wrap and let the dough rest for 10 minutes.113 grams sourdough discard, 180 grams bread flour, 90 grams all-purpose flour, 60 grams whole wheat flour, 7 grams salt
- Stretch and fold: After the rest period, complete 3 sets of stretch and folds in 15-minute intervals.
- To complete a stretch and fold, with the dough inside your bowl, pick up the side of the dough closest to you using your fingertips. Stretch the dough out as much as you can without it tearing and fold it over itself. Turn the bowl 90 degrees and repeat 3 more times.
- Cover the bowl with plastic wrap. Set it in a warm place and let the dough rest for 15 minutes.
- First rise: Let the dough rise at room temperature until doubled in volume. The dough should double in volume and appear bubbly, about 10 to 15 minutes.
- Prep: Preheat the oven to 475 F with a Dutch oven inside.
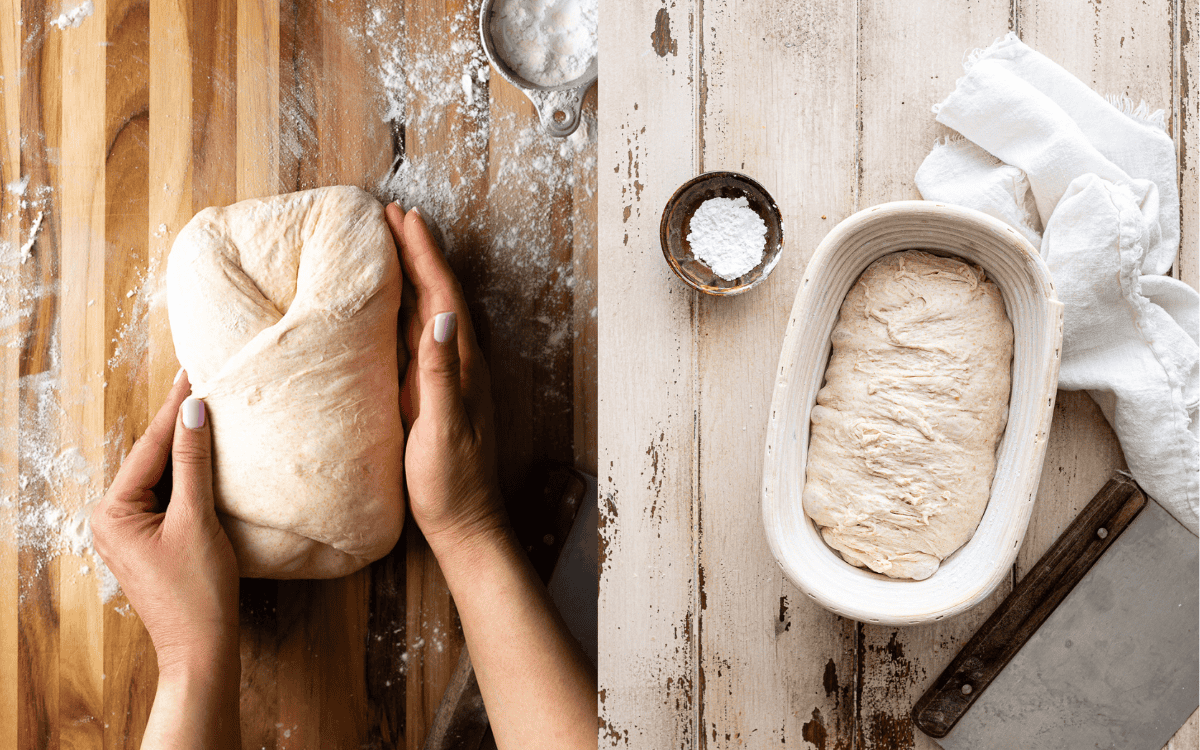
- Shape: Coat a banneton with rice flour (see note*). Shape the dough into a boule or a batard.
- To shape your dough, turn the proofed dough on a clean work surface. Flatten the dough out into a rectangle. Fold the side closest to you towards the center and the top of the dough over the bottom flap. Fold the sides over each other
- Flip the dough and round it into a boule or roll it into a batard. Place the dough into a prepared banneton with the seam side up.
- Second rise: Cover the banneton with plastic wrap and let the dough rise until puffy and well risen, about 30 to 45 minutes.
- Score: Transfer the dough to a piece of parchment paper with the seam-side down. Score the dough.
- Bake: Place the dough with the parchment paper inside the hot Dutch oven. Bake the dough covered for 25 minutes and uncovered for 10 to 15 minutes.
- Enjoy: Transfer the baked loaf to a cooling rack. Let the bread cool for at least 2 hours before slicing.
- Store: This bread will store well for up to a week in an airtight container at room temperature.
Tips
These recipes were developed and tested using grams for precise measurements. To increase your chances of success, I recommend investing in a kitchen scale. I've included rough volume estimates (in tablespoons and cups), but they might not be totally accurate.
Remember all ovens are unique, these recipes were tested in my oven which runs cooler than others. You might need to lower the temperature if your bake appears to be browning too quickly. Monitor your bake closely and make adjustments if needed.
Notes
Nutrition
I am not a nutritionist or dietitian, any nutrition information provided is an estimate.

Karen Brooks says
Wonderful loaf of bread. You can have it on the table in less than 4 hours. I was a little concerned about how wet the dough is, but I resisted the urge to add more flour and I'm glad I did! The loaf rose beautifully and had a fluffy crumb and lovely soft crust. Slices great and tastes terrific. This is the first recipe I've made from this blog. Definiitely going to make more!
Hannah Dela Cruz says
I'm so glad you were brave enough and you stuck with the process! Even happier that you enjoyed it.
Rebekah Lu says
This really is just about the easiest loaf to make and a great use of discard! It's pretty cool here on the coast where I live, so rise times were much longer. Definitely will make this one again.
Hannah Dela Cruz says
Hi Rebekah! Thank you so much for the nice comment. Glad you loved the recipe.
Mary R says
Hi Hannah, I am really enjoying your recipes and wonder if adding cranberries and nuts would work with this recipe. I've made sourdough versions and the long proof artisan yeasted version but would love to make this quicker hybrid. Any thoughts or helpful information would be greatly appreciated!
Hannah Dela Cruz says
Hi Mary! Absolutely. My best advice would be to use the formula/ingredients list in my Cranberry Walnut Sourdough recipe but add 1 packet of yeast. Then follow the instructions for mixing/proofing using this recipe. Hope that helps and feel free to email me if that seems unclear.
Good luck!
https://makeitdough.com/cranberry-walnut-sourdough-bread/
Katelyn says
I don’t say this lightly… this is the best discard recipe I have ever used. I’ve made 4 loaves of bread and I am truly impressed with how good everyone of these comes out. Time to check out the other recipes!
Hannah Dela Cruz says
That's such a nice compliment, Katelyn! I am so happy you enjoyed this bread recipe. I've been making this discard bread recipe a lot too since I've been a bit busy these days. Glad you loved it and it's worked for you on numerous occasions.
Rachael Pack says
Question! My bread is very shaggy and I dont have strong gluten strands. Does that mean I need to develop more gluten in my initial mix or does that mean my starter/ yeast combo is too strong for strands to form?
Hannah Dela Cruz says
Hi Rachael - thanks for reaching out! The term “shaggy” can mean a few different things, so it helps to think about where you are in the process.
Right after mixing: A shaggy dough is totally normal. The flour just needs time to hydrate, and the gluten will start forming as the dough rests and you continue with kneading or folds.
After kneading: If the dough still looks rough, that’s usually a sign it needs to rest. Even a short pause will let the gluten relax and repair, which helps the dough smooth out.
Your starter/yeast combo isn’t preventing gluten from forming. The only way a starter could affect the gluten network is through long fermentation (the dough becomes more acidic over time, which can weaken gluten). But since this recipe doesn’t ferment that long, that’s not something to worry about.
Marge says
I haven’t tried this recipe yet but have used a similar recipe . This one looks amazing. I want to know if olive oil can be added to this recipe. I have used several recipes that include oil and I like the the resulting texture that the oil adds. If so , how much can I add and would I have to adjust the amount of liquid at all?
Hannah Dela Cruz says
Hi Marge! So happy you want to try this one out. Your best bet is to try this recipe instead - https://makeitdough.com/roasted-garlic-rosemary-olive-oil-sourdough/.
It has olive oil so the ingredient proportions are already worked out for you perfectly. You can skip the herbs if you want a plain loaf.
Pat says
I've tried many discard bread recipes. This is, by far, my best. It is artisan like, but very soft and airy. Stays fresh for a week. Thanks so much for the recipe. Great way to use my discard in between my regular sourdough bread making.
Hannah Dela Cruz says
What a compliment! Thank you so much.
Kylie says
Perfection. Thanks for the recipe and tips Hannah. Your discard crepes are also very, very good 🙂
Hannah Dela Cruz says
So glad you love the recipes, Kylie!