

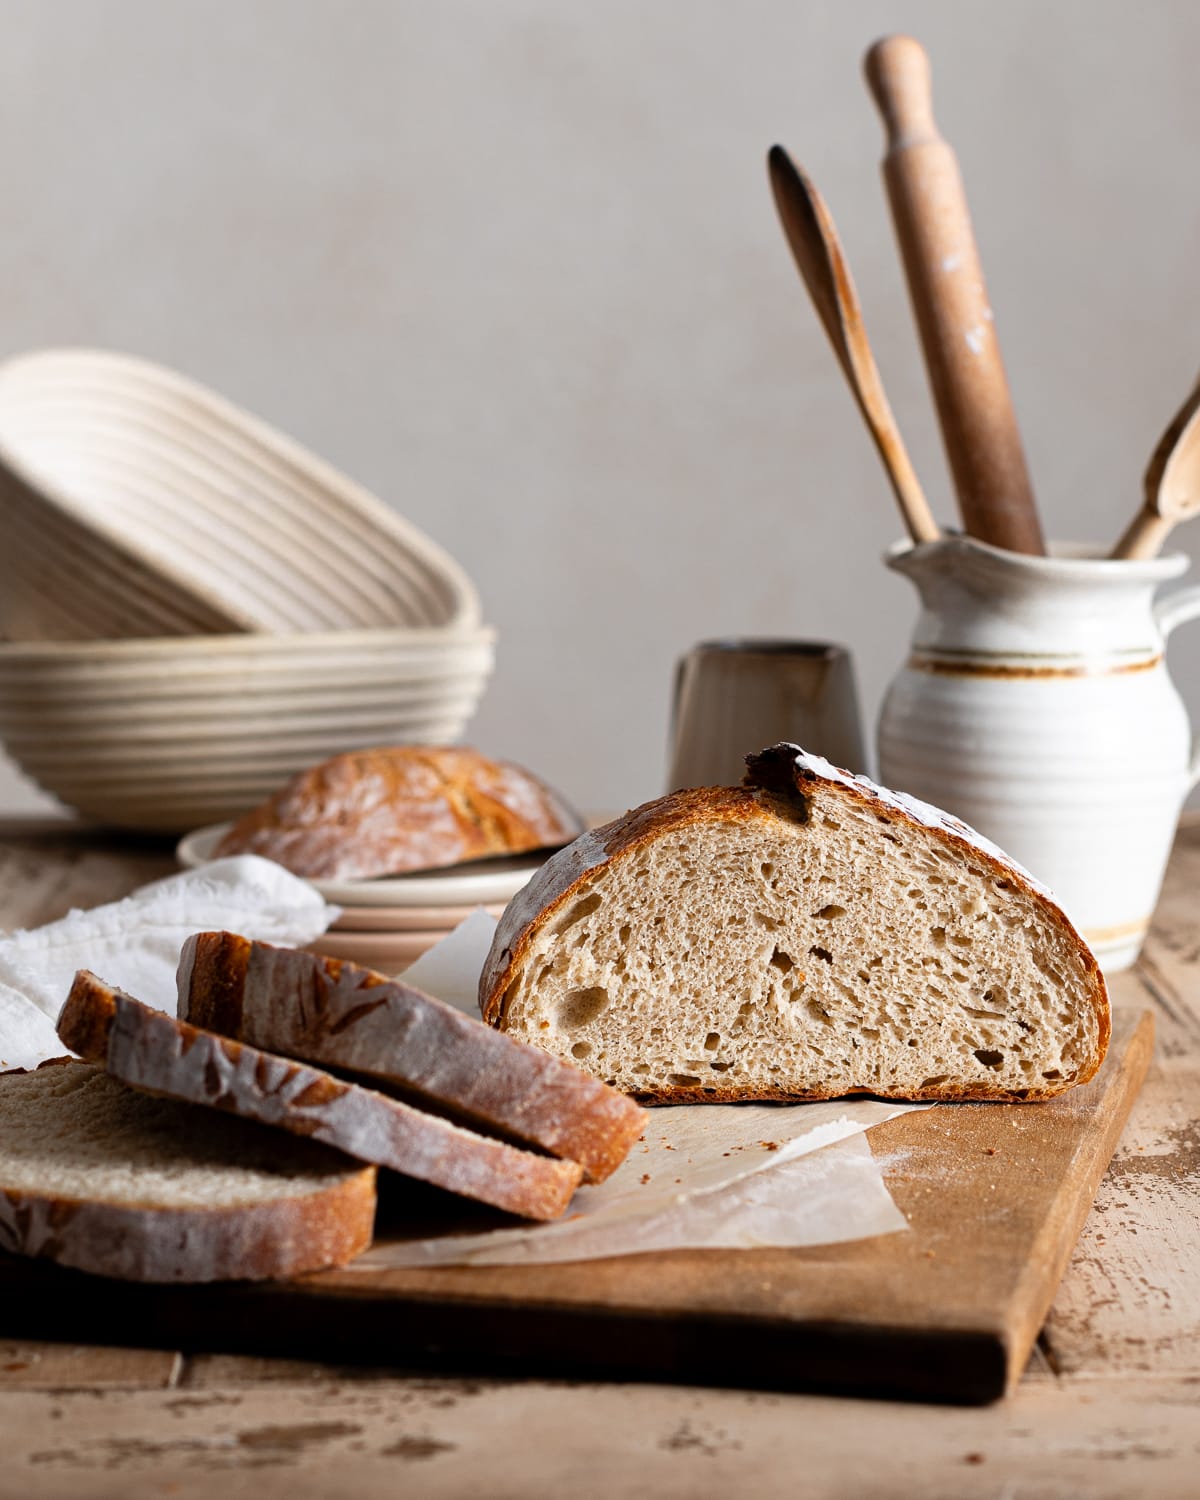
If you're craving fresh-baked bread but didn't plan ahead, this no-knead discard bread fits easily into a busy schedule. It's mixed by hand, rises quickly, and bakes into a loaf that's light, soft, and full of tangy flavor. You don't even need to activate your sourdough starter! This is the recipe I rely on when I want a light, flavorful loaf but don't have the time (or energy) to make my classic sourdough bread recipe. Everything comes together in one bowl with a few simple ingredients, making fresh bread feel doable on any day of the week.

This recipe was originally published in Sept. 2023. I have since added more photos and tips for success.
5-STAR REVIEW
This was my first run through with this recipe and it turned out amazing! I love that this loaf yields a similar structure to a true sourdough loaf with a fraction of the time and effort. Will definitely make again.
Allison
I'll admit, I used to be a bit of a purist and believed good bread could only come from long fermentation. But as life has gotten fuller (we've added a few pets to our family and I've picked up a few new hobbies), I've embraced how reliable and convenient baking with commercial yeast can be. Paired with sourdough discard, it still makes wonderfully flavorful bread, just on a schedule that fits real life.
If you've made my sourdough discard focaccia, sourdough discard pretzels, and sourdough discard sandwich bread, you'll know that sourdough discard and a bit of yeast can work together beautifully.
Ingredients and Substitutions
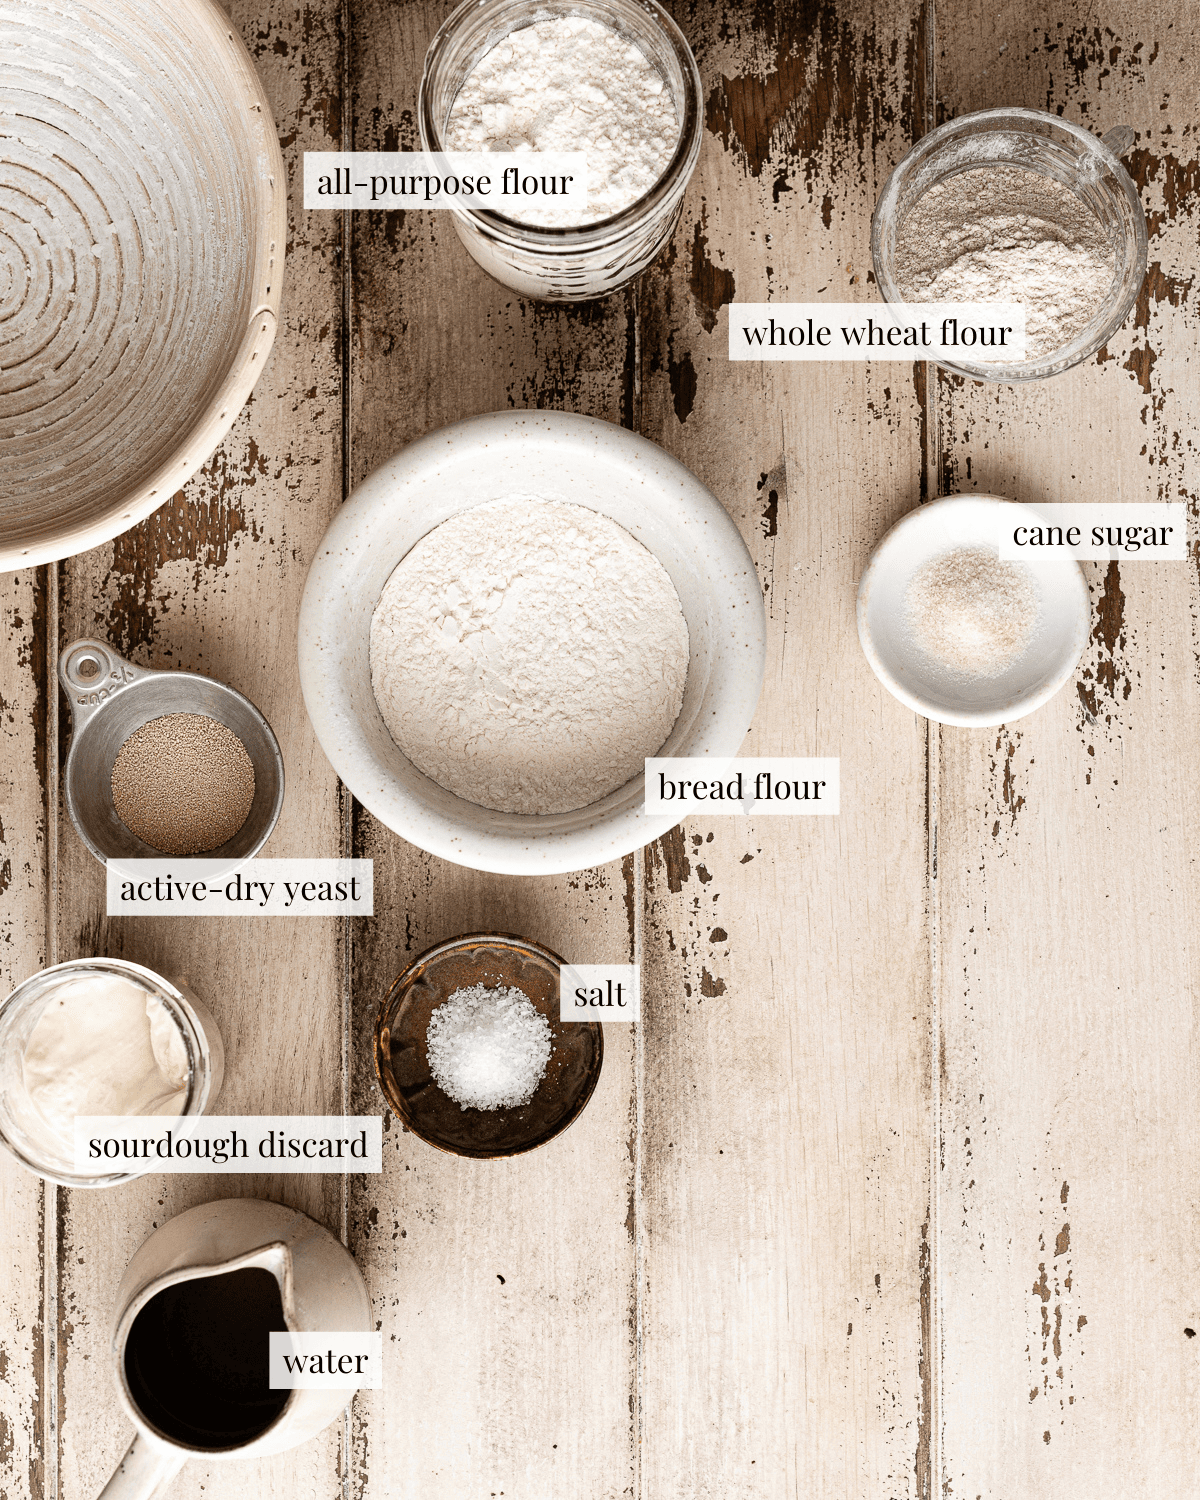
This recipe uses a mix of different types of flours, all-purpose flour, bread flour and whole wheat the ideal mix for flavor and texture. But if you don't have all three on hand, no problem. You can use just all-purpose or bread flour and still get great results.
Since this recipe uses commercial yeast you can use your sourdough starter straight from the fridge, no need to activate it!
Step-by-step Instructions
STEP 1: Make the dough
Combine water, sugar and active-dry yeast, let the yeast bloom for 15 minutes. Add in the sourdough starter and dry ingredients. Mix until no traces of dry flour remain.

STEP 2: Stretch and fold
Perform 3 sets of stretch and folds in 15-minute intervals during bulk rise. To perform 1 set, use your fingertips pick up one side of the dough and stretch it as far as you can without tearing. Then fold the dough over itself, turn the bowl 90 degrees, and repeat 3 more times (this is one set).

Stretch and Fold Sample Schedule
9:00 a.m. - Fold 1
9:15 a.m. - Fold 2
9:30 a.m. - Fold 3
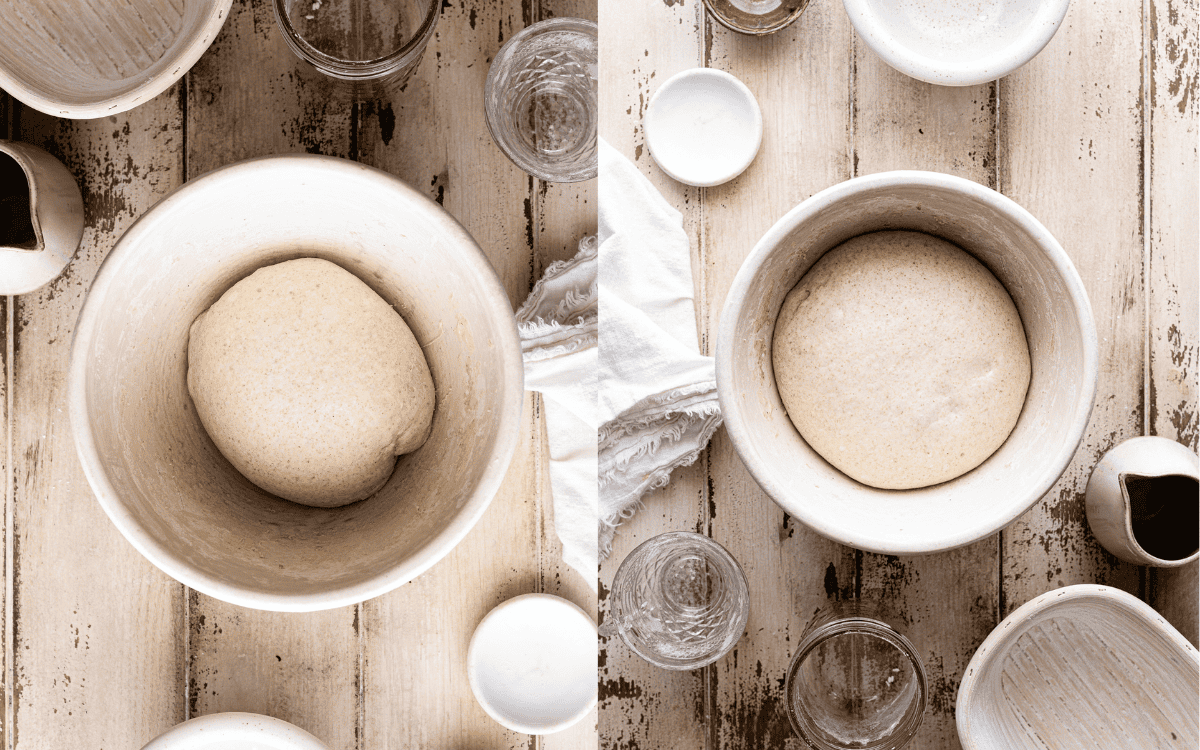
STEP 3: First rise
After the last fold, allow the dough to rise untouched until doubled in volume.
STEP 5: Bake
Score the dough. Bake in a covered Dutch oven at 475 F for 25 minutes. Remove the cover and bake at for an additional 10 to 15 minutes, depending on how dark you'd like your crust.

Tips from Hannah's test kitchen
- This dough contains a lot of water (about 73% hydration). It's completely normal for your dough to feel very sticky and difficult to handle right after it's mixed. Don't panic! Be gentle, use your fingertips during stretch and fold, and keep your hands damp to make it easier to handle.
- Although I love how yeast speeds things up, I had better results using cold water during testing. It slows down fermentation, but it gives the dough more time to develop flavor and the payoff is worth it.
- This bread works really well as a sandwich loaf too check out How to Bake Bread in a Loaf Pan in my post.
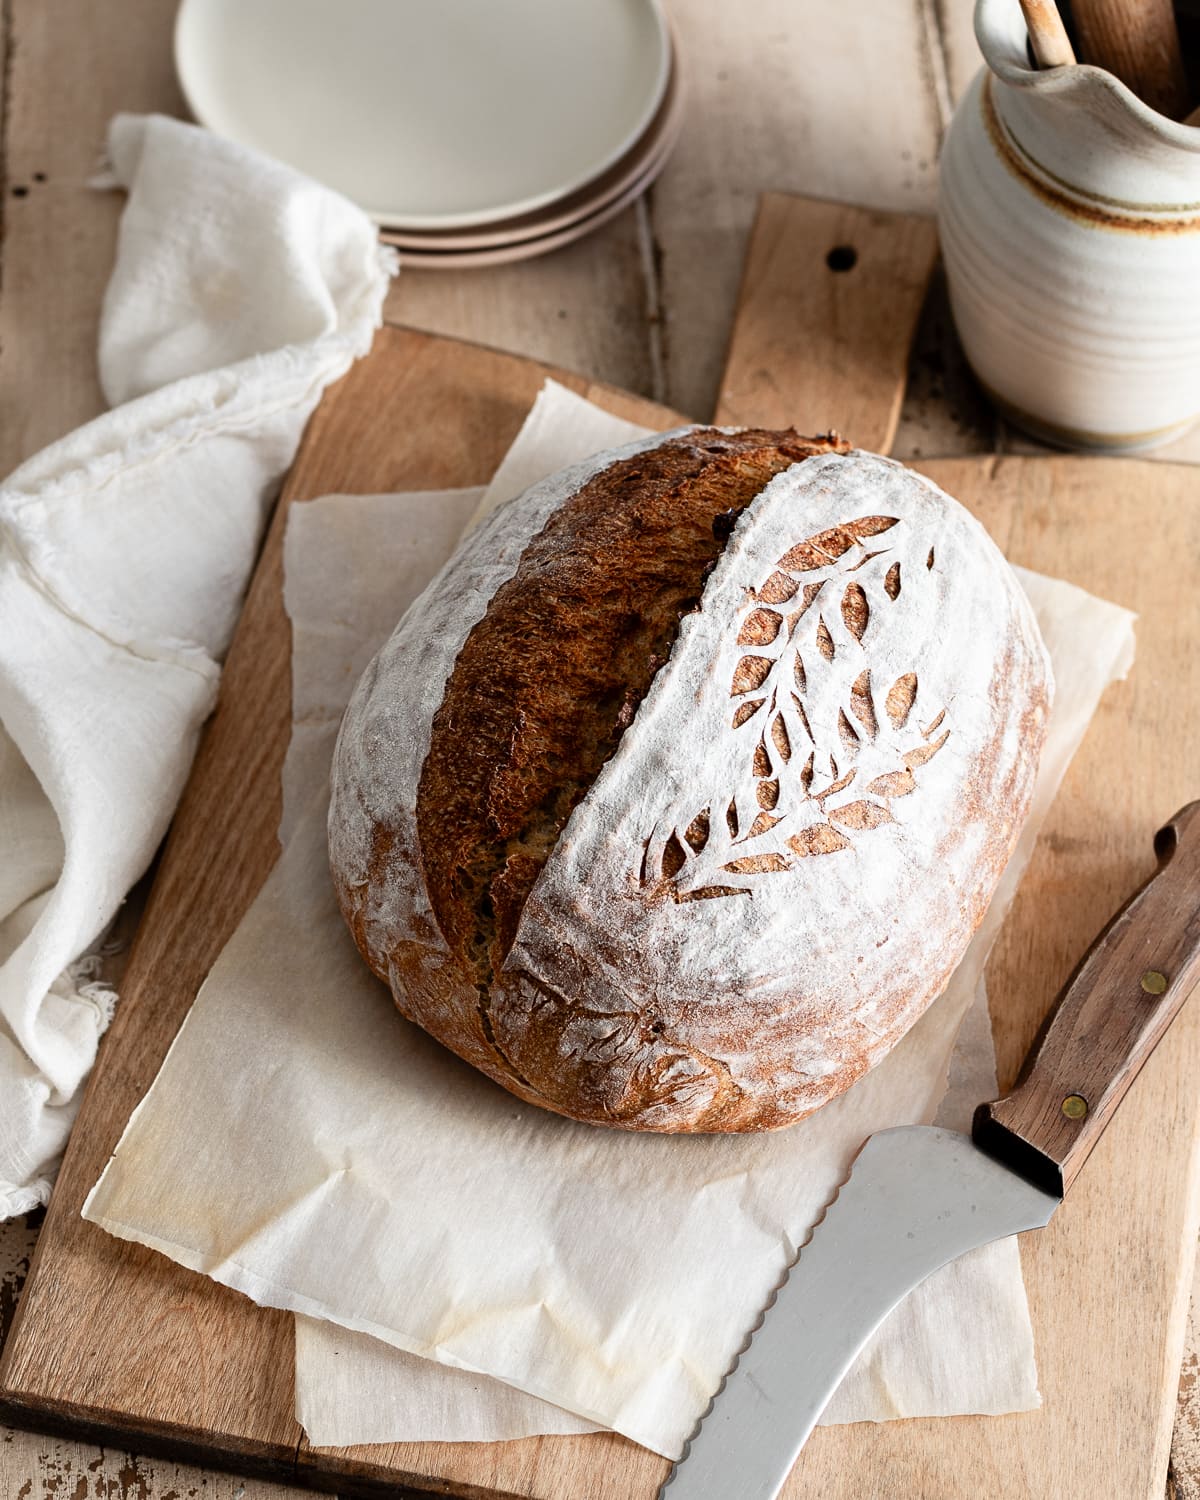
Want to learn how to create beautiful decorative scoring patterns on your bread? My sourdough bread scoring guide is a great place to start.
Did this recipe rise to the occasion?
★★★★★
Leave a star rating and a comment. Your feedback inspires future recipes and helps others feel confident choosing what to bake next. I read and respond to every message.
If you're looking for additional ways to support my work, share this recipe or buy me a Ko-fi. Every little bit helps me keep creating the recipes and guides you enjoy.
Thank you for your support!

Easy Sourdough Discard Bread Recipe
This section may contain affiliate links
Ingredients
- 7 grams active-dry yeast
- 226 grams water
- 14 grams cane sugar
- 113 grams sourdough discard
- 180 grams bread flour
- 90 grams all-purpose flour
- 60 grams whole wheat flour
- 7 grams salt
Click US Customary to view volume measurements
Instructions
- Make the dough: Mix the water, active-dry yeast, and sugar in a mixing bowl. Allow the mixture to bloom until it smells yeasty and looks bubbly.7 grams active-dry yeast, 226 grams water, 14 grams cane sugar
- Fold in the sourdough discard, bread flour, all-purpose flour, whole wheat flour and salt until no traces of dry flour remain. Cover the bowl with plastic wrap and let the dough rest for 10 minutes.113 grams sourdough discard, 180 grams bread flour, 90 grams all-purpose flour, 60 grams whole wheat flour, 7 grams salt
- Stretch and fold: After the rest period, complete 3 sets of stretch and folds in 15-minute intervals.
- To complete a stretch and fold, with the dough inside your bowl, pick up the side of the dough closest to you using your fingertips. Stretch the dough out as much as you can without it tearing and fold it over itself. Turn the bowl 90 degrees and repeat 3 more times.
- Cover the bowl with plastic wrap. Set it in a warm place and let the dough rest for 15 minutes.
- First rise: Let the dough rise at room temperature until doubled in volume. The dough should double in volume and appear bubbly, about 10 to 15 minutes.
- Prep: Preheat the oven to 475 F with a Dutch oven inside.
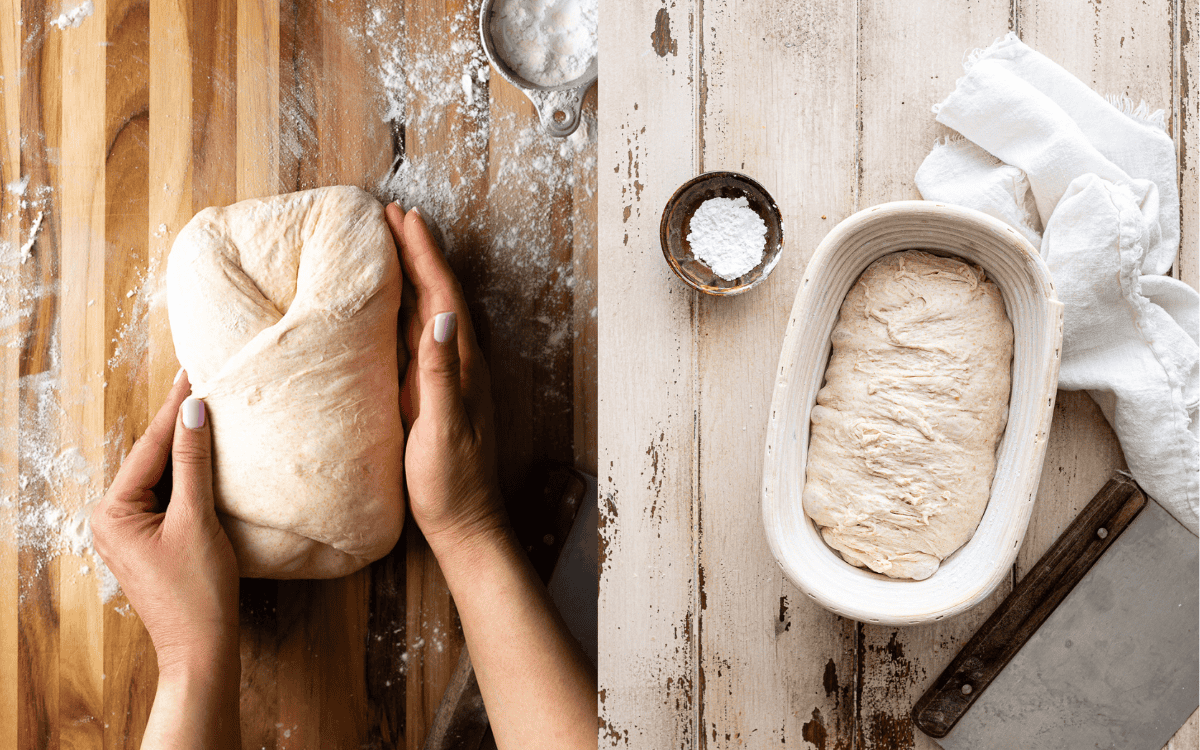
- Shape: Coat a banneton with rice flour (see note*). Shape the dough into a boule or a batard.
- To shape your dough, turn the proofed dough on a clean work surface. Flatten the dough out into a rectangle. Fold the side closest to you towards the center and the top of the dough over the bottom flap. Fold the sides over each other
- Flip the dough and round it into a boule or roll it into a batard. Place the dough into a prepared banneton with the seam side up.
- Second rise: Cover the banneton with plastic wrap and let the dough rise until puffy and well risen, about 30 to 45 minutes.
- Score: Transfer the dough to a piece of parchment paper with the seam-side down. Score the dough.
- Bake: Place the dough with the parchment paper inside the hot Dutch oven. Bake the dough covered for 25 minutes and uncovered for 10 to 15 minutes.
- Enjoy: Transfer the baked loaf to a cooling rack. Let the bread cool for at least 2 hours before slicing.
- Store: This bread will store well for up to a week in an airtight container at room temperature.
Tips
These recipes were developed and tested using grams for precise measurements. To increase your chances of success, I recommend investing in a kitchen scale. I've included rough volume estimates (in tablespoons and cups), but they might not be totally accurate.
Remember all ovens are unique, these recipes were tested in my oven which runs cooler than others. You might need to lower the temperature if your bake appears to be browning too quickly. Monitor your bake closely and make adjustments if needed.
Notes
Nutrition
I am not a nutritionist or dietitian, any nutrition information provided is an estimate.

Meg says
I've been using this recipe a LOT - the base recipe is great (though the first rise is described as 10-15 mins to double in volume which is definitely incorrect).
I'm experimenting with this loaf a lot as well - it's amazingly flexible and can cope with just about any addition, including flavoured oil. It's flexible about resting times and number of stretches too (I'm usually baking amidst child and work chaos and sometimes it gets forgotten for a bit or I'll end up doing extra stretches because I'll forget how many I've done). Excellent base recipe, thank you!
When I'm making the basic loaf, the only regular change I make is to half the sugar and use 10-12g salt per loaf due to personal preference.
Hannah Dela Cruz says
Glad the recipe is working for you! I should probably edit this recipe and rename the first rise section to bench rest*. The dough rises throughout the folding period so that's also included in the rise time which makes it 45 mins in reality.
finn payne says
Used this for my first loaf and it was INCREDIBLE!
Hannah Dela Cruz says
I'm glad your first loaf came out great! Thanks for trying my recipe.
Noemi says
Best discard bread ever! Isn’t as tasty as the real thing but a very good use for my discard and if you want quick but real bread! Also used my discard straight out of the fridge 😜
Hannah Dela Cruz says
So happy you loved the recipe, Noemi!
Sara says
If I want to bake the next day, at which point should I put it in fridge? Before or after second rise?
Hannah Dela Cruz says
I would put it straight into the fridge after shaping. Commercial yeast is quite strong so it will continue rising in the refrigerator.
Sarah says
mine isn't rising much in the oven, is this normal?
Hannah Dela Cruz says
Hi Sarah - this may be a proofing issue. If your bread isn't rising much in the oven, it may be over or underproofed.
Dawn says
If I wanted to add inclusions, at what step would be best?
Thank you in advance!
Hannah Dela Cruz says
I'd add the inclusions during the second fold.
Sonia Mendez says
I tried this recipe today! Amazing results! Thank you so much!
Kathleene says
I made this for the first time the other day and it is easily one of my new favorites. I did have an issue with getting my loaf out of my banneton. I floured it up, just as I would do with my pure sourdough loaves and it stuck to the inside. After I finally got it out, it was not cooperating with shaping. Despite that and it not being pretty, it was SUPER tasty and it's still fresh 5 days later. We are getting snow tomorrow so, Im prepping to make another. Thank you for sharing this recipe. Positively delicious!
Hannah Dela Cruz says
Hmm unless I am misunderstanding your comment. The dough should have been shaped before it was put inside the banneton. Glad you still loved the taste!
Maggie says
I love that this recipe lists the ingredients and measurements after each instruction. I’m excited to bake this today!
Hannah Dela Cruz says
I'm baking this today too! Good luck!
Carol Shields says
Great use of my discard and a really consistent bread! Result
Nadine Franklin says
Hi.
I am having a bit of trouble understanding all your rise times etc. So from after the stretch and folds how long to let rest and rise before shaping and baking. Any help would be amazing. Thank you
Hannah Dela Cruz says
Hi Nadine! I'm glad you're attempting this recipe. The after the first fold, wait 15 minutes and complete another one. Now repeat this 2 more times.
After your last fold, let the dough rest on the counter until doubled in volume. This should only take about 10 to 15 minutes. I know this seems short, but remember your has bee fermenting for 45 minutes while you were completing your folds. So the total rise time for this bread is actually about an hour.
I hope this makes sense! Let me know if you have any more questions!
Shannon says
This is such a great and yummy recipe! I want to add more discard to the recipe but I’m not sure how much extra I should add. If I do add more, should I add less flour or something else? I would love some advice on it! Thank you for such a great recipe!
Hannah Dela Cruz says
I wouldn't add anymore as it might make the dough too acidic and could prevent you from developing a good gluten network in your dough.
PhyllisCorella says
It tastes delicious, is very easy, and looks like it came from the bakery. Just like almost everyone, I hate to chuck the discard.
Thank you for all your discard recipes. I don't know which one I'm going to try next but rest assured, I will be trying another one.
Rema says
I made this recipe because I had too much extra sourdough discard. The smell and flavor of this bread were incredible. Visually, though, my bread wasn't as pretty as yours. My bread was flatter and had a more closed crumb structure.
Katrine Eskildsen says
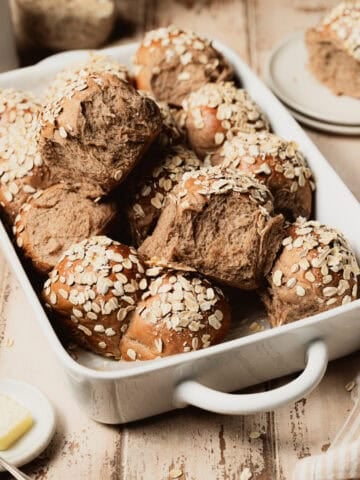
I have adjusted this recipe to make the most amazing rolls that we use either for pulled pork sandwiches or for breakfast just with butter and maybe jam. I have exchanged the whole wheat flour with quick oats. When it's time to shape the dough, I flatten it into a rectangle that I cut into 8 pieces. I raise these for about 30 minutes and bake at 450F for 15 minutes. I'm baking them several times a week now! Thank you for a great recipe!
Hannah Dela Cruz says
That sounds delicious! Such a great idea making these into rolls.
Claire Parker says
I’d like to make this into rolls so following your instructions. Before you cut into 8 pieces do you fold the rectangle then cut or just make into a rectangle and cut? Thx
Hannah Dela Cruz says
I would go straight to dividing the dough after proofing. No need to pre-shape the dough or "fold the rectangle."
Don't forget that you'll need to add steam to your oven if you're baking your rolls in a baking pan or baking sheet.
Jessie says
I have made this recipe several times now, and I really like it.
I have been dabbling in trying to make homemade sourdough bread off and on for awhile. My sourdough starter never seems to rise as much as they say it should, no matter what I do, and I don't like throwing away the discard at all. So, I tried this recipe to use up the discard and was amazed by the result. My bread came out looking like it was made in a bakery. It rises really well and looks almost too pretty to eat, and tasted like delicious. So, happy I tried this recipe. I have made it several times and each time it comes out perfect.
I use my kitchen aid mixer with the dough hook attachment to initial mix the dough and then just follow the directions from there. Thank you for this recipe excited to try your other sourdough discard recipes.
Hannah Dela Cruz says
I'm so happy you were finally able to make bread that you love!
Ben says
Hi, no matter how many stretch and fold I make the dough doesn’t hold any shape at al, I can’t fold it or shape it as it’s too loose.
Not sure where I go wrong I’m at 5-6 stretch and fold and no difference.
Have you any tips ? Maybe my stretch and fold are incorrect but I’ve looked up loads of tutorials and I think I’m doing it right, just not seeing any difference after.
Can I use a kitchen aid to knead the dough a little bit to give it strength or reduce the amount of water maybe ?
Still tastes amazing 🤩
Thanks !
Hannah Dela Cruz says
You may actually be harming the gluten network of your dough by completing too many folds. It's very normal for your dough to feel "loose" after it has sat for a while, this characteristic is called "extensibility." Perhaps you are having a proofing issue - which is why you feel as though your dough doesn't have a form. Try letting your dough proof until it feels bubbly and has noticeably increased in volume. This usually makes dough look a bit more like it has a structure. Complete the windowpane test, once you've passed it, stop folding and just let your dough rise until ready to shape. See if this makes a difference.