

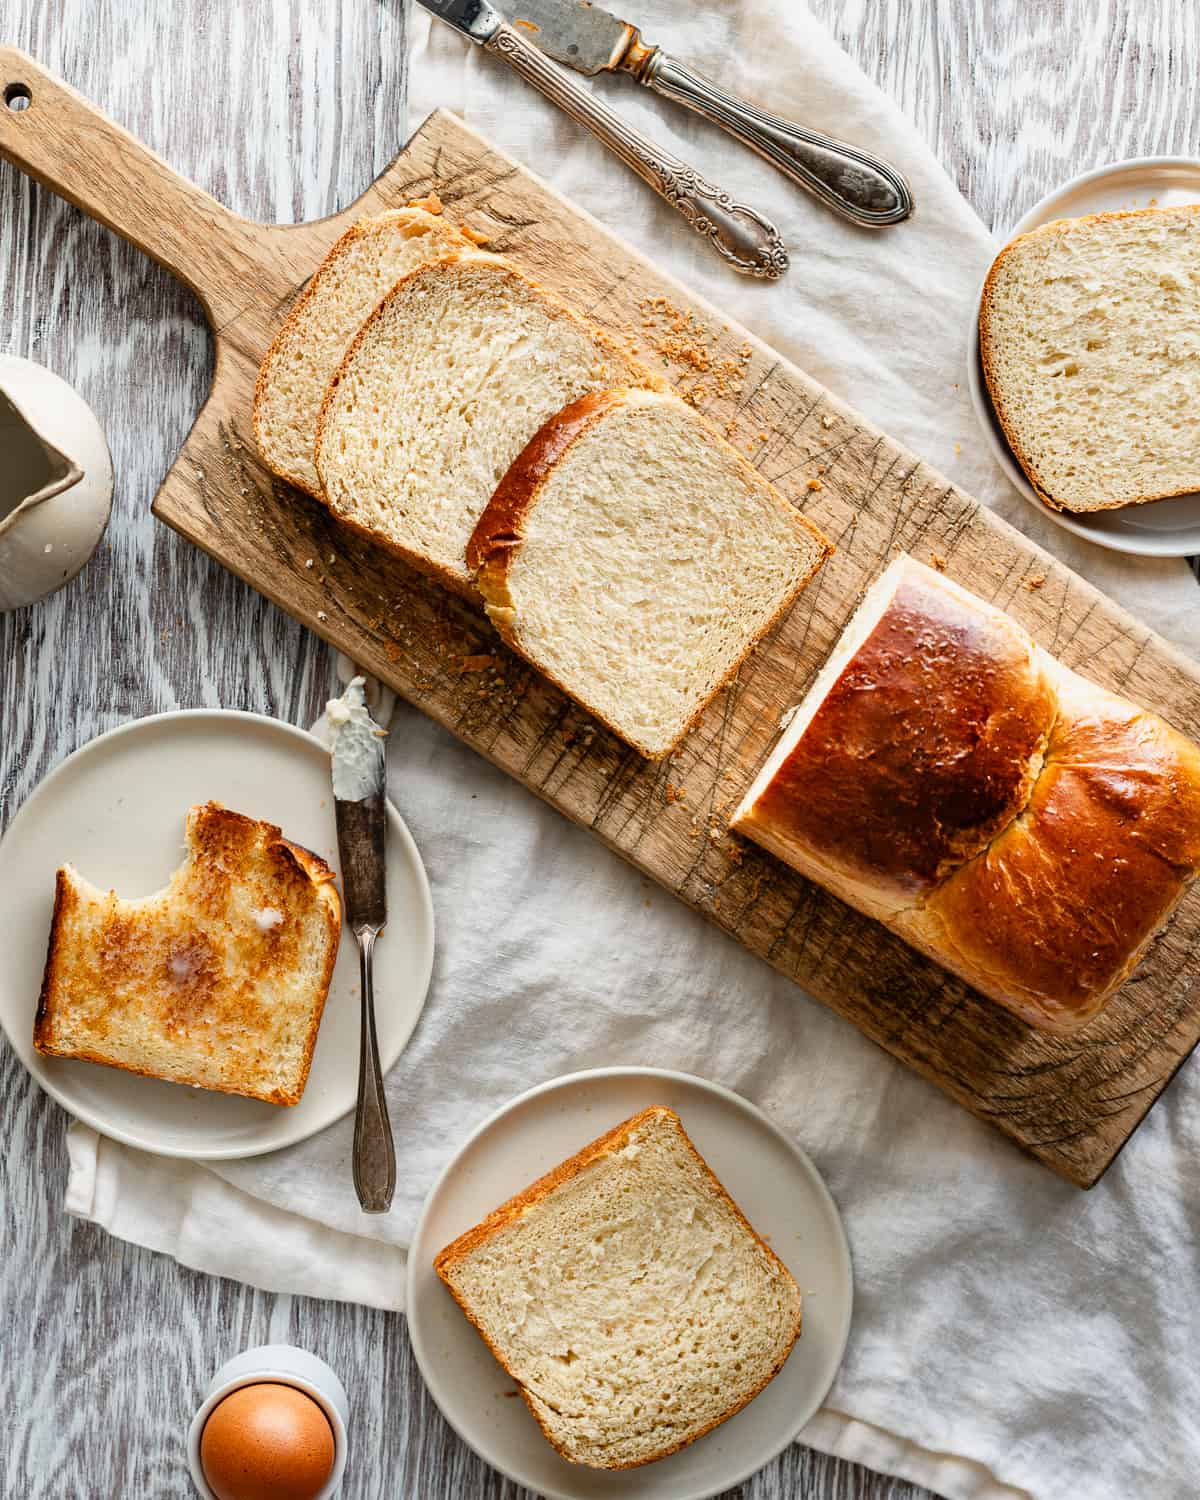
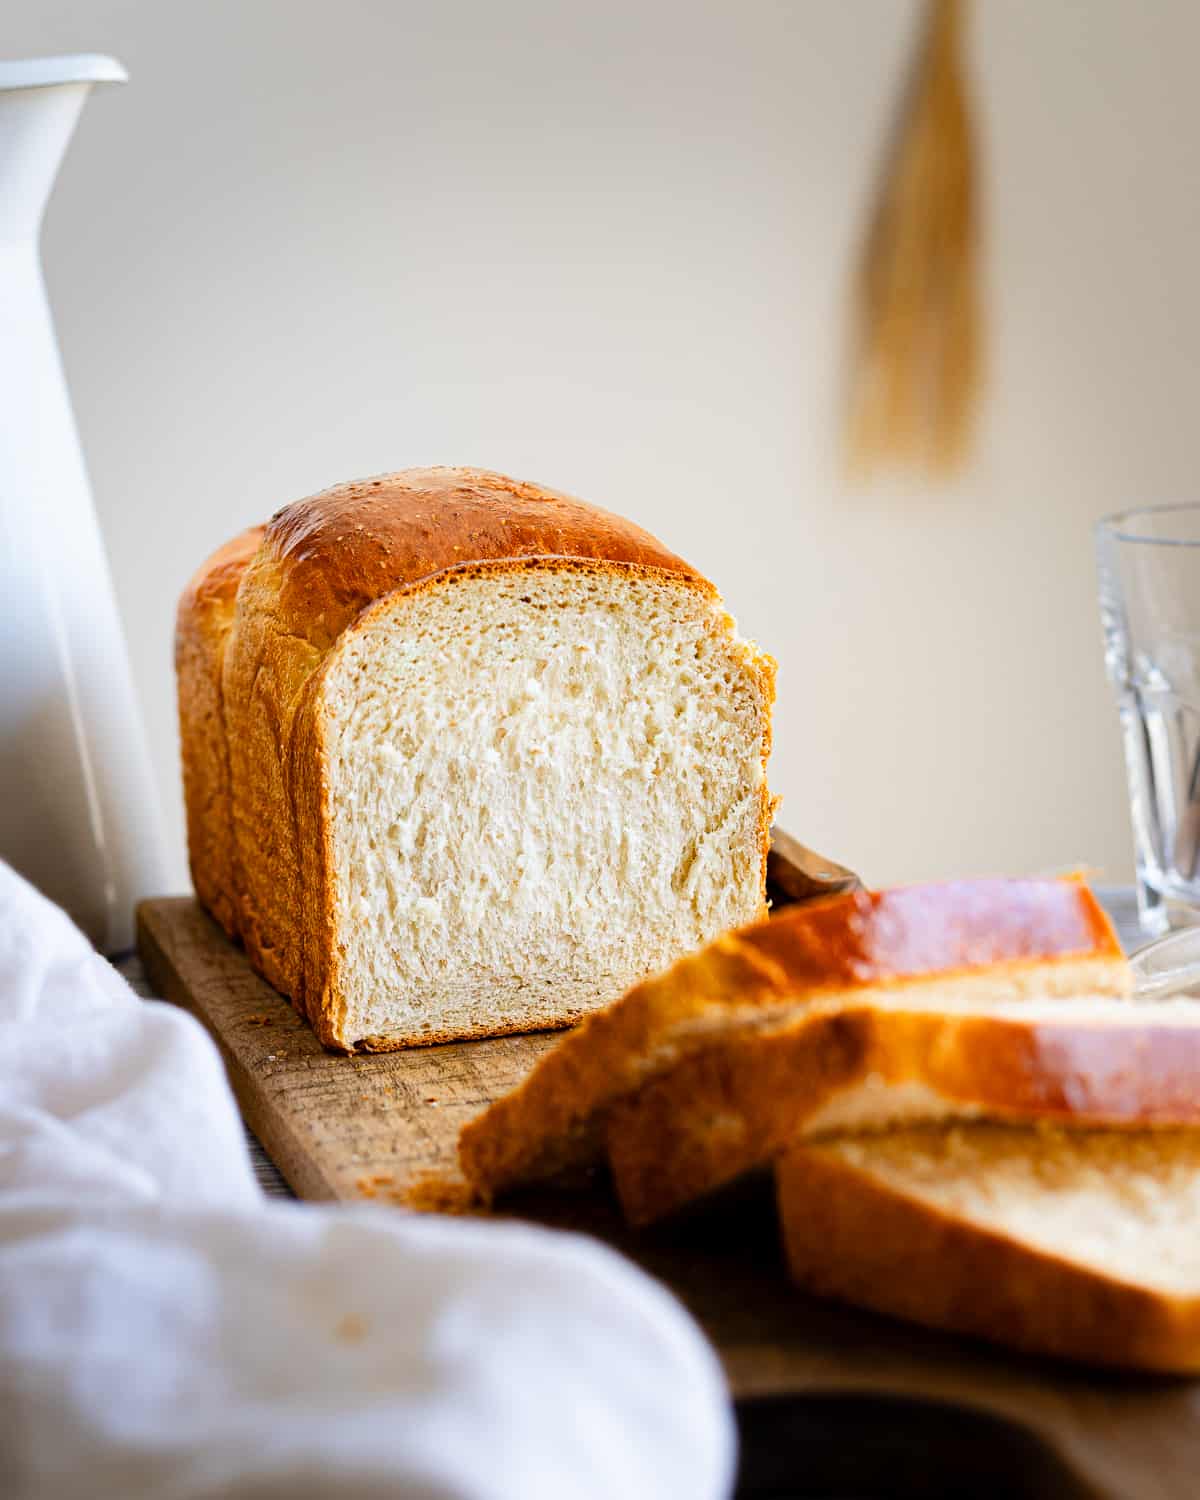
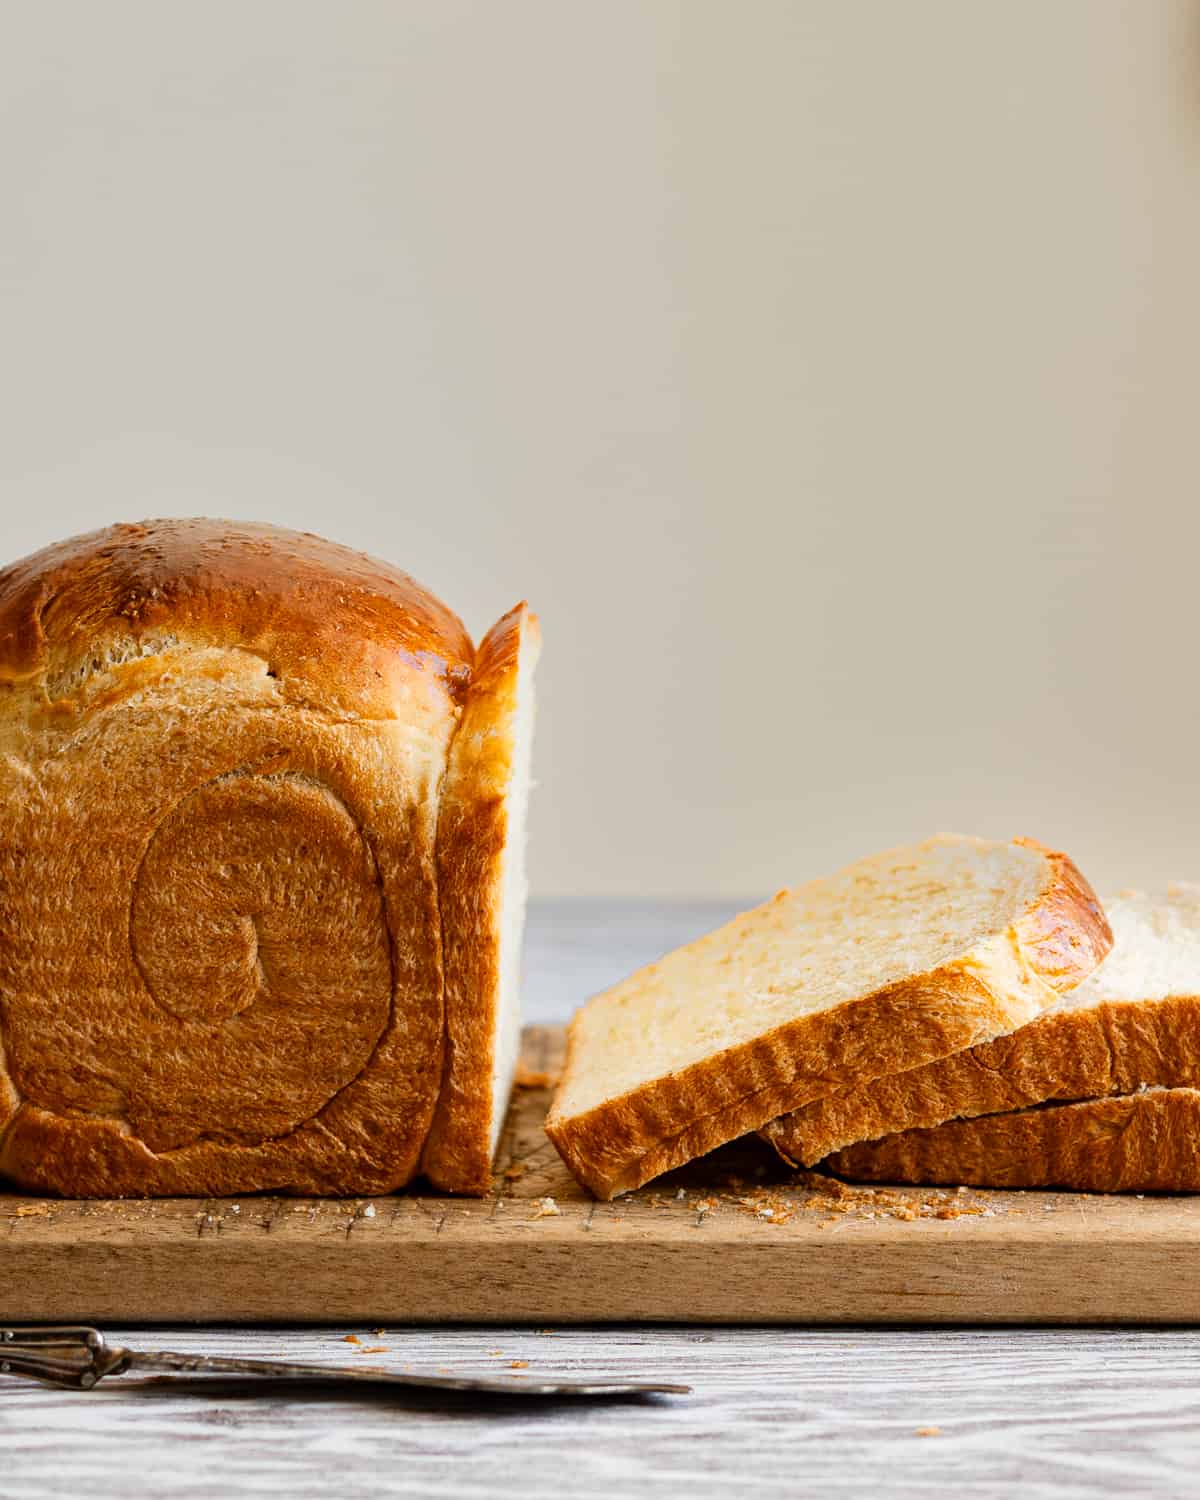
Nothing beats a classic. This soft, fluffy Sourdough Discard Sandwich Bread is perfect for sandwiches and toast. For a quick and but flavorful loaf, this recipe uses a combination of commercial yeast and sourdough discard.
This recipe was originally published in July 2022. I have since updated it with more information, new photos and additional tips for success.
Easy peasy recipe, very fluffy and delicious. Made it already more than 5 times…sooo good! Thank you.
- Nadine
I used to be a purist when it came to my bread recipes. I never wanted to use commercial yeast because I'm such a huge fan of sourdough and while I still believe sourdough bread stands out in texture, flavor, and digestibility, I now have an appreciation for breads made from hybrid dough (dough that uses both sourdough and commercial yeast).
This sourdough discard sandwich loaf sparked my love for sourdough discard bread recipes. Just because there's no time to babysit a naturally leavened sourdough loaf doesn't mean we should go without fresh, homemade bread.
While sourdough starter makes incredible bread, commercial yeast has its place, especially in enriched doughs with butter, milk, and eggs, which can further slow fermentation. It's also useful for breads where a strong tangy flavor isn't the goal. Even though the starter isn't the main leavener here, it still adds depth of flavor. Plus it's a great way to use up starter that would otherwise go to waste.
Want more ideas for using your sourdough discard in bread recipes? Try my Sourdough Discard Focaccia Bread, Sourdough Discard Hot Dog Buns and Sourdough Discard Dinner Rolls.
Why I love this recipe
- Quick and easy bake that's great for beginners and pro bakers.
- Delicious sourdough flavor without the long rise times of naturally-leavened bread.
- Soft and fluffy texture perfect for peanut butter sandwiches but sturdy enough for turkey sandwiches.
- All-mixed by hand - no stand mixer or special equipment required.
- Great way to use up excess sourdough starter.
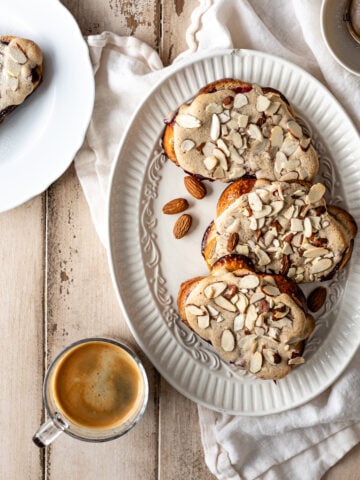
- Leftovers make the best French Toast, Bread Pudding or Bostock Pastry.
Ingredients and Substitutions
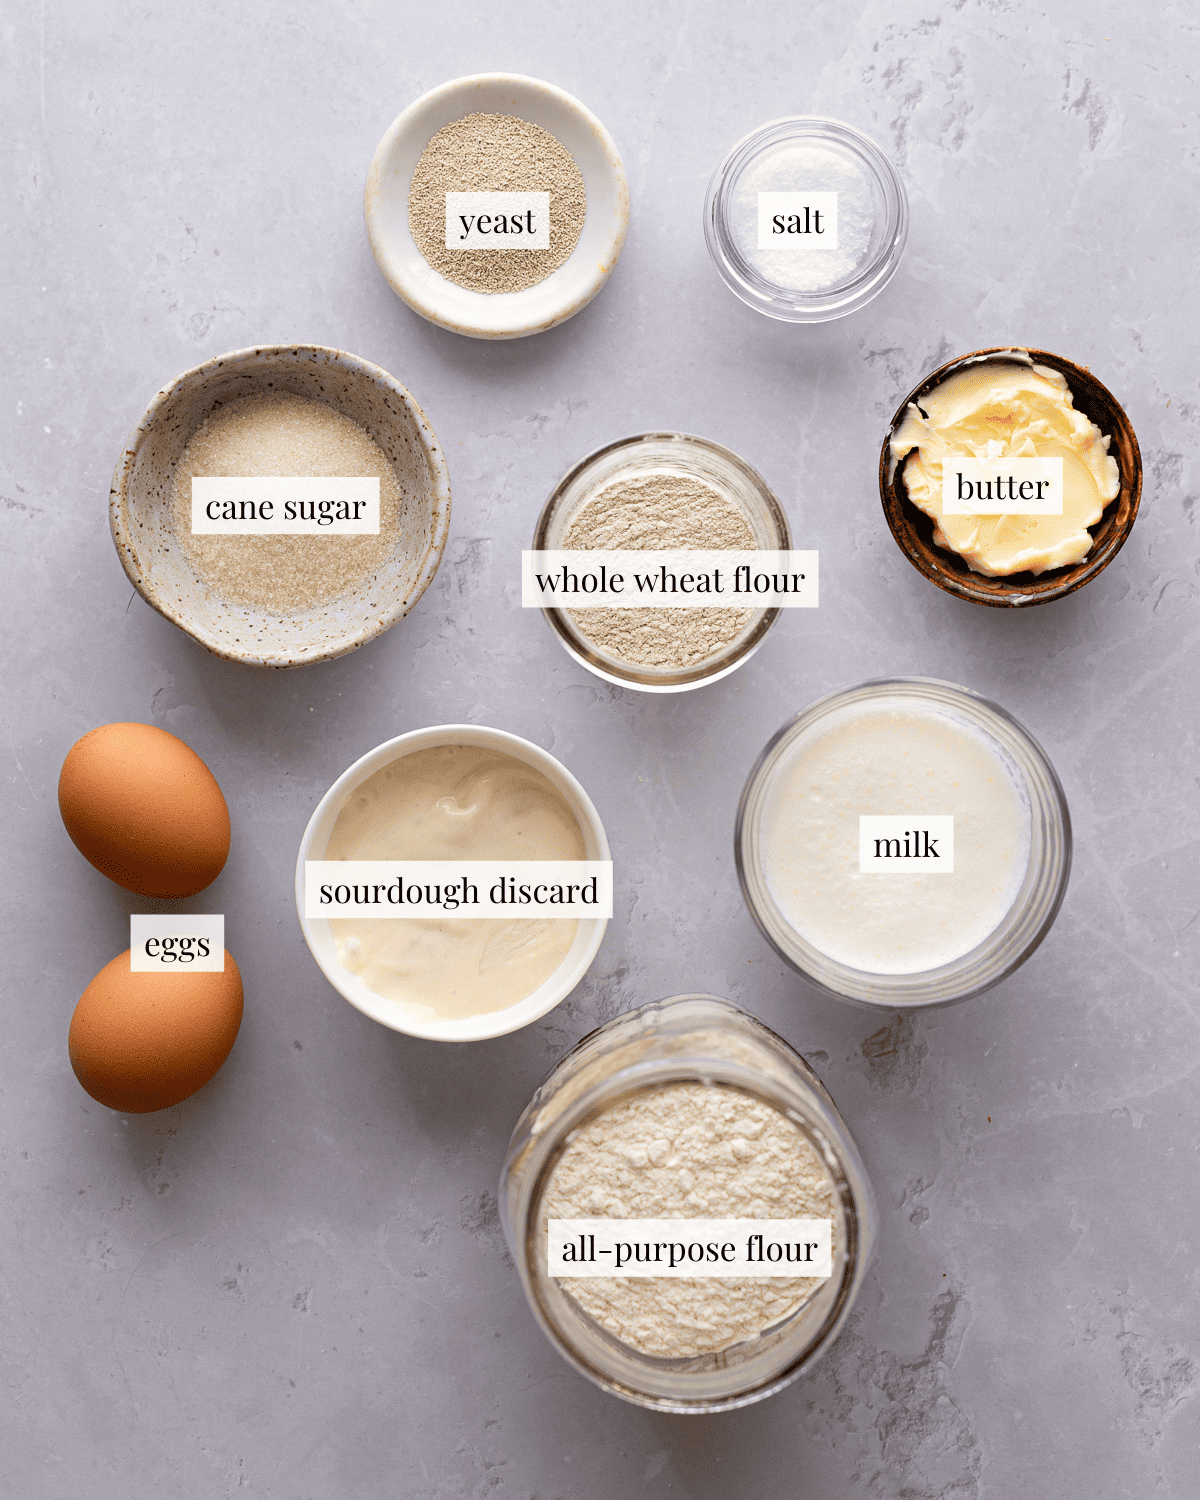
All-purpose: The low protein content of this flour makes this bread light and fluffy. You can substitute bread flour but do not use a flour like whole wheat or rye in place of the all-purpose in this recipe.
Whole wheat flour: Adds a little bit of nuttiness to this recipe without making the loaf too dense or heavy. If you're looking for whole wheat recipes, try my Whole Wheat Sourdough Discard Bread and Sourdough Discard Marble Rye Bread recipe.
Sourdough discard: Both active starter and sourdough discard will work for this recipe. If you don't have a starter, simply add 37 grams of all-purpose flour and 37 grams of water to the dough.
Milk, sugar, eggs and butter: These classic enrichments add richness and tenderness to bread. Looking for a plant-based alternative? Try my recipe for Vegan Sourdough Discard Sandwich Bread.
See the recipe card for detailed ingredient information.
Check the expiration date on your yeast packet before starting this recipe! If your yeast is past its prime, your dough will not rise and your bread will be dense and gummy.
Baking with sourdough discard
Since you are not using it as a leavener, your sourdough starter does not need to be activated or fed for it to work in this recipe. You can use your sourdough discard straight from the refrigerator.
If you're using sourdough that's been in the fridge for weeks it will add more acidity to your loaf, which you won't get when using a freshly fed starter. Both will work for this recipe but you'll get different results.
Step-by-step instructions
Step 1: Make the dough
Bloom the yeast. Fold the ingredients in until a cohesive dough forms. Knead the butter into the dough. Turn the dough out on a clean surface and knead until smooth.
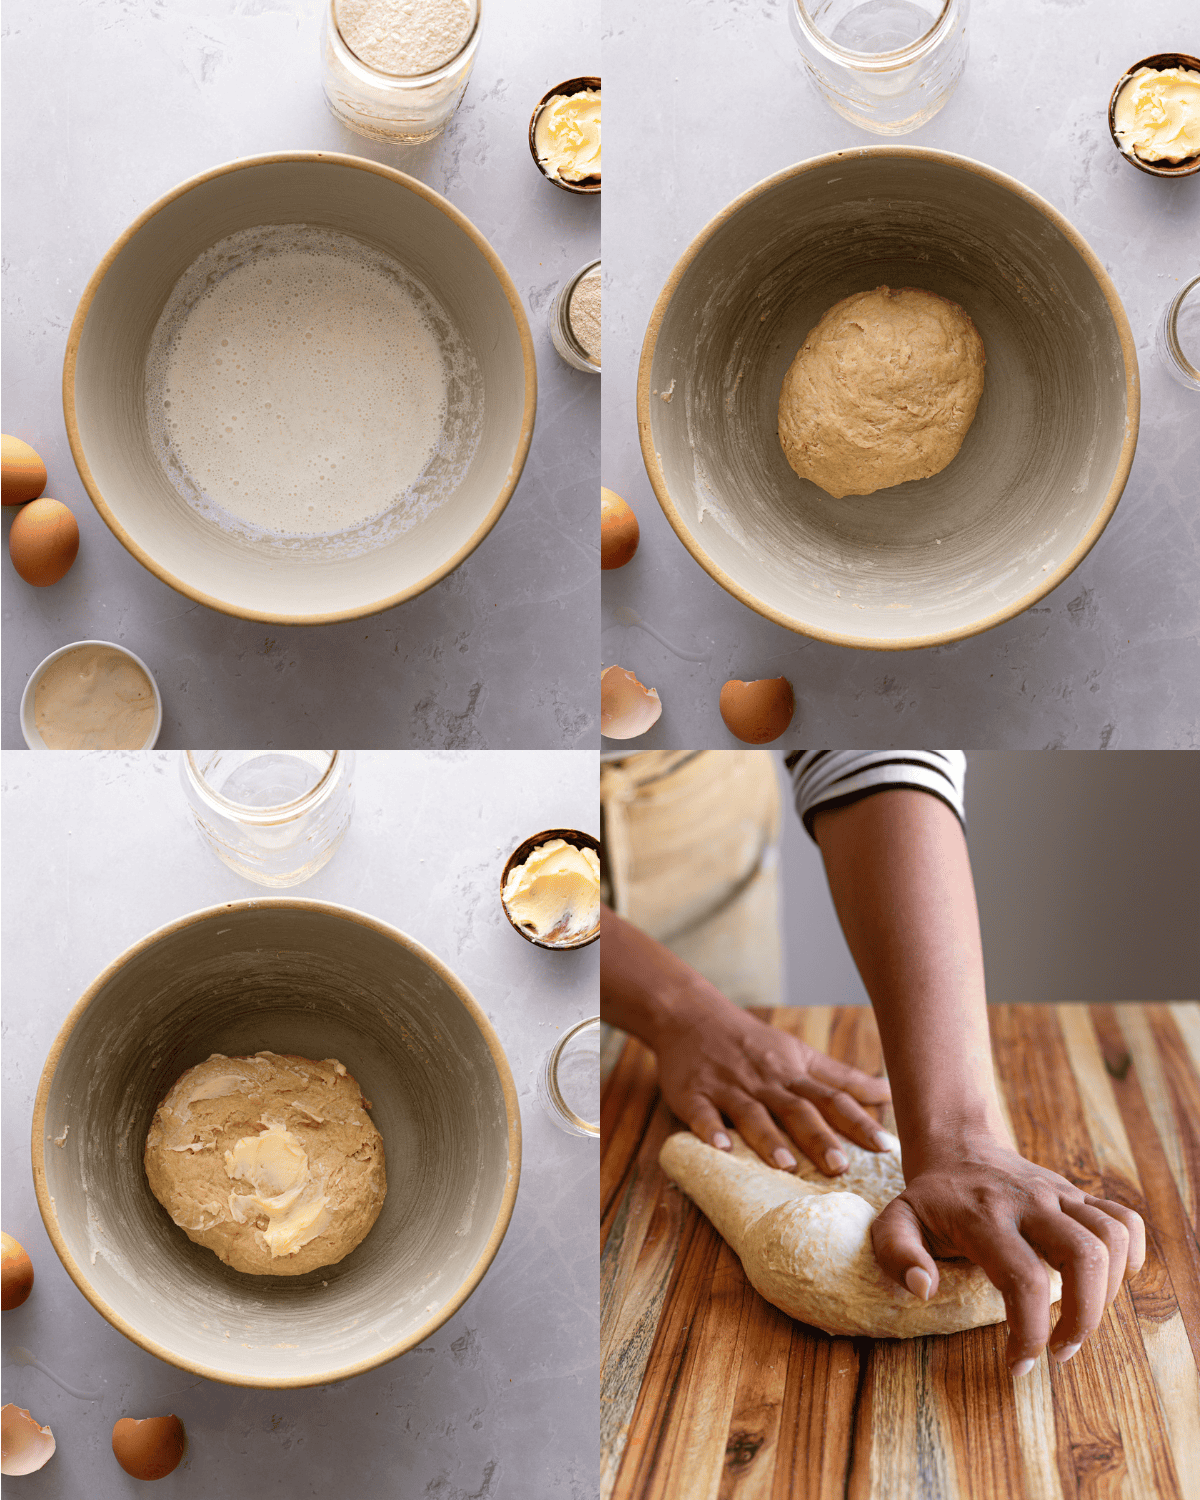
What to do if your dough feels too sticky
Allow the dough to rest for 15 minutes before kneading. This will give the gluten development a head start, making it less sticky and much easier to handle.
Step 2: Proof the dough
Transfer the dough into a clean, lightly-oiled bowl and cover with plastic wrap. Let the dough rise in a warm spot until doubled in volume.

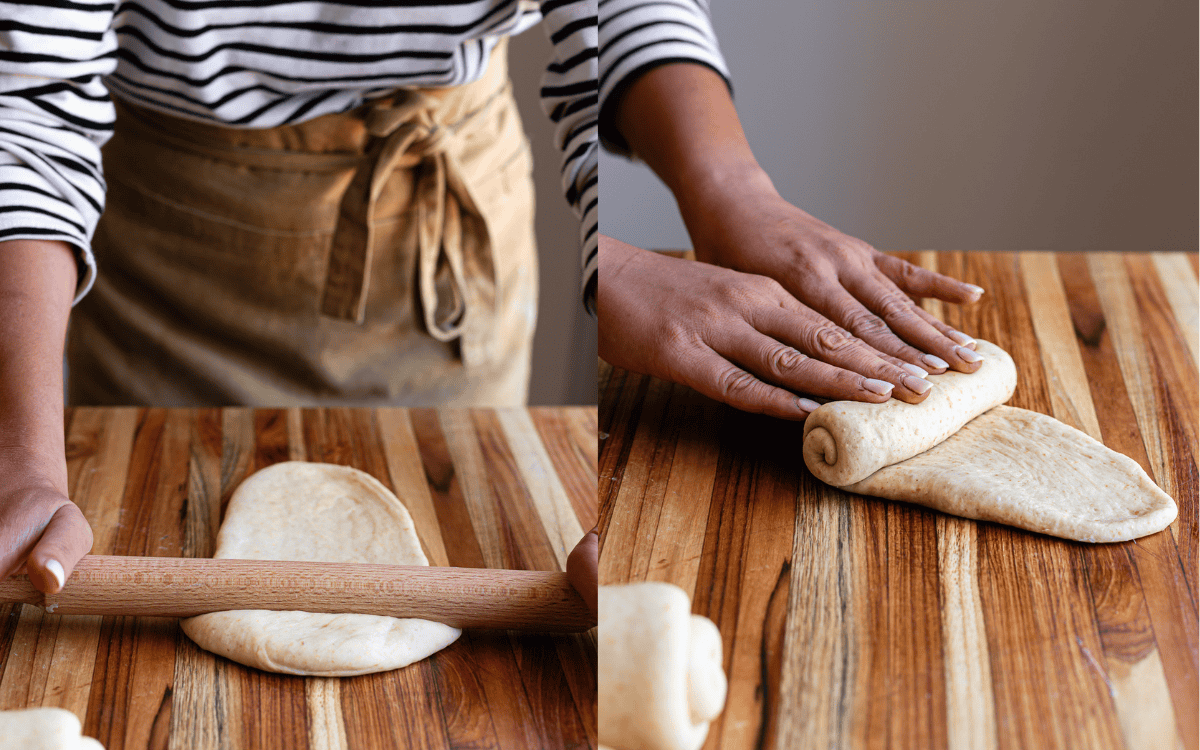
Step 3: Shape the dough
Divide the dough in 3 portions. Flatten one portion into a 9 by 4 inch oval. Starting from one of the shorter sides, roll the dough into a tight cylinder.
Can I shape this dough like a regular sandwich loaf?
You can shape this bread anyway you want! I prefer shaping my dough in this way because it helps it rise evenly in the oven and prevents it from bursting in unwanted spots as it bakes.
Check out my post Sourdough Oatmeal Sandwich Loaf to see my sandwich loaf shaping method.
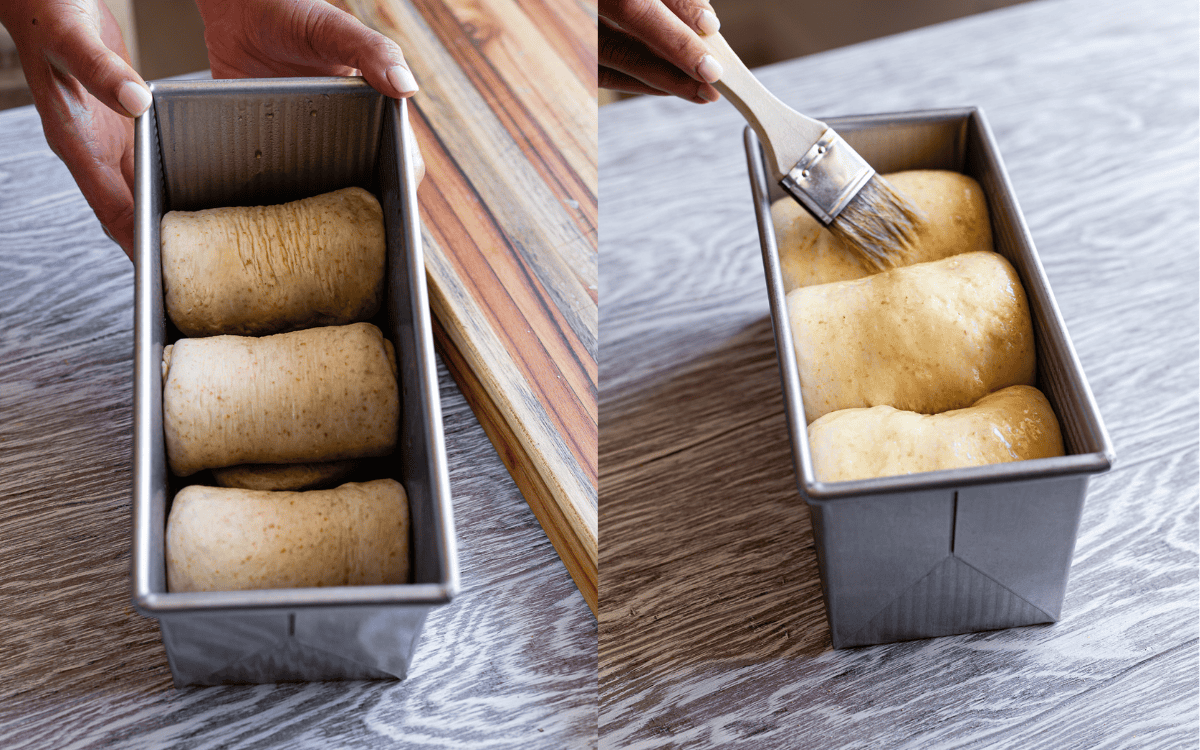
Step 4: Final proof and bake
Arrange the dough in a greased 9 by 4-inch Pullman pan or 8 by 5-inch loaf pan. Cover with plastic wrap and let the dough rise untouched until the dough almost reaches the top of the pan. Brush with egg wash. Bake at 375 F for 30 to 35 minutes.
Baker's Tips
- Weigh your ingredients. Measuring with a scale is more accurate than using cups and tablespoons and will help guarantee your chances of success.
- Both active dry yeast and instant yeast work for this recipe. Blooming is unnecessary if you opt for instant yeast.
- You can use active sourdough starter or discard for this recipe. No sourdough starter? Just add 38 grams all-purpose flour and 38 grams of water to your dough.
- Watch the dough not the clock. I'll provide time cues throughout this recipe. However, since fermentation depends on temperature and your specific environment, rise times may vary.
- Measure temperature for doneness. Time is a great guide for baking, but measuring temperature using an instant-read thermometer is the only way to know your bread is thoroughly baked. Make sure your bread registers at 200 F when probed before pulling it out of the oven.
Recipe FAQs
Absolutely! Simply use the same proportion of freshly fed sourdough starter in the recipe. Your starter won't add a strong tangy flavor to your biscuits, but it will still work.
If you don't have a starter, but still want to try out this recipe, simply add 37 grams of all-purpose flour and 37 grams of water to your dough.
Yes! You can use active-dry yeast in this recipe, just make sure you bloom the yeast to proof it before making your dough.
There are a few reasons:
1. Your yeast is expired.
2. Your kitchen is cold and fermentation may be progressing slowly.
3. You used hot milk and it killed your yeast.
You May Also Like

Did this recipe rise to the occasion?
★★★★★
Leave a star rating and a comment. Your feedback inspires future recipes and helps others feel confident choosing what to bake next. I read and respond to every message.
If you're looking for additional ways to support my work, share this recipe or buy me a Ko-fi. Every little bit helps me keep creating the recipes and guides you enjoy.
Thank you for your support!

Sourdough Discard Sandwich Bread Recipe
Equipment
- Cooling rack
This section may contain affiliate links
Ingredients
Dough
- 7 g Instant Yeast
- 150 g milk
- 25 g granulated sugar
- 300 g all-purpose flour
- 30 g whole wheat flour
- 6 g salt
- 75 g sourdough discard
- 1 egg large
- 28 g unsalted butter softened
Egg Wash
- 1 egg large
- Pinch of salt
Click US Customary to view volume measurements
Instructions
- Make the dough: Whisk the yeast in with the milk and sugar.7 g Instant Yeast, 150 g milk, 25 g granulated sugar
- Stir in the remaining ingredients except for the butter with a spatula or wooden spoon until the mixture forms a shaggy dough and no traces of dry flour remain.300 g all-purpose flour, 30 g whole wheat flour, 6 g salt, 75 g sourdough discard, 1 egg
- Knead the butter into the dough.28 g unsalted butter
- Cover the bowl with plastic wrap and let the dough rest for 15 minutes, this rest period will make the dough much easier to work with.
- Knead the dough: Turn the dough out on a clean work surface (you shouldn't need to flour your surface, but if your dough feels too sticky feel free to use a little bit of bench flour). To knead the dough, hold the bottom of the dough with your fingertips, fold the dough over itself, then push it out using the heel of the palm of your hand. Repeat until the dough looks cohesive and smooth.
- Let the dough rise: Round the dough into a tight ball and place it in a clean, lightly-oiled bowl. Cover with plastic wrap and let the dough rise until doubled in volume, about 1 to 2 hours.
- Shape the dough: Punch the dough down to release the air. Divide the dough into 3 equal portions. Round each portion into a tight ball, cover the dough with plastic wrap. Let the dough relax for 15 minutes.
- Using a rolling pin, flatten the dough out into a 9 by 4 inch oval. Starting from one of the shorter sides, roll the dough into a tight cylinder. Repeat with the remaining dough portions.
- Lightly grease your loaf pan. Place each cylinder of dough into the loaf pan.
- Let the dough proof for the second time: Cover the pan with plastic wrap and let the dough rise until the dough looks puffy and has filled up to at least ½-inch to the top of the pan, about 45 minutes to 1 hour.
- Preheat the oven: When the dough is close to being ready, preheat the oven to 375 F.
- Brush the dough with an egg wash: Whisk together an egg and a pinch of salt. Using a pastry brush, coat the top of the dough with an even layer of egg wash.1 egg, Pinch of salt
- Bake the loaf: Bake the dough for 30 to 35 minutes or until the loaf is golden brown and the bread registers at 190 F when probed with an instant read thermometer.
- Enjoy and store: Transfer the loaf to a wire rack to cool for at least 20 minutes before slicing. Store slices in a ziplock bag for up to 5 days at room temperature.
Tips
These recipes were developed and tested using grams for precise measurements. To increase your chances of success, I recommend investing in a kitchen scale. I've included rough volume estimates (in tablespoons and cups), but they might not be totally accurate.
Remember all ovens are unique, these recipes were tested in my oven which runs cooler than others. You might need to lower the temperature if your bake appears to be browning too quickly. Monitor your bake closely and make adjustments if needed.
Notes
Nutrition
I am not a nutritionist or dietitian, any nutrition information provided is an estimate.


JP says
SO easy and SO delicious! Tastes just like the soft and fluffy Japanese milk bread we use for egg sandwich! This was fun to make and the instruction was clear. A+ !!
Susan says
This is the softest sandwich bread, this is now the only recipe I will use.
Hannah Dela Cruz says
Thank you, Susan! So glad you loved the recipe.
Layean says
Can i use oil instead of butter? If yes how much oil needed? Thanks
Hannah Dela Cruz says
Absolutely! You can sub it for butter 1:1.
I also have a vegan version if you're interested in a plant-based version: https://makeitdough.com/vegan-sourdough-discard-sandwich-bread/
Bridget says
This was the best sandwich bread recipe I have found! It rose so well and came out perfect! I will definitely be making this again.
Hannah Dela Cruz says
Thank you for the kind words, Bridget!
Arthur Brands says
I'm not going to rate this recipe until I get the recipe right. In step two, the remaining ingredients are to be added to the sugar, yeast, and milk, including the egg. After following those instructions, the resulting goopy mess was more than difficult to work the butter into. Was this a misprint?] I'll continue, as I need bread tomorrow, but I'll follow a milk bread recipe I'm familiar with.
Hannah Dela Cruz says
Totally not a misprint. It takes quite some effort to get the butter absorbed into the dough but it will eventually be incorporated if you keep kneading.
KARI SHIGENO says
This is a wonderful recipe for a great tasting loaf of sandwich bread! I love how quickly it was from mixing to baking and that it also used some of my sourdough discard. Just a few things I did different: I mixed the dough in my Kitchenaid mixer with the dough hook (for just a few minutes) and let it do the first rest in the bowl; I used the mixer again to replaced kneading on the counter; I also skipped cutting the dough into three pieces and opted to just leave it one ball and still shaped/rolled according to the instructions. The loaf was beautiful and tasted amazing! I appreciated the way you detailed the measurements in each step - a simple yet very helpful thing. Thank you for a wonderful recipe!
Hannah Dela Cruz says
So glad you appreciate that feature! It's so useful. So happy you loved this recipe as well.
Serenity says
This is helpful, thank you.
Hannah says
Amazing loaf! In hindsight, I think I should have kneaded the bread longer as the loaf was a little fragile/crumbly on the inside. But I loved how tall and crusty it was.
Hannah Dela Cruz says
Ooh that definitely might have been it! I'm glad you still loved the recipe!
Jeanna says
to make this dairy free could I use soy milk and honey to replace the sugar and milk 1:1? I was also wondering if I could sub spelt flour or all purpose for the wheat flour?
Hannah Dela Cruz says
Absolutely! You can also try my recipe for Vegan Sourdough Discard Sandwich Bread - it's light and fluffy as well and doesn't use any animal products - https://makeitdough.com/vegan-sourdough-discard-sandwich-bread/
Erica says
Hello! I have tons of bread flour. Was wondering if I can sub the all purpose flour and the whole wheat flour for just the bread flour. Seeing if I can avoid purchasing whole wheat flour
Hannah Dela Cruz says
Hi Erica - you can! Your bread may be a bit chewier and not as fluffy but it will still work.
Becky says
This is my first successful attempt at making ANY type of bread, and I am thrilledd! I have yet to try to make sourdough bread, but did want to try to make something with the discard. I'm so glad I found your website. Thank you so much for the easy to follow directions which led to a delicious and beautiful loaf of bread!
Hannah Dela Cruz says
Music to my ears! I love that you were able to make yummy bread!
Sandra Torres says
I wanna steal your recipe to make this for my babies & my home! God bless you always Ms Cindy💕💕
Tonya says
I’ve been looking for a discard sandwich loaf for use this summer with our Jersey tomatoes. Nothing like a tomato sandwich on white bread!! This might just be it. Very pleased with my first attempt.
Hannah Dela Cruz says
So happy you loved the recipe!
Brittney says
My first review ever on any site! I've made so much bread in the past 8+ months it's not even funny. I saw the 5 star reviews and thought why not. It is an unknown recipe outside sourdough circles but I don't mind wandering there. It's now my own little secret recipe. It was so so delicious. Like WOW. I followed the recipe as written. I did mix my starter and water first, then added in the smaller ingredients. Finished by adding in the flour. Followed every step exactly while keeping in mind my home temp etc. The bread rose beautifully. A nice dark crust but not burnt. The dough was so incredibly soft and light and airy. The flavor was yum. I wasn't so sure about rolling it into separate balls at first but it all turned out beautiful. A keeper recipe. Bonus it's sourdough. This will be a regular. I've tried plenty of sourdough discard yeast breads and this one wins. Hands down.
Hannah Dela Cruz says
Thank you so much for the wonderful review, Brittney! I'm so glad this recipe was a success for you.
Cindy Moñina says
I made this loaf for the first time and it did not disappoint! It is delicious. I divided and rolled the three sections a bit different and it came out delicious. It is fluffy, airy, soft and scrumptious! Will definitely make it again.
Hannah Dela Cruz says
So happy you enjoyed the recipe!
Nicolette says
Turns out perfectly every time. I do the recipe at 1.3 times the amount just because I like a taller loaf but the proportions of ingredients are perfect.
Hannah Dela Cruz says
So happy this loaf has been working for you! I sometimes wish this recipe makes a taller loaf as well. I might take your cues and increase the recipe at some point. But I'm scared of messing with it since it's such a go-to for so many people.
Nadine says
Easy peasy recipe, very fluffy and delicious. Made it already more than 5 times… sooo good! Thank you
Hannah Dela Cruz says
Thank you so much, Nadine! I'm so thrilled this recipe has been working for you!