

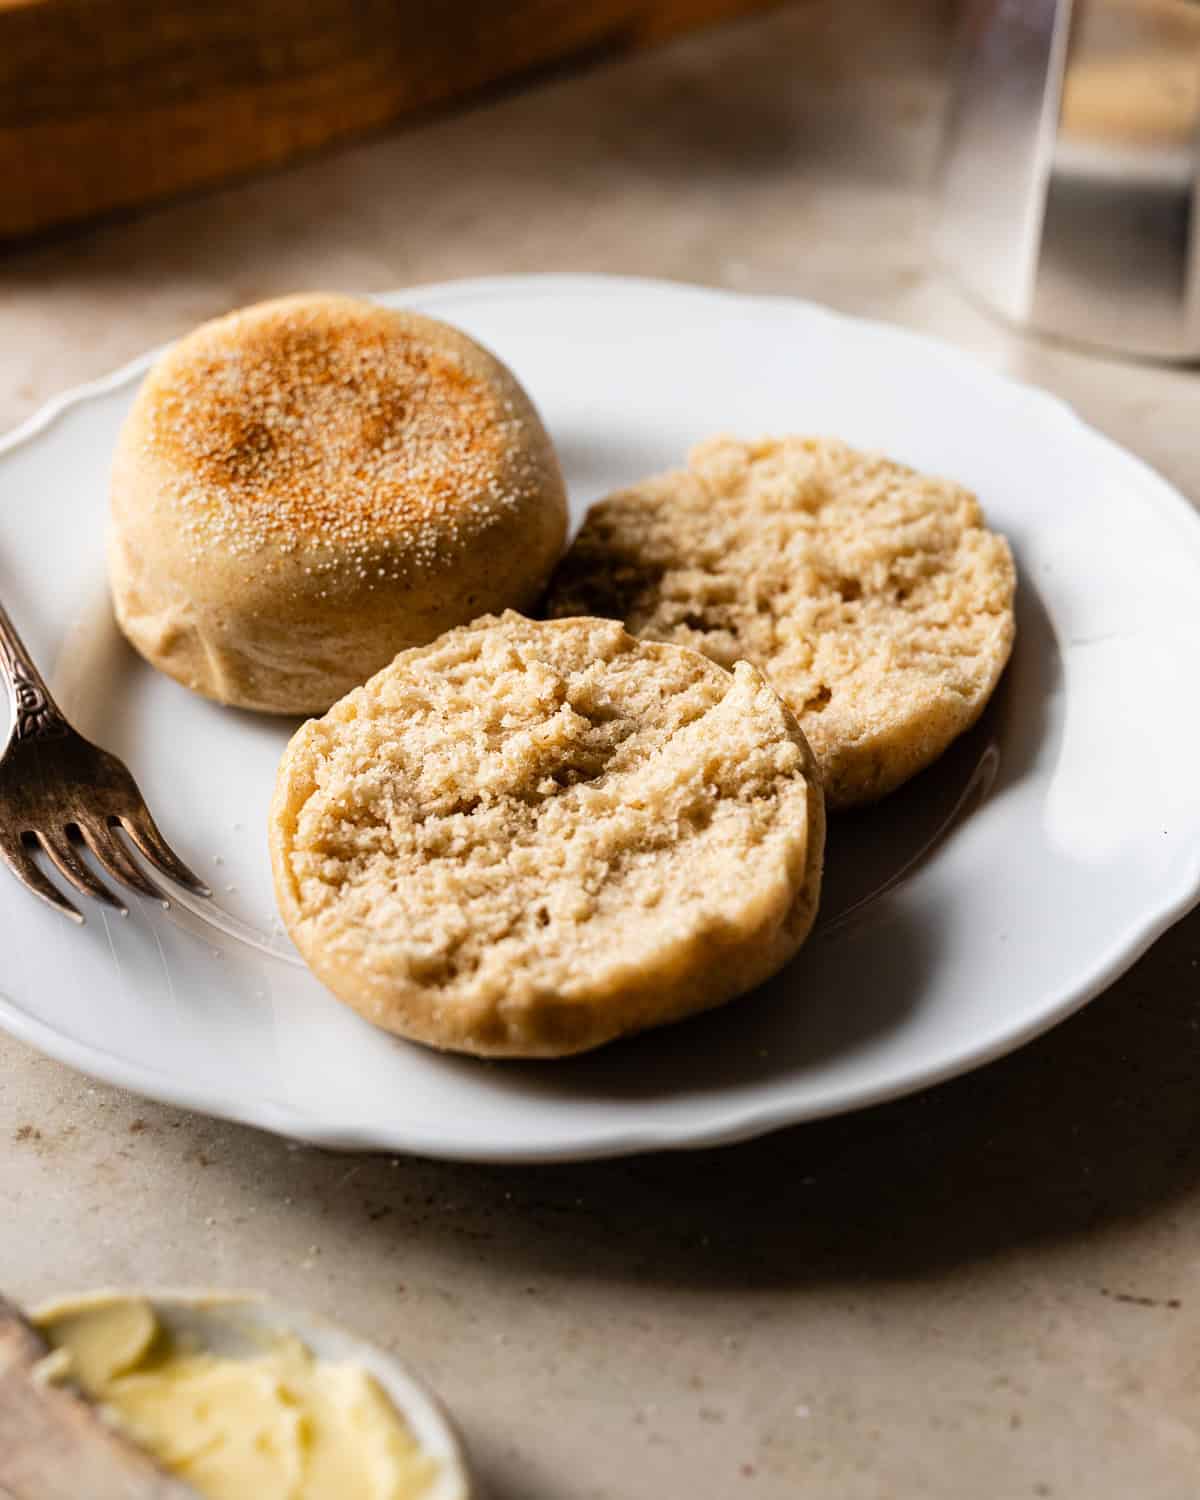
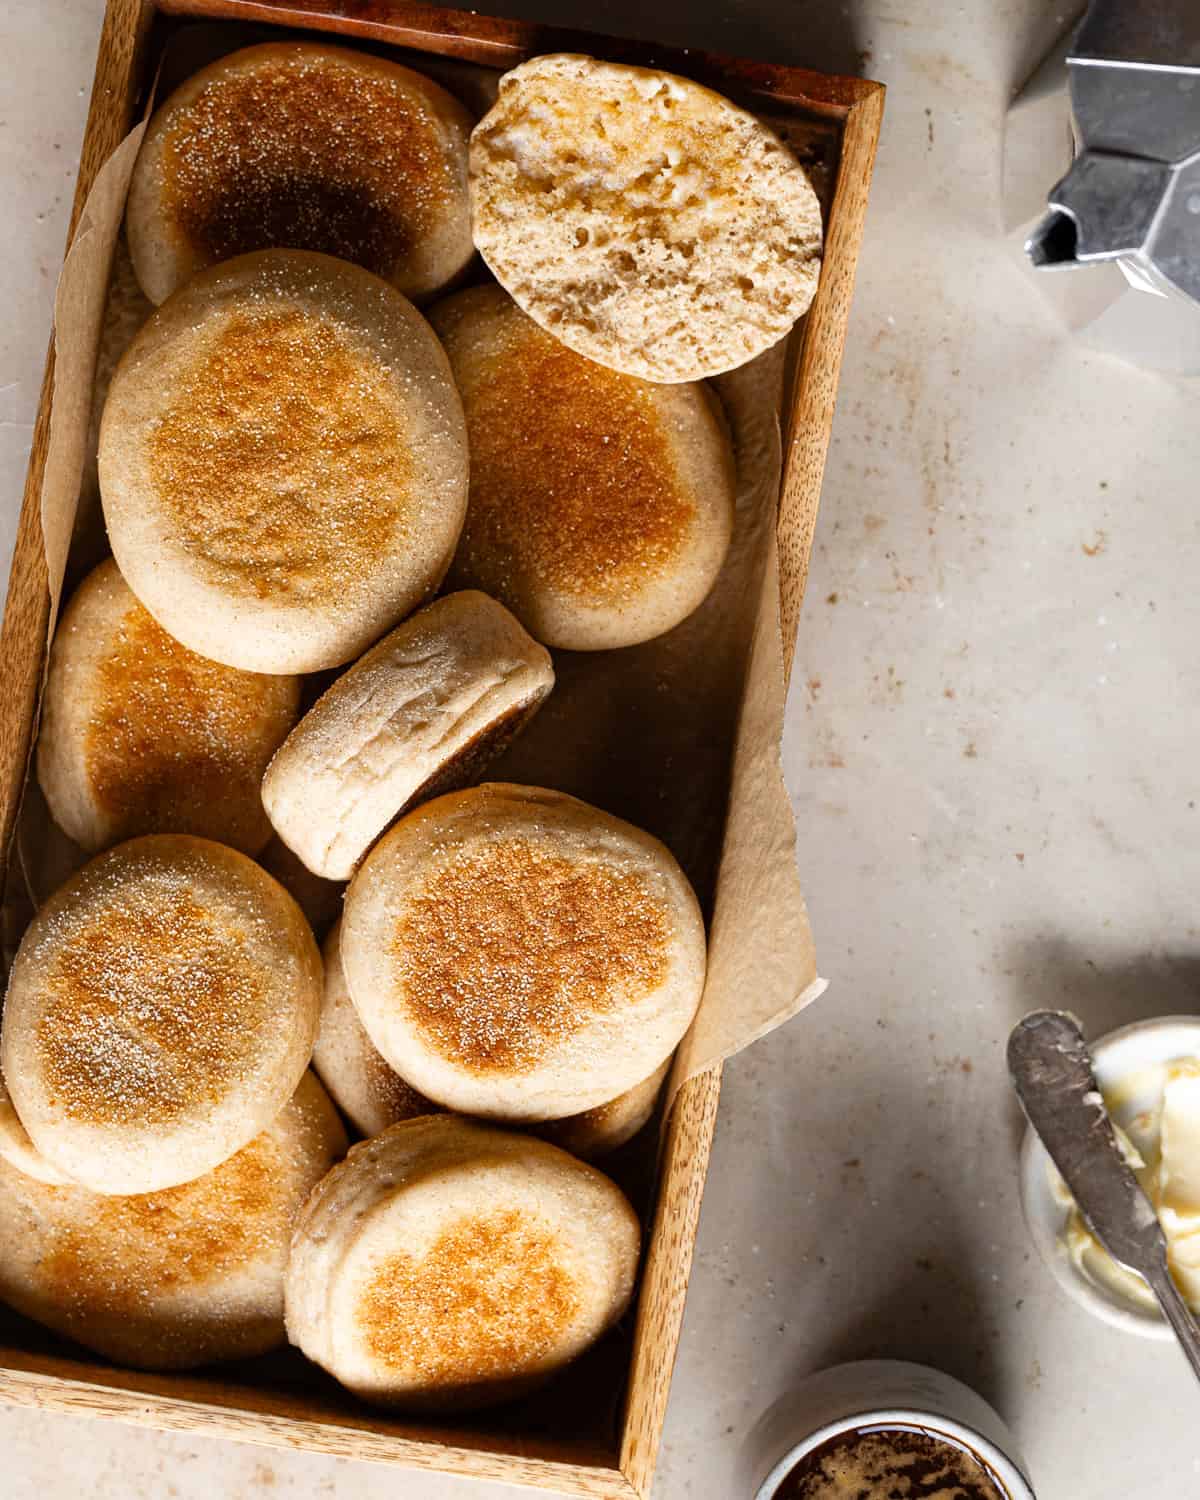
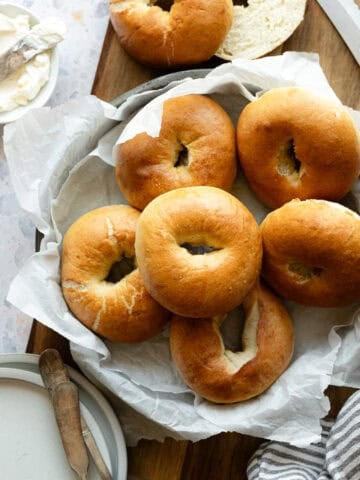
These sourdough discard English muffins are one of my favorite ways to use my excess starter. Soft, tender, and full of nooks and crannies, they have the dreamiest texture for slathering on lots of cultured butter and raspberry preserves. Made with commercial yeast, they come together in just a few hours perfect for an afternoon baking project and can be mixed entirely by hand, no stand mixer required.
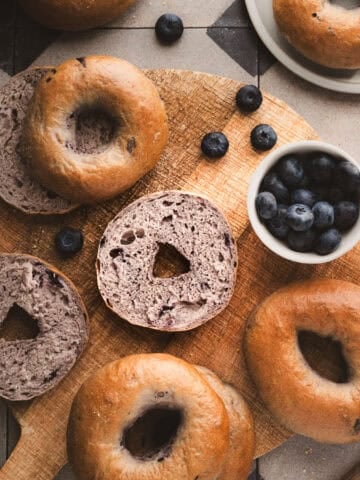
Just like my sourdough discard bagels, they're freezer-friendly, so I like to keep a stash on hand to make mornings easier.
5-STAR REVIEW
Best English muffins EVER! And fun recipe to follow!
Heather
I was never a fan of store-bought English muffins-they always tasted bland and had a rubbery texture that made me wonder, why not just have a bagel or sliced bread instead? That all changed once I started making them at home. These sourdough discard English muffins are tender, chewy, and so easy to make you'll never reach for a store-bought pack again.
Unlike most breads, English muffins are cooked on a cast-iron pan or skillet instead of baked. This gives them their signature shape and thin, crispy crust, and you don't even need to turn on the oven. Because the griddle doesn't cook them all the way through, you have to toast these to be fully baked.
Ingredients and Substitutions
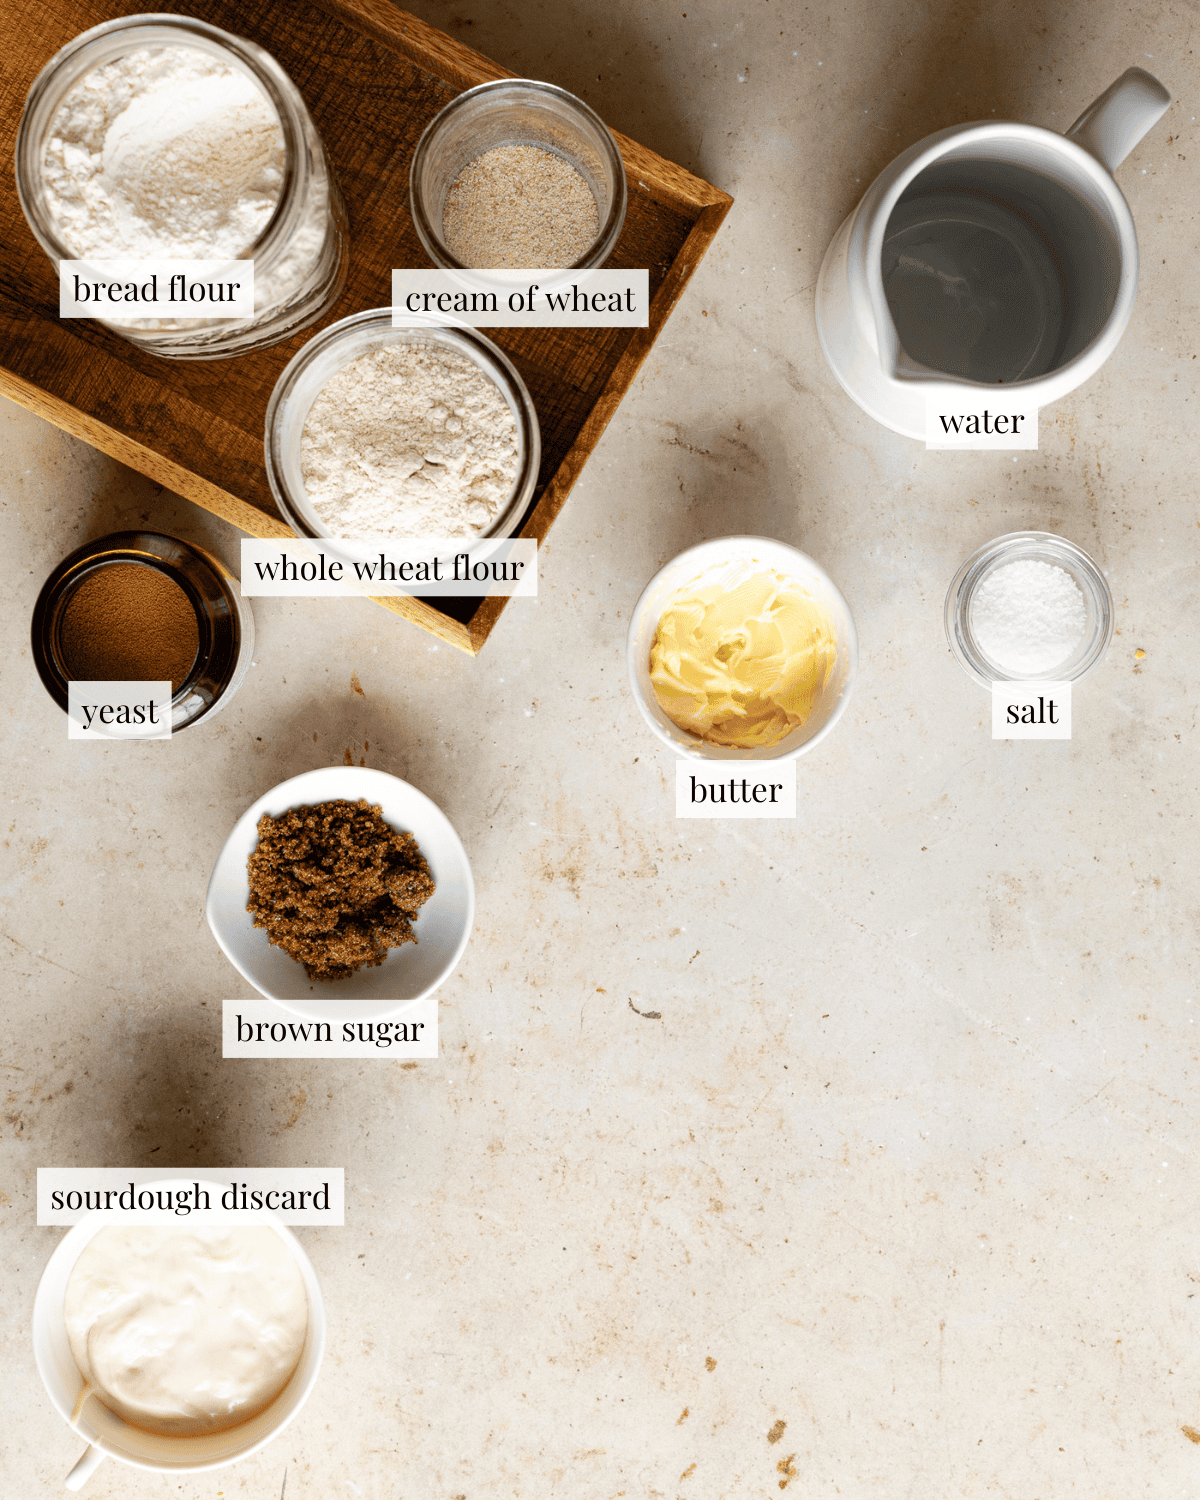
This recipe is made with a mix of bread flour and whole wheat, a mix that imparts a chewy texture and nutty flavor to these English muffins. If you don't have these flours in your pantry, you can use all-purpose flour instead.
I use commercial yeast and sourdough discard to make this recipe quick and easy. The discard contributes a rich and nuanced flavor to these English Muffins. Since the sourdough starter is used solely for flavor enhancement, there's no need to activate or feed it and you can use it directly from the refrigerator.
Should I leave the yeast out if I use an active sourdough starter?
Using active sourdough starter instead of active dry yeast will drastically increase fermentation time.
Wild yeast in a sourdough starter ferments dough at a much slower pace. So, instead of a 30 to 45 minute proofing time, you should expect your dough to rise for about 4 to 6 hours. Final proof may also stretch out to 2 to 4 hours.
Step-by-step Instructions
Make the dough
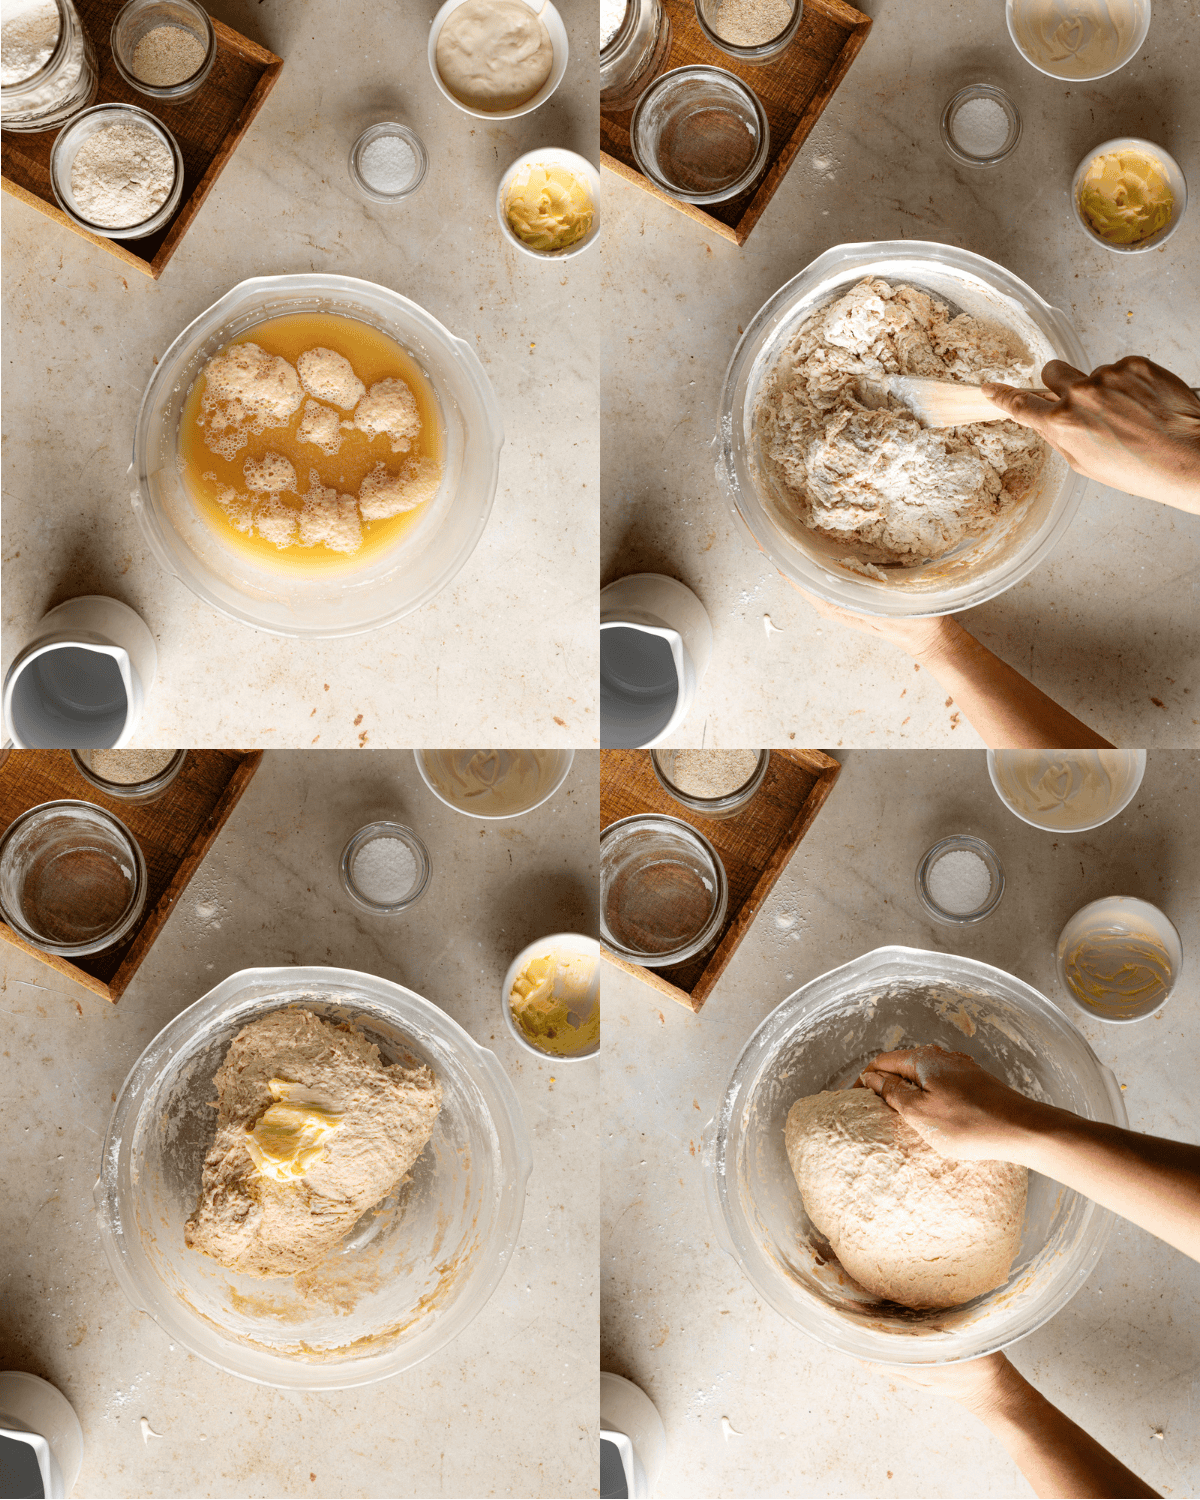
Bloom the yeast. Fold the ingredients in until a shaggy dough forms. Knead the butter into the dough. Continue kneading until all the butter is absorbed.
Stretch and fold the dough
Pull one side of the dough up as far as it will stretch, then fold it over itself. Turn the bowl 90 degrees and repeat until all 4 sides of the dough are folded. Round the dough into a tight ball.

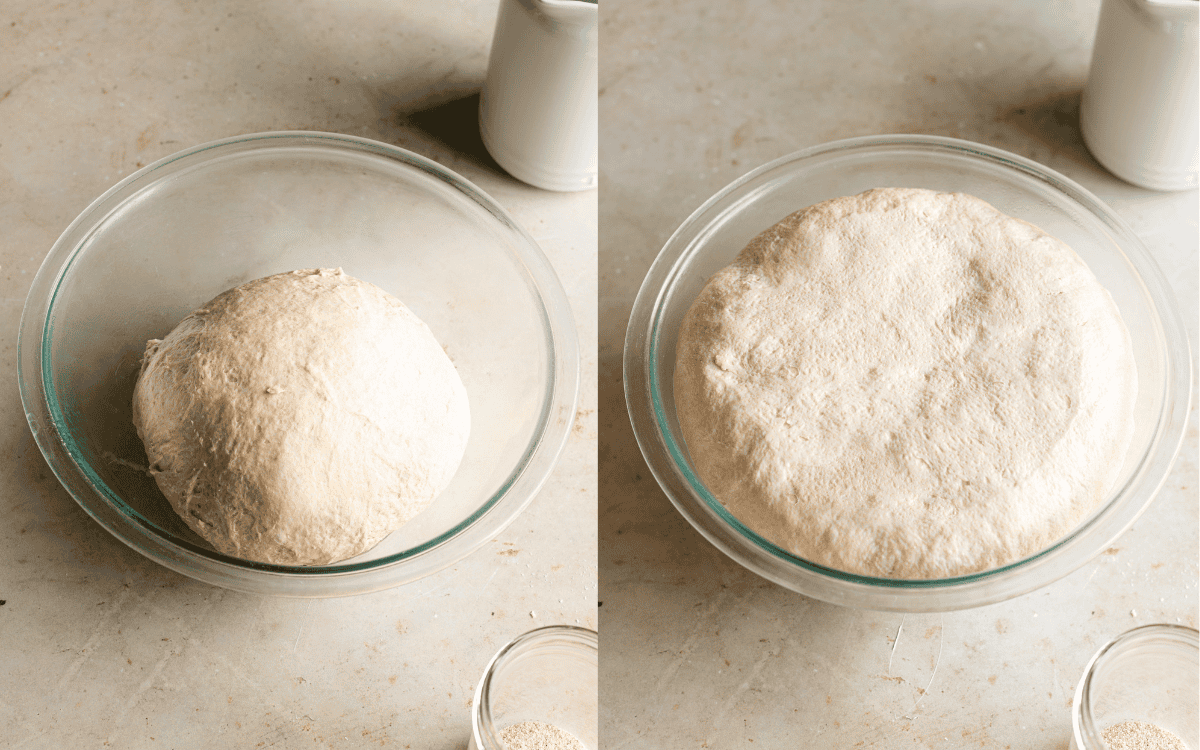
Bulk ferment
Transfer the dough to a clean, lightly-oiled bowl and cover with plastic wrap. Let the dough rise in a warm spot until doubled in volume, about 30 to 45 minutes.
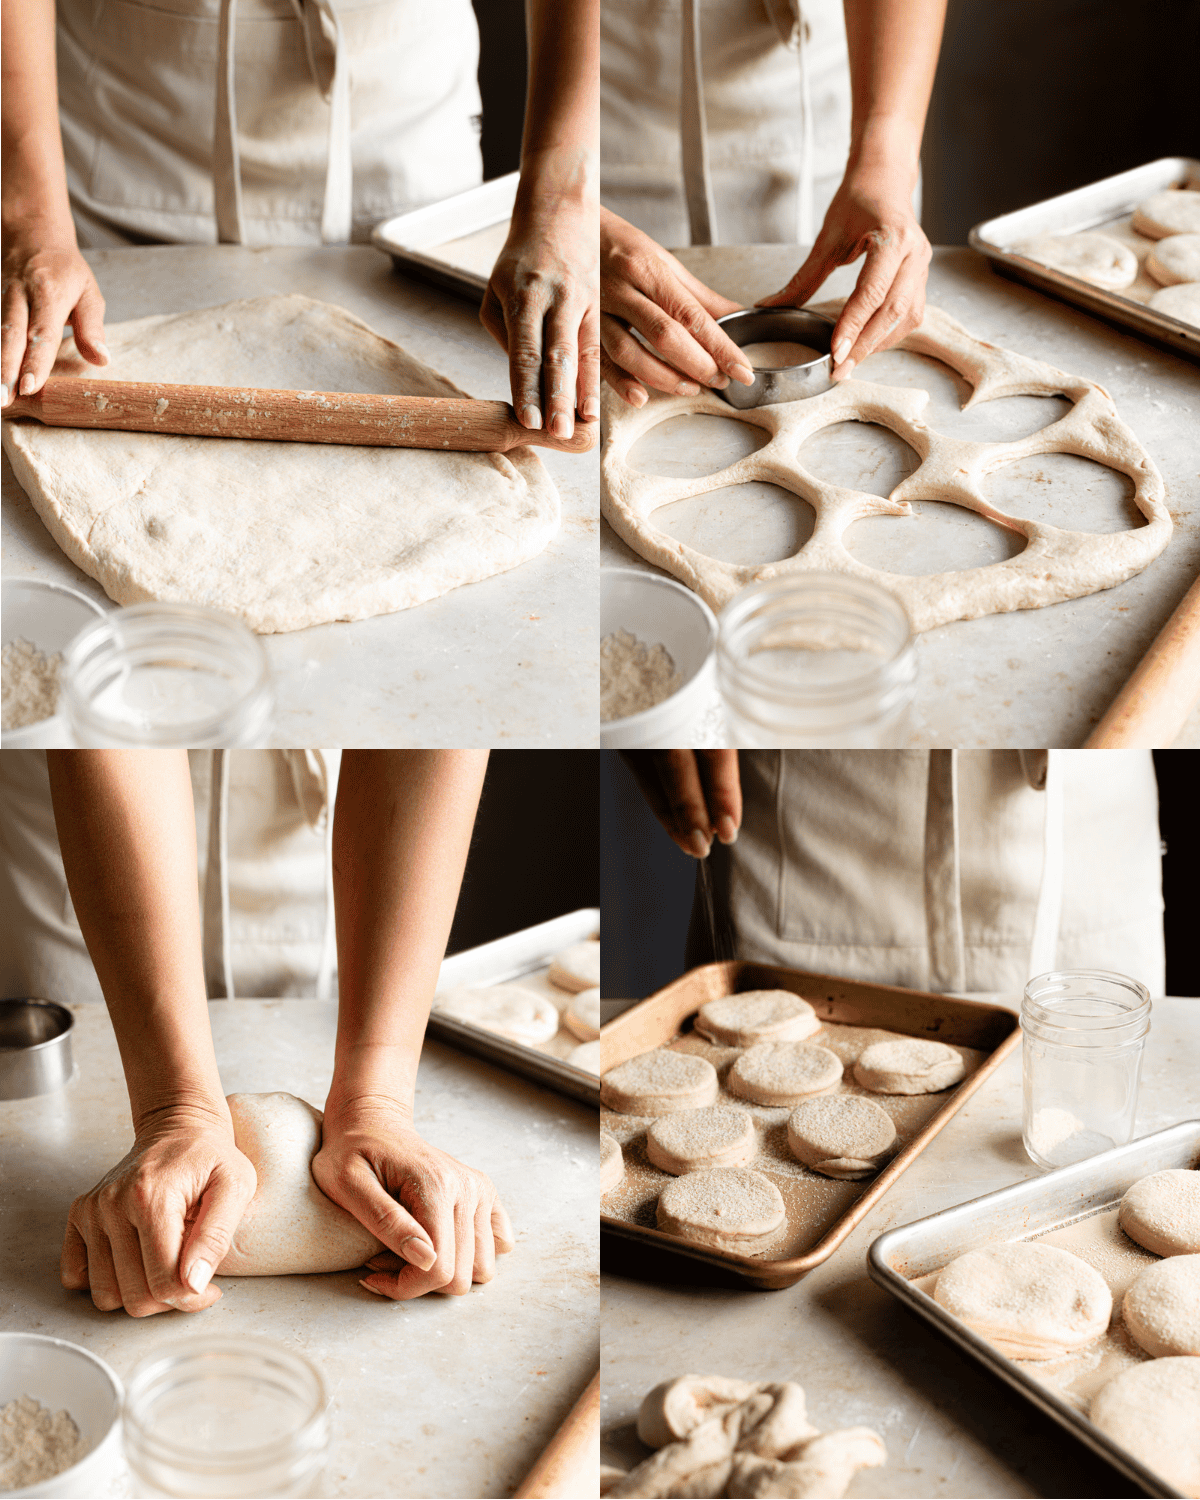
Shape the English muffins
Flatten the dough into a 12 by 10-inch rectangle, about ½-inch thick. Using a 3-inch biscuit cutter, cut as many rounds out of the dough as you can. Knead the dough and flatten it once more until it is about ½-inch thick. Cut out rounds and transfer to a parchment-lined baking sheet dusted with cornmeal or cream of wheat.
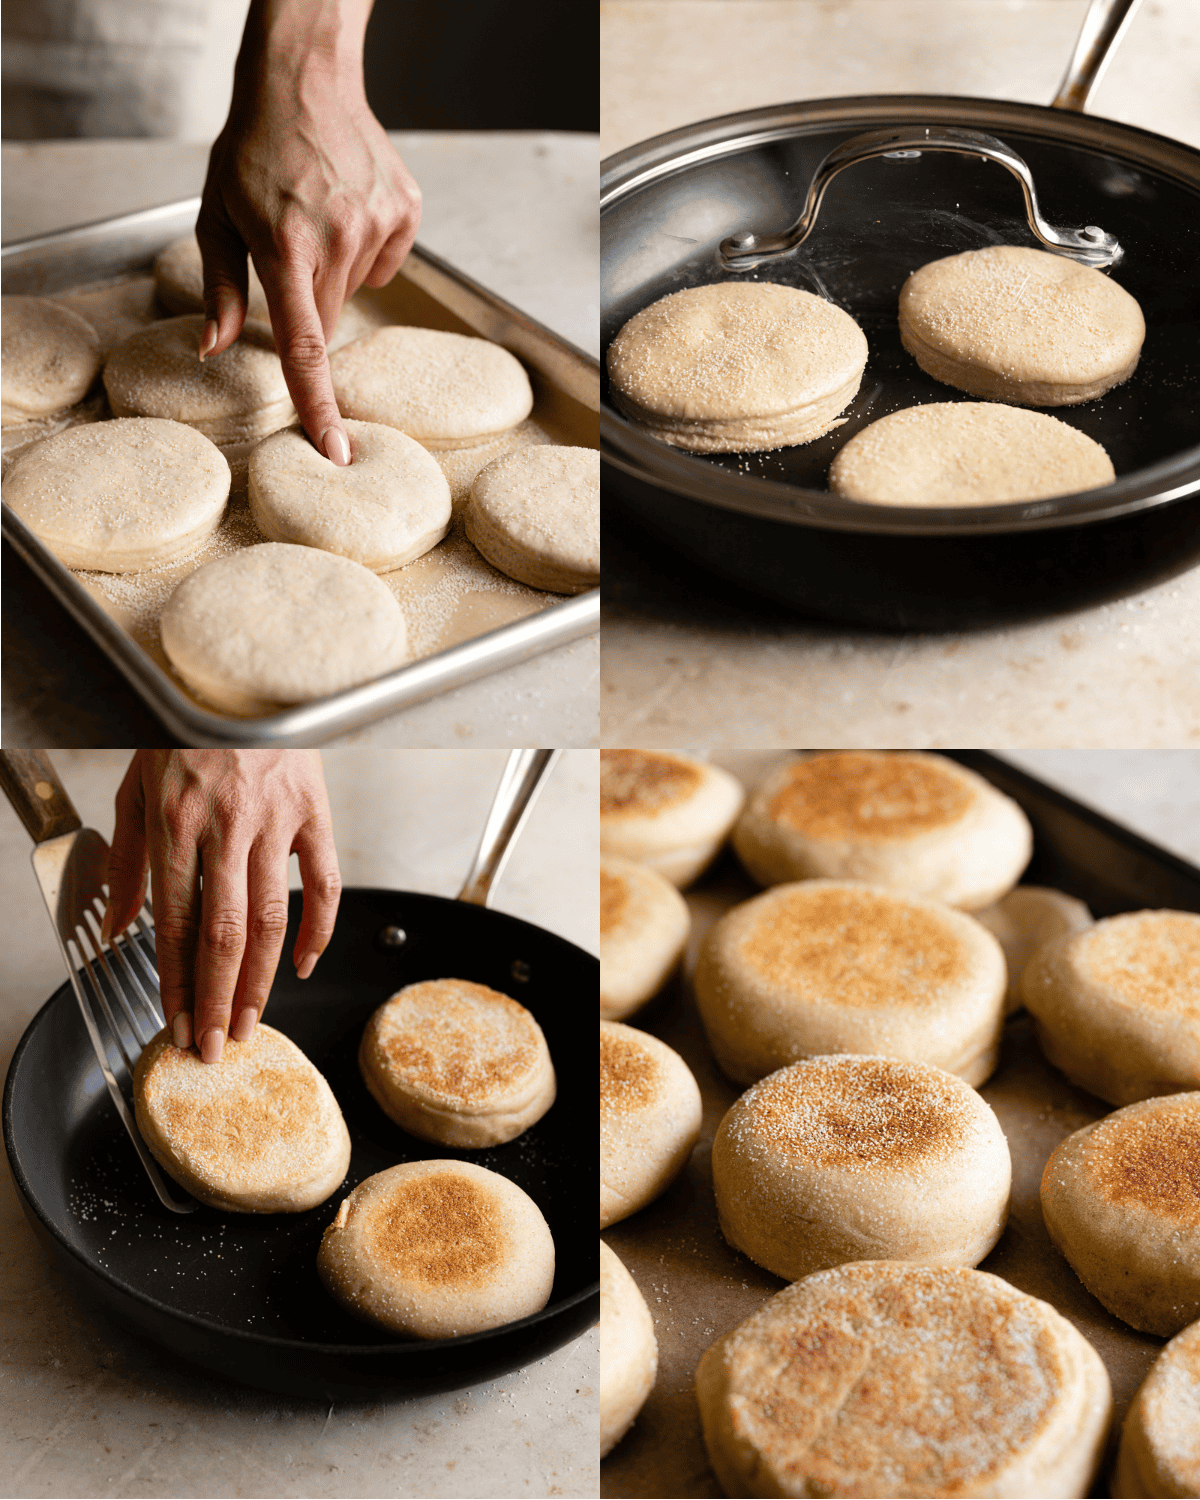
Griddle the English muffins
Let the dough rise covered until puffy and well risen, about 15 to 20 minutes. Fry the dough in a preheated, dry skillet for 6 to 8 minutes with a cover. Flip the English muffins and cook for another 6 to 8 minutes or until golden brown. Transfer to a parchment-lined baking sheet and bake for 10 minutes at 350 F.
Toast the English muffins
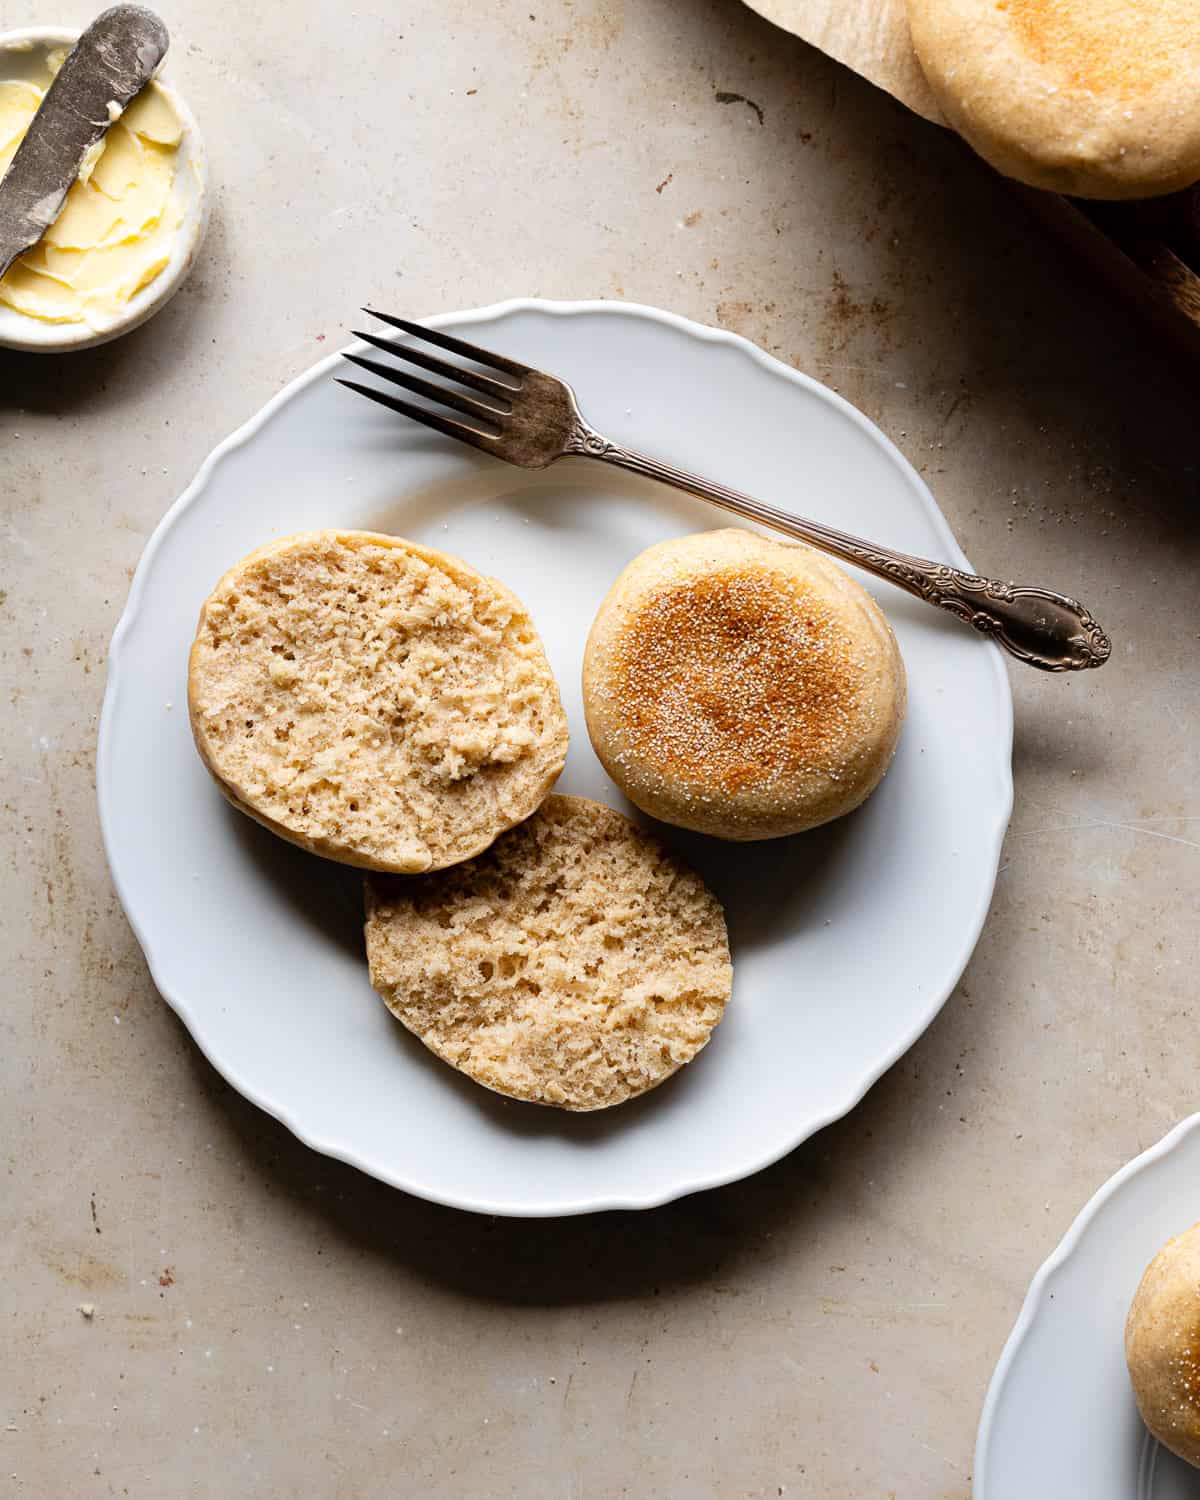
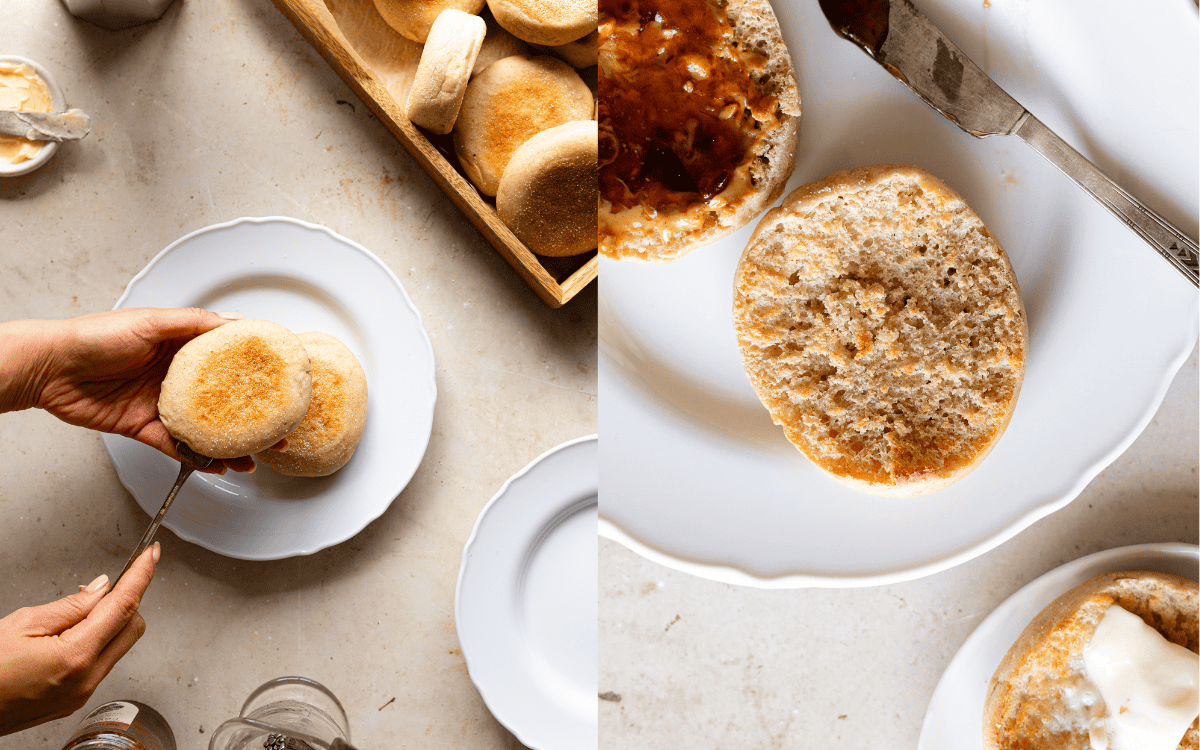
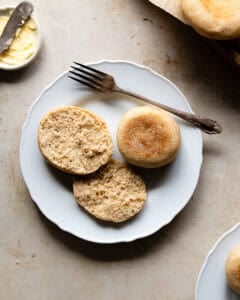
Poke the sides of the English muffin with a fork. Gently pull the sides apart. Toast the English muffins until golden brown.
Notes from Hannah's Test Kitchen
- Don't panic if the dough feels sticky. The stretch and fold method makes creating a strong gluten network more manageable for wet doughs.
- Watch the rise. Letting the dough proof too long can lead to flat, gummy English muffins.
- Cook low and slow. Keep the heat low so the center cooks through without the outsides over-browning.
- Skip the knife. Use a fork to split your English muffins so you don't squash the crumb or lose those signature nooks and crannies.
- Always toast before serving. English muffins aren't fully baked until they're toasted, which brings out their best texture and flavor.
How to Store Sourdough English Muffins
Like my sourdough discard blueberry bagels and sourdough discard egg bagels, these freeze beautifully. They retain their freshness for up to a month, and taste as good as the day they were made.
- Split & Wrap: Use a fork, not a knife, to gently split each piece in half.
- Bag: Store the English muffins in a zip lock freezer bag. Store in the freezer for up to 1 month.
- Toast: When you're ready to enjoy a muffin, simply grab one from the freezer, toast it until warmed through.
Did this recipe rise to the occasion?
★★★★★
Leave a star rating and a comment. Your feedback inspires future recipes and helps others feel confident choosing what to bake next. I read and respond to every message.
If you're looking for additional ways to support my work, share this recipe or buy me a Ko-fi. Every little bit helps me keep creating the recipes and guides you enjoy.
Thank you for your support!
Sourdough Discard English Muffin Recipe
This section may contain affiliate links
Ingredients
Dough
- 340 grams water
- 7 grams active-dry yeast
- 14 grams brown sugar sub honey or maple syrup
- 60 grams whole wheat flour
- 450 grams bread flour
- 10 grams salt
- 113 grams sourdough discard
- 28 grams unsalted butter softened
Topping
- 14 grams cornmeal sub cream of wheat
Click US Customary to view volume measurements
Instructions
- Bloom the yeast: Whisk the water, brown sugar and yeast together in a large mixing bowl. Cover the bowl and let the yeast bloom until foamy, about 15 minutes.340 grams water, 7 grams active-dry yeast, 14 grams brown sugar
- Make the dough: Using a stiff spatula or a wooden spoon, stir the remaining dough ingredients into the yeast mixture until no dry bits of flour remain. Switch to your hands and knead until a cohesive dough forms.60 grams whole wheat flour, 450 grams bread flour, 10 grams salt, 113 grams sourdough discard
- Knead the butter into the dough until completely absorbed. The dough should start greasy and gradually become smoother and less sticky.28 grams unsalted butter
- Stretch and fold the dough: Pull one side of the dough up as far as it will stretch, then fold it over itself. Turn the bowl 90 degrees and repeat until all 4 sides of the dough are folded and the dough looks smooth. Round the dough into a tight ball.
- Bulk fermentation: Transfer the dough to a clean, lightly oiled bowl. Cover the bowl with plastic wrap and set it in a warm place until doubled in volume, about 30 to 45 minutes.
- Prep: Line two large baking sheets (18 by 13-inch) with parchment paper. Dust the baking sheets with cornmeal or cream of wheat. Set aside.14 grams cornmeal
- Shape the dough: Turn the dough out onto a lightly floured work surface. Using a rolling pin, flatten the dough out to a 12 by 10-inch rectangle, about ½-inch thick. Using a 3-inch biscuit cutter, cut as many rounds as you can out of the dough. Place the dough rounds on the prepared baking sheet, be sure to leave about 2 inches of space between each dough round on the prepared baking sheet. This prevents them from sticking together
- Re-roll the dough: Gather the dough up into a ball and knead until it comes together into a smooth ball. Cover the dough with plastic wrap and let it rest for 15 minutes, this will make it easier to roll out.
- Flatten the dough out into a 10 by 6-inch rectangle, about ½-inch thick. Cut out as many rounds of dough as you can. Re-roll scraps once more. I ended up with 16 rounds. Place the rounds on the prepared baking sheet.
- Final Proof: Let the dough rise until puffy and well-risen, about 15 to 20 minutes.
- Prep: While the dough rises, preheat a dry skillet over medium-high heat. Preheat the oven to 350 F.
- Griddle the English muffins: Lower the heat to medium-low and gently transfer 3 portions of dough to the preheated skillet. Be very gentle and avoid flattening or stretching them. Fry the dough, untouched for 6 to 8 minutes or until one side is golden brown. Flip the dough and continue frying for another 6 to 8 minutes.
- Bake the muffins: Transfer the cooked English muffins back to the prepared baking sheets. Bake for 10 minutes. This will dry out the interior and ensure the crumb is no longer gummy and raw. Transfer to a wire rack and let the muffins cool for 10 to 15 minutes.
- Finish the English muffins in the toaster: Using a fork, poke holes into the side and pry the sides apart. Toast the muffins until heated through and some spots are lightly browned. Top with your favorite spreads and enjoy!
- Store: Split up the English muffins, and wrap in plastic wrap. Store wrapped English muffins in an airtight container and store in the freezer for up to 1 month. Toast the English muffins without defrosting
Tips
These recipes were developed and tested using grams for precise measurements. To increase your chances of success, I recommend investing in a kitchen scale. I've included rough volume estimates (in tablespoons and cups), but they might not be totally accurate.
Remember all ovens are unique, these recipes were tested in my oven which runs cooler than others. You might need to lower the temperature if your bake appears to be browning too quickly. Monitor your bake closely and make adjustments if needed.
Notes
- Make sure your yeast is not expired before baking these rolls or your dough may not rise.
- Give your dough enough time to rise, waiting until it has doubled in volume before shaping. Otherwise, your bread may be dense and gummy.
- Feel free to use active sourdough starter or sourdough discard to make this recipe.
- Both instant yeast and active dry yeast will work to make this recipe.
- Don't skip toasting! English muffins are not fully baked after they come out of the oven. Toasting ensures the interior reaches a safe final temperature and achieves a desirable texture.
Nutrition
I am not a nutritionist or dietitian, any nutrition information provided is an estimate.
heather says
Best English muffins EVER! And fun recipe to follow!
Hannah Dela Cruz says
So found this recipe and happy you loved them! Thank you for your feedback.