

Intimidated by making fresh pasta at home? Don't be! Sourdough Discard Pasta is one of the best ways to use up a lot of sourdough discard and it's easier than you think. Adding sourdough enhances the flavor, texture and adds the health benefits of fermentation to homemade pasta.
I originally published this recipe in Apr. 2022 and have since altered the title, added new photos, step-by-step instructions and tips for success.
Jump to:
This pasta is AMAZING...I've done comparisons with at least three other recipes (both with and without discard), and this one comes out noticeably silkier every time. Everyone I've made it for says it's the best pasta they've ever had...Thanks for sharing it!!
- Dani
Cooking with sourdough discard
Not only does sourdough discard add a delightful tangy flavor to your Sourdough Pasta, but it also enhances its nutritional value and aids in digestion when given a longer fermentation time.
Wheat contains phytic acid, also known as phytates. Our bodies don't naturally produce the enzyme phytase, necessary for digesting phytic acid, which can block the absorption of vital minerals like magnesium, calcium, zinc, and iron. Extended fermentation helps by breaking down phytic acid through enzymes, allowing our bodies to absorb these nutrients more effectively.
Since we don't need our pasta dough to rise, you won't have to activate or feed your sourdough starter for it to be effective in this recipe. You can use sourdough discard straight from the fridge!
Why I love this recipe
- You can make it with just a handful of ingredients.
- Fermentation enhances the health benefits of homemade pasta by improving its digestibility.
- Great way to use up lots of excess sourdough starter.
- Dries perfectly for longterm storage.
- Sourdough discard adds a delicious flavor and texture to pasta.
Ingredients and Substitutions
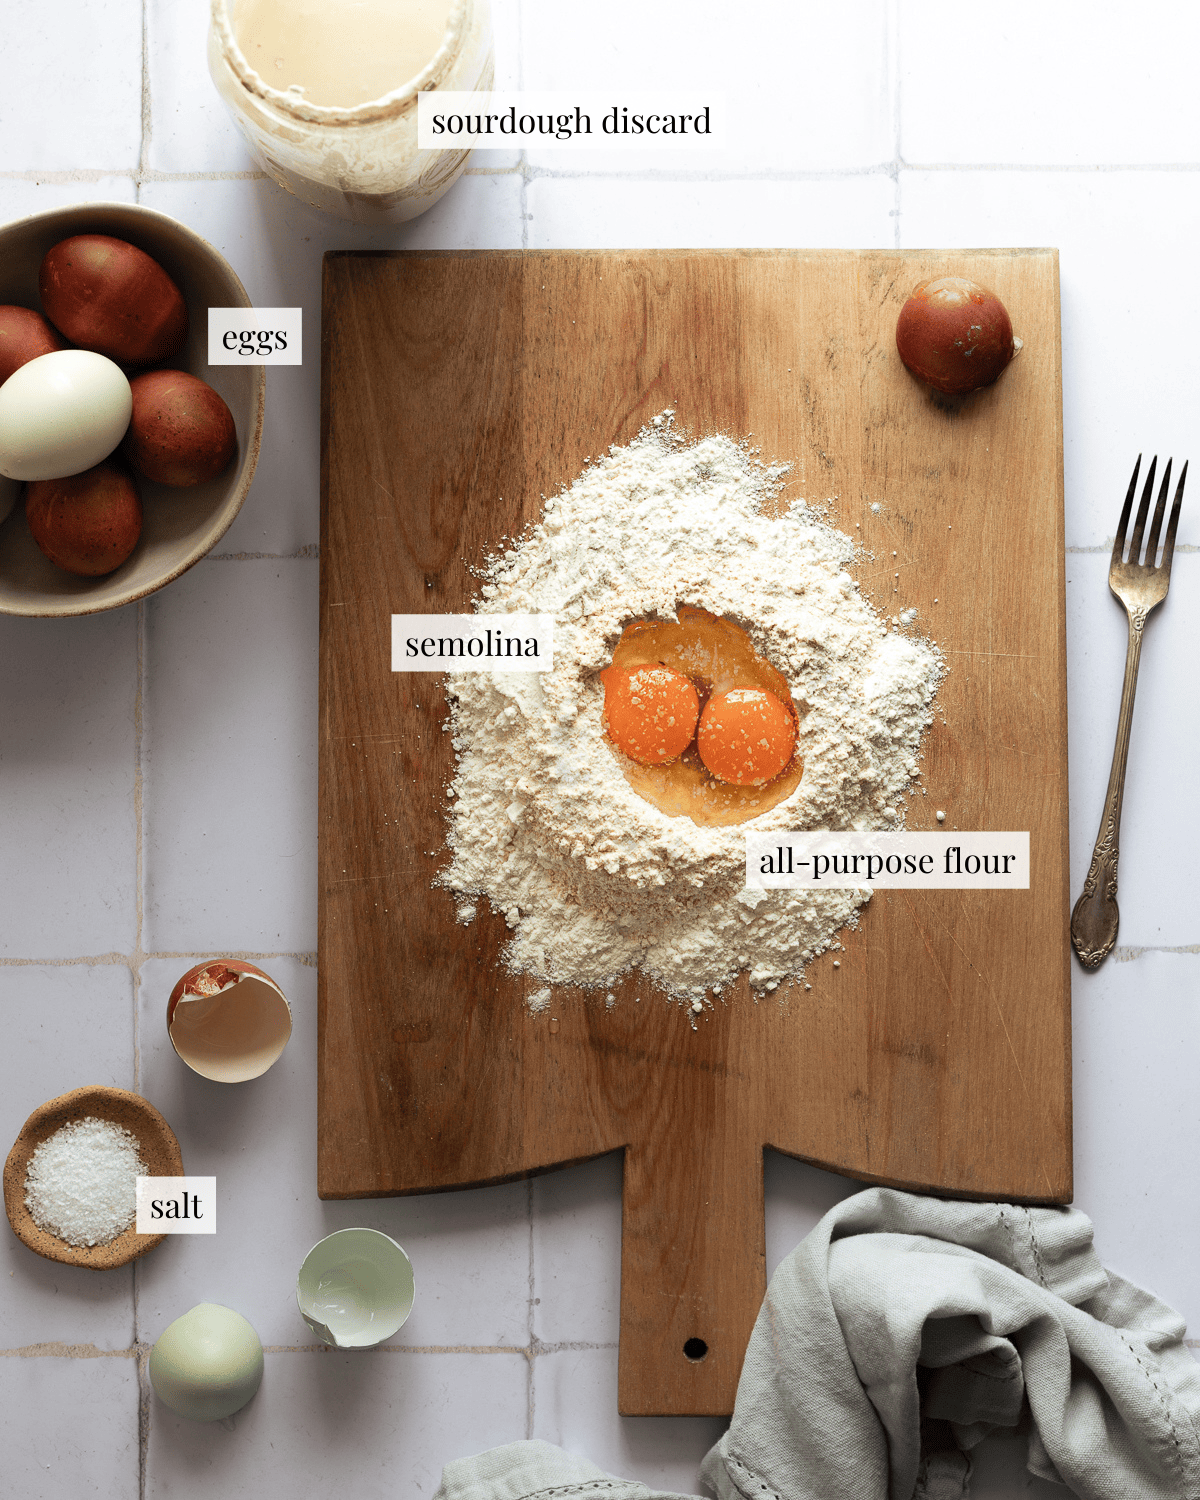
- All-purpose or 00 flour - Pasta is traditionally made with 00 flour, a low-protein flour that's milled very finely. 00 flour can be purchased at most specialty grocery shops or online. But if you don't have any on hand, I've used all-purpose flour with great results.
- Semolina flour - Semolina flour is made of Durum Wheat, a harder type which gives this pasta a nice bite. If you don't have any in your pantry, feel free to substitute with all-purpose or even whole wheat!
- Sourdough discard - If you don't have any discard on hand, feel free to use active sourdough starter or just add 36 grams of water and 36 grams of flour to your dough.
See recipe card for detailed ingredient information.
Curious about different types of flour? Check out my post on the Best Flours for Sourdough to learn more.
How to Make Sourdough Pasta Step-by-Step
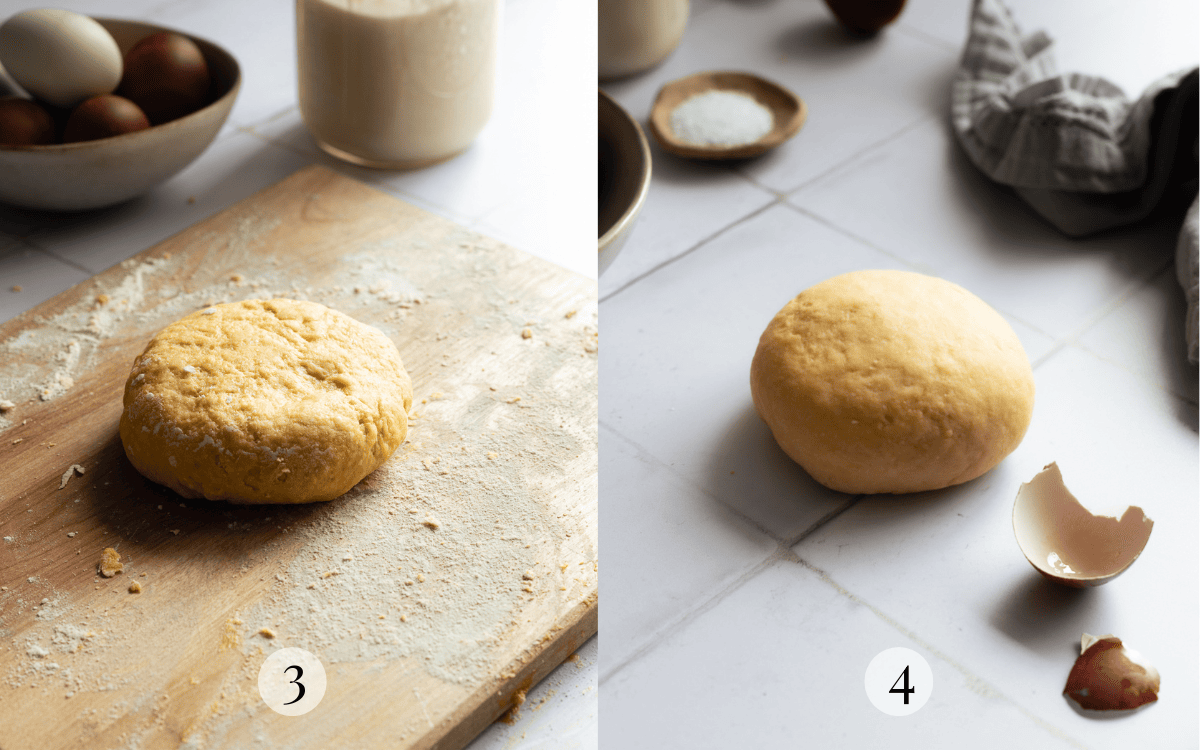
STEP 1: Make the dough
Start with a mound of flour and create a well in the center with high walls to prevent the eggs and starter from spilling from the sides. Beat the eggs and sourdough discard to make a thick paste and begin incorporating the flour from the sides. Incorporate all of the flour into the dough using your hands or cut the ingredients together with a bench scraper.
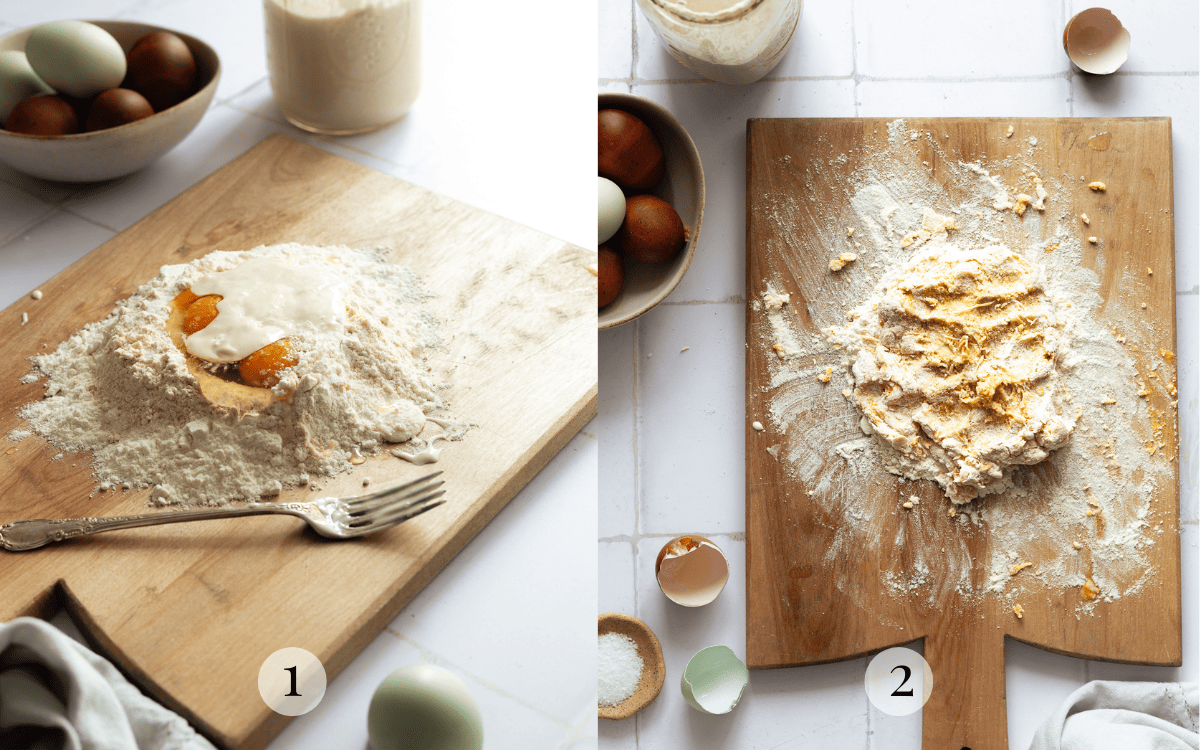
Tip
I like to use a butcher block or wooden cutting board to make my pasta dough. It allows me to mix and knead my dough right on the board without making too much of a mess.
STEP 2: Knead the dough and ferment
Knead the mixture thoroughly until a cohesive dough forms, wrap the dough in plastic and let the dough rest for 30 minutes. Turn the dough out on a clean surface and knead until completely smooth. Wrap it in plastic and let the dough ferment 2 hours at room temperature or up to 48 hours in the refrigerator before using.
Benefits of Fermentation
Allowing the dough to ferment for a longer period enhances the flavor of the sourdough, while also boosting its nutritional value and improving the digestibility of the pasta. (source: NIH).
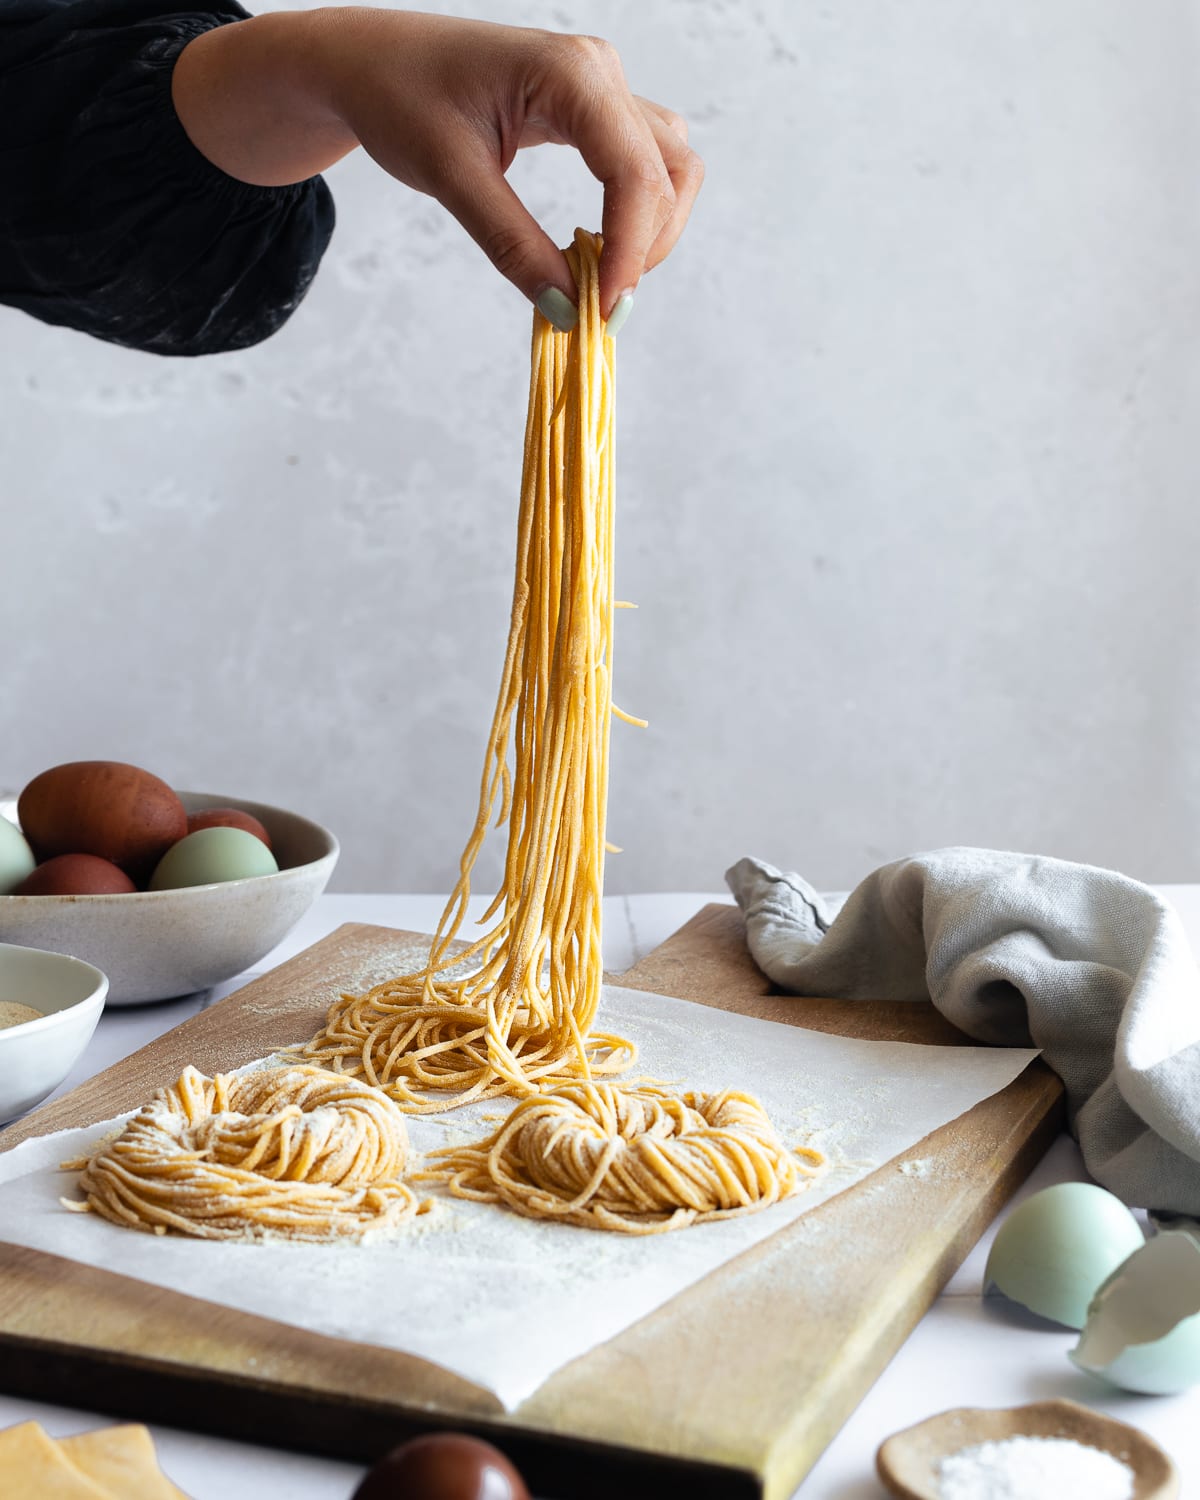
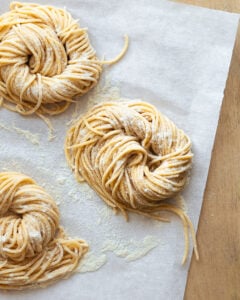
STEP 3: Roll out and cut the dough
Divide the dough into two portions. Working with one portion at a time, use a rolling pin to flatten out the dough into a long oval (image 5). You can choose to cut your pasta by hand or using a pasta machine.
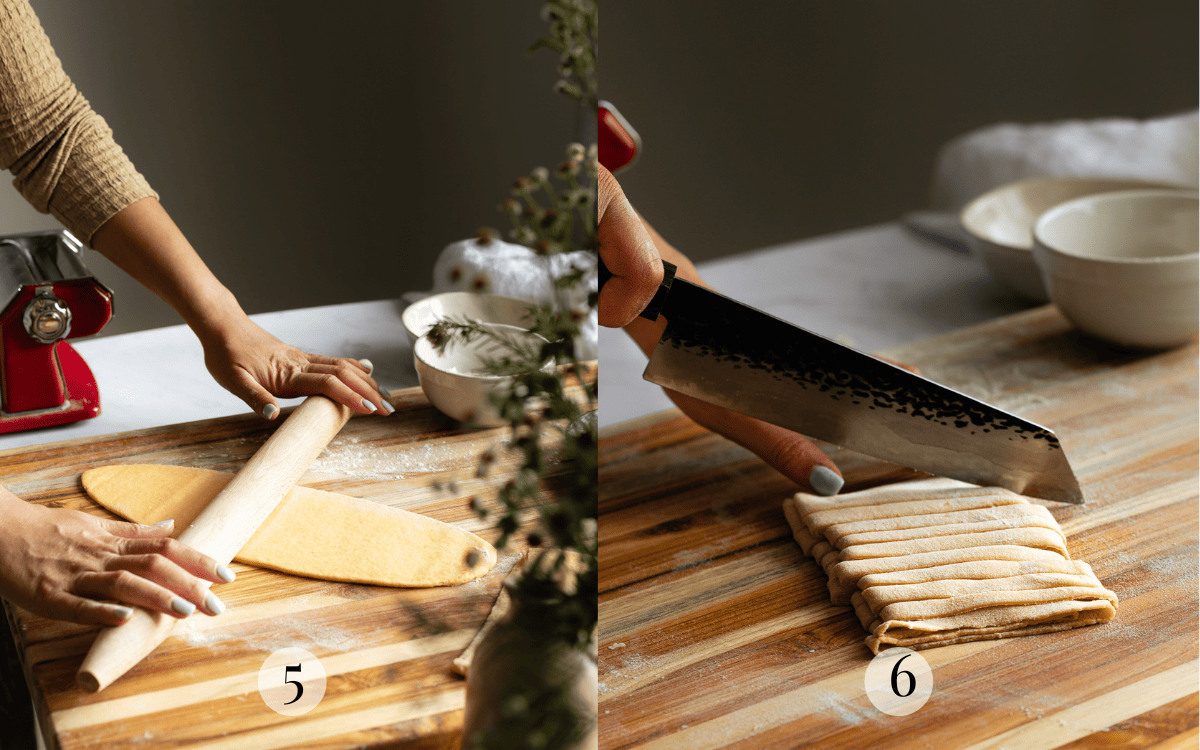
How to cut pasta dough by hand: Get the dough as thin as you can, preferably enough so you can see the outline of your fingers through the sheet of pasta. Starting at the shorter end closest to you, fold the sheet of pasta into a 2 to 3 inch long rectangle. Using a sharp knife, cut the dough into your desired width.
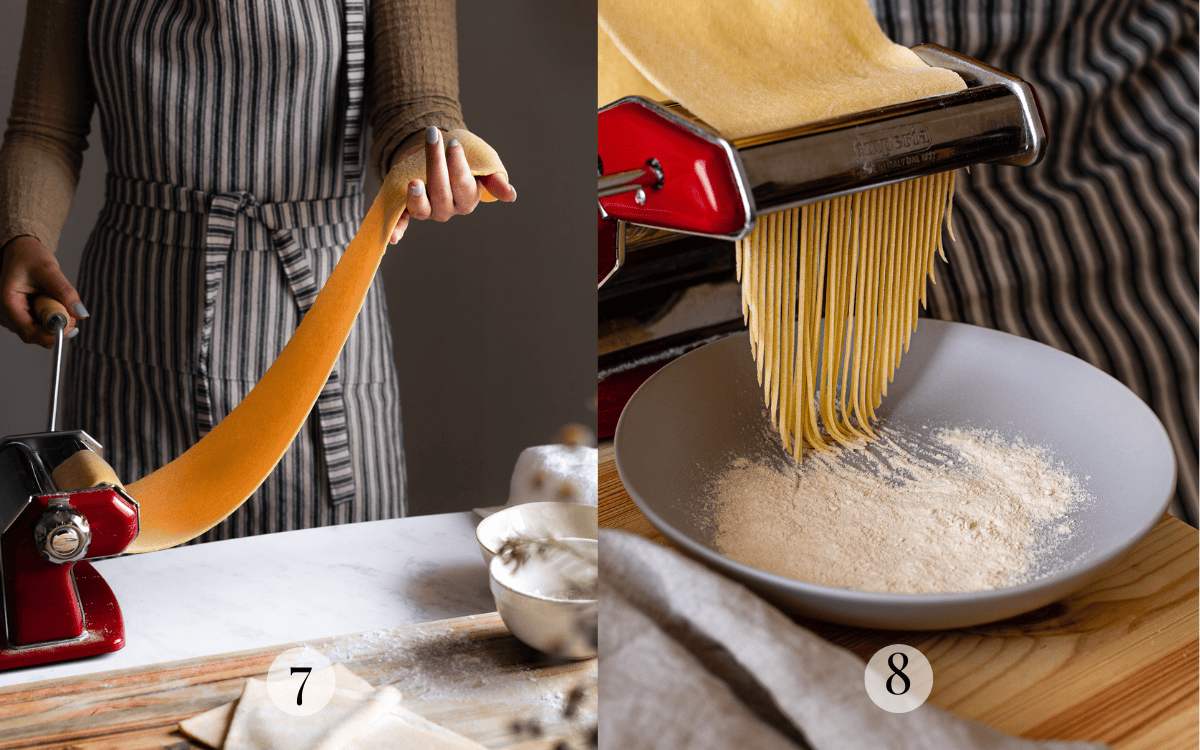
How to use a pasta machine: Roll the dough into a narrow rectangle (about 6 inches wide) using a rolling pin, then feed it through your pasta machine at set at its thickest setting. Continue passing it through, adjusting to thinner settings until you achieve your desired thickness. Choose your preferred attachment and cut it into your desired shape.
Tip
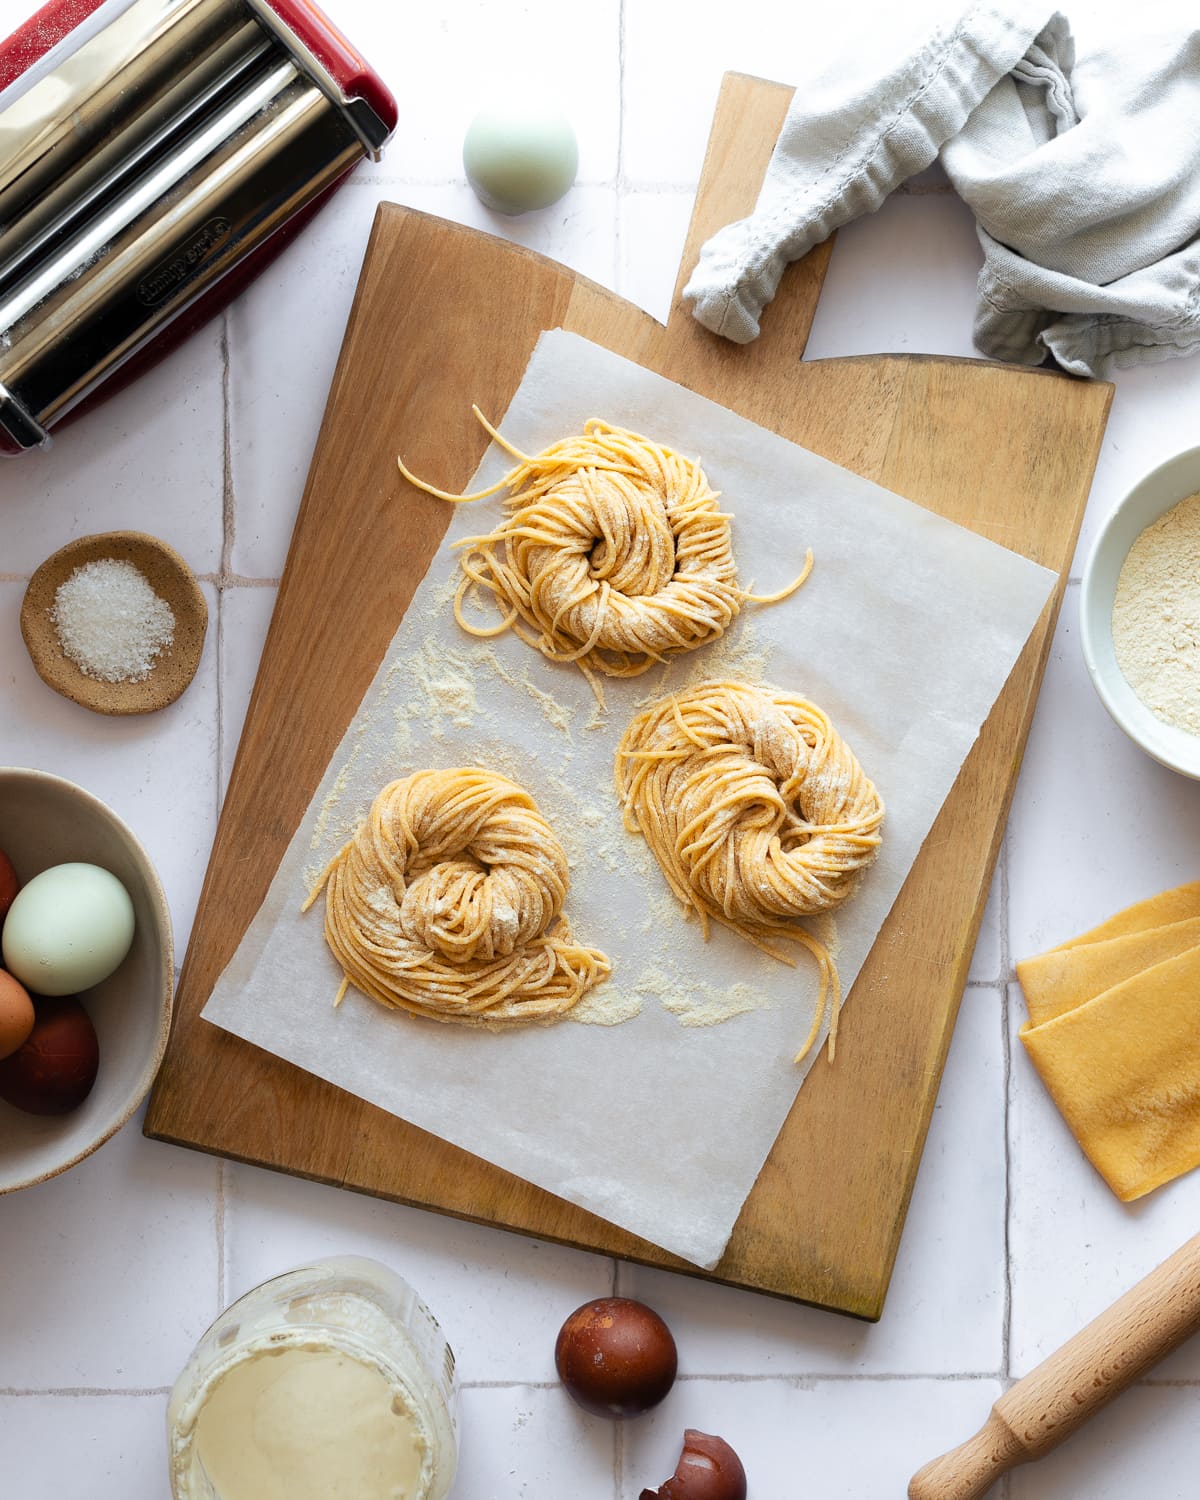
Generously flour the pasta dough before using the pasta cutter to prevent the noodles from clumping and sticking together.
STEP 4: Cook
Cook pasta in a large pot of heavily salted boiling water. Let the pasta boil for 60 to 90 seconds, or until the pasta floats and is tender. Serve with your sauce of choice. My favorite is
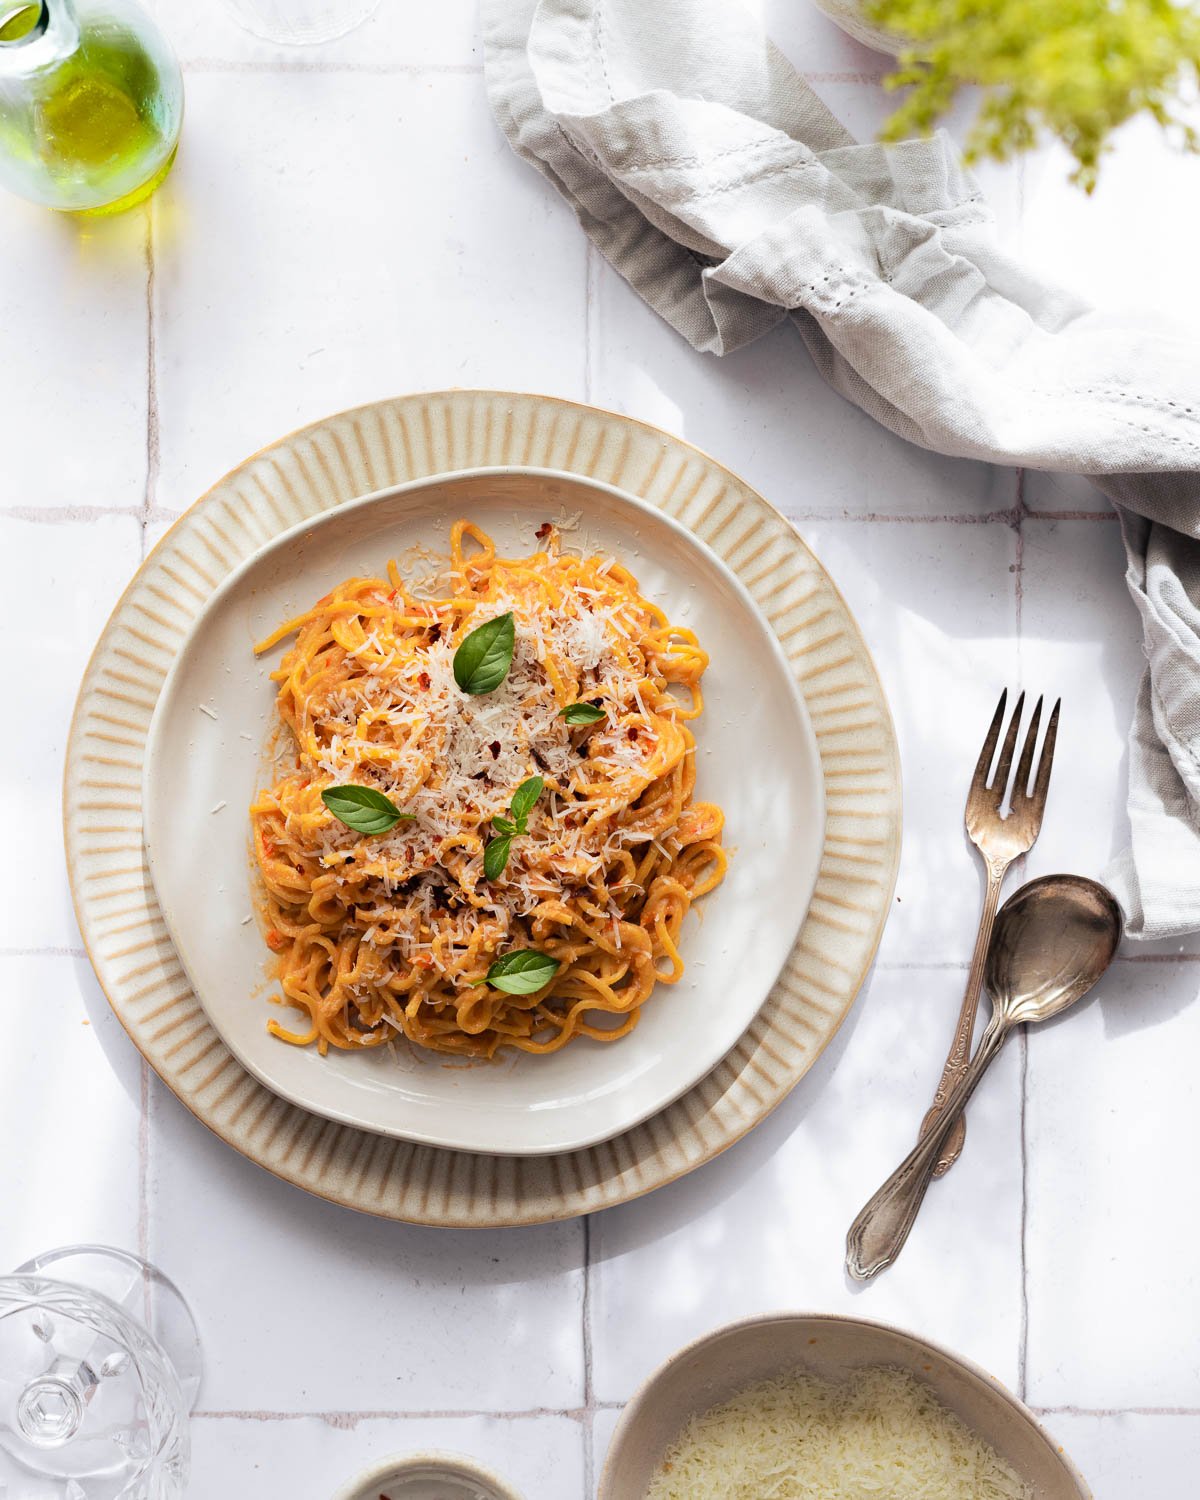
Looking for ways to enjoy your fresh sourdough pasta? Try this homemade Arrabbiata Sauce or my Roasted Tomato and Red Pepper Sauce.
Expert Tips
- For the best results, use gram over volume measurements. Measuring by weight is more accurate than measuring by cups or tablespoons.
- Different brands of flours absorb moisture differently, if your dough feels too dry, add a little bit of water, teaspoon at a time until your dough no longer feels dry and unmanageable.
- I've gotten a few comments about this dough feeling too wet, I based this recipe on one I learned at a pasta class in Rome where the dough we made felt similarly soft and supple. If your dough feels too wet, feel free to add up to 30 grams (¼ cup) of flour to your dough.
- Give your dough enough time to rest, this lets the flour fully hydrate, the gluten to relax and makes the dough easier to knead and roll out.
- Let the dough rest for at least 2 hours before rolling it out and cutting or shaping.
- Fresh pasta cooks quickly so don't walk away as its boiling. Overcooked pasta will become soft and mushy.
Recipe FAQs
Absolutely! The flavor will be different, however this recipe will still work. Simply add 38 grams of flour and 38 grams of water to your dough.
Whole wheat flour contains bran which can prevent dough from building a strong gluten network. This can lead to your pasta becoming too fragile and breaking apart as it cooks. If you'd like a little whole wheat flavor, it's best to combine it with all-purpose flour.
It's best to cook fresh pasta in a large pot of heavily salted water at a rolling boil. Cook pasta for 60 to 90 seconds, or until it floats to the surface and reaches your desired texture.
Absolutely! You can use this pasta dough to make any shape of pasta, you can even add fillings to make ravioli or tortellini.
You may also like


Did this recipe rise to the occasion?
★★★★★
Leave a star rating and a comment. Your feedback inspires future recipes and helps others feel confident choosing what to bake next. I read and respond to every message.
If you're looking for additional ways to support my work, share this recipe or buy me a Ko-fi. Every little bit helps me keep creating the recipes and guides you enjoy.
Thank you for your support!
Sourdough Discard Pasta Recipe
Equipment
- pasta maker
This section may contain affiliate links
Ingredients
- 120 grams all-purpose or 00 flour up to 150 grams if needed
- 40 grams semolina flour
- 6 grams salt
- 2 egg
- 75 grams sourdough discard
Click US Customary to view volume measurements
Instructions
- Make the dough: Place flours and salt on a butcher block or large plate and create a mound with tall walls and a large well in the center. Add eggs and sourdough discard in the center of the well.120 grams all-purpose or 00 flour, 40 grams semolina flour, 6 grams salt, 2 egg, 75 grams sourdough discard
- Using a fork, break the egg yolks and stir in the sourdough discard. While keeping the walls intact, begin incorporating the flour into the egg and discard paste until a majority of the flour has been mixed in.
- Work mixture until all dry bits of flour have been hydrated. This may take a while, but don't worry the ingredients will be integrated eventually. Knead the dough until smooth.
- If your dough feels too wet and slack, add up to 30 grams (¼ cup) of all-purpose flour, a little bit at a time.
- Allow the dough to rest: Wrap the dough in plastic and allow it to ferment at room temperature (75 F / 23 C) for at least 2 hours before using.
- Ferment dough (optional): After 2 hours, place in the refrigerator for at least 2 hours or up to 48 hours to ferment. Rest time is essential for pasta, this allows the flour to hydrate fully and gluten to develop so it doesn't break apart as it cooks.
- Laminate the dough (optional): Liberally dust the dough with flour. Using a rolling pin, flatten the dough into a long rectangle, about 4 inches wide. Brush off any excess flour. Grabbing the short side, fold the dough in thirds to laminate it, this strengthens the gluten further. Roll it out to a thickness that will fit into your pasta machine (if using). Then run it through the rollers to help the dough adhere to itself. If you don't have a pasta machine, simply use your rolling pin to roll out the dough.
- Cut the pasta: Cut the pasta by hand or by using a machine (see step-by-step instructions in post).
- Cook the pasta: Bring a large pot of salted water to a boil. Drop the pasta into the water while gently separating the strands. Cook the pasta for 60 to 90 seconds, this pasta cooks very quickly so make sure you watch for doneness.
- Serve and enjoy: Drain the pasta, toss with a little olive oil to prevent from sticking and serve with the sauce of your choice.
Tips
These recipes were developed and tested using grams for precise measurements. To increase your chances of success, I recommend investing in a kitchen scale. I've included rough volume estimates (in tablespoons and cups), but they might not be totally accurate.
Remember all ovens are unique, these recipes were tested in my oven which runs cooler than others. You might need to lower the temperature if your bake appears to be browning too quickly. Monitor your bake closely and make adjustments if needed.
Notes
Nutrition
I am not a nutritionist or dietitian, any nutrition information provided is an estimate.


Leslie says
I have read through all the comments and am a bit concerned about the extrusion machine method. While these machines can be more challenging, the dough is mixed in the machine for extrusion, the myriad of shapes is limited only by the availability of compatible dies. Have you had any experience using this recipe in this type of machine? Any recommended adjustments to the recipev
Hannah Dela Cruz says
Hi Leslie - so sorry to say but I've never used an extruder before and can't really give advice on this.