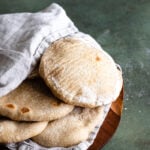
Sourdough Pita Bread
Make soft, fluffy Sourdough Pita Bread in your kitchen with simple ingredients you already have in your pantry. Homemade pita is so much tastier than store-bought, sourdough bread makes these freshly-baked flatbreads even better. You’ll love stuffing roasted veggies, falafel or grilled meat in the center of your pita pocket!
Servings: 10 pitas
Calories: 134kcal
Equipment
- Parchment paper
- baking stone
Ingredients
- 75 grams sourdough starter mature and active
- 226 grams water
- 80 grams whole wheat flour
- 240 grams all-purpose flour
- 6 grams salt
- 14 grams olive oil
Instructions
- Make the dough: Combine the water, sourdough starter and whole wheat flour in a large mixing bowl. Stir until the starter is completely dissolved.75 grams sourdough starter, 226 grams water, 80 grams whole wheat flour
- Fold the all-purpose flour into the sourdough starter a third at a time. This will ensure all of your flour is properly hydrated and incorporated into your mixture. Add salt and stir until no dry bits of flour remain and a shaggy dough forms.240 grams all-purpose flour, 6 grams salt
- Knead the olive oil into the dough until it's completely absorbed. Cover the bowl with plastic wrap and let the dough rest in a warm place for 30 minutes.14 grams olive oil
- Knead the dough: Knead the dough in the bowl until completely smooth, about 3 to 5 minutes.
- Bulk ferment: Round the dough into a tight ball, cover the bowl with plastic wrap and set it in a warm place until doubled in volume, about 4 to 6 hours.
- Pre-shape: Once the dough has risen, turn the dough out on to a lightly floured surface. Divide the dough into 10 portions. Round each ball of dough into a tight ball, set the dough on a heavily floured plate, spaced apart with room to spread.
- Cold proof: Cover the plate with plastic wrap and place it in the refrigerator overnight (up to 16 hours).
- Prep: If using, place a baking stone on a rack positioned at the very bottom of your oven. Preheat your oven to 500 F for at least 1 hour (or as long as your baking stone normally needs to heat up).
- Cut out ten 6-inch squares of parchment paper (this will make rolling your dough out and transferring them to the oven much easier).
- Shape: Working with one portion at a time, brush off all the excess flour from the dough. Place the dough in the center of a piece of cut parchment.
- Using a rolling pin, flatten the dough out into a 5-inch disc, about ¼-inch thickness.
- Set the shaped dough aside, and repeat with the remaining portions. You can stack the dough on top of each other.
- Bake: With the parchment paper, transfer the dough to the baking stone. Bake only 3 at a time.
- Bake for 2 to 3 minutes or until the pita puffs up, and looks dry and lightly browned. Transfer the baked pita to a serving platter and cover with a dry, clean tea towel.
- Enjoy: These pitas are best enjoyed freshly baked.
- Store: Store any leftover pitas in a zip-top bag at room temperature for up to 3 days. Reheat the pitas on a dry, preheated skillet for 2 to 3 minutes.
Notes
When in doubt, use gram over volume measurements.
Divide the dough into 8 portions for larger 8-inch pitas.
Bake pitas on an upside-down cast-iron skillet on the bottom rack of your oven if you don't have a baking stone.
The refrigerator will dry out these pitas, they are best stored at online temperature.
Nutrition
Calories: 134kcal | Carbohydrates: 26g | Protein: 4g | Fat: 2g | Saturated Fat: 0.3g | Polyunsaturated Fat: 0.3g | Monounsaturated Fat: 1g | Sodium: 234mg | Potassium: 55mg | Fiber: 2g | Sugar: 0.1g | Vitamin A: 1IU | Calcium: 7mg | Iron: 1mg